
Howto Perform Backup Restores with Amanda with the Tape Spanning Feature
NEVER NEVER NEVER EVER ATTEMPT TO RESTORE DATA IN PLACE, ON TOP OF THE ORIGINAL DATA, UNLESS YOU REALLY KNOW WHAT YOU ARE DOING! YOU WILL WIPE OUT ALL THE PRE-EXISTING DATA. RATHER CREATE A TEMPORARY DIRECTORY, RESTORE IN THERE AND COPY/MOVE THE DATA IN PLACE MANUALLY.
(:toc:)
CVS tag kept for nostalgic purposes:
$Id: howto-amanda-restore.txt,v 1.7 2010–08–26 20:05:00 malin Exp $
$Author: malin $
$Date: 2010–08–26 20:05:00 $
There are many ways to restore files with amanda, all depending if the amanda config is online and if the index/logs are online.
Levels of functionality for restore:
| OS | Amanda | Config | Logs | Indexes | Restore program |
| X | X | X | X | X | amrecover |
| X | X | X | X | amfetchdump | |
| X | X | amrestore(*) | |||
| X | Bare metal |
(*) not changer-aware.
Amfetchdump
To restore an entire DLE you should use amfetchdump if it is using the tape-spanning feature. Note that all the logs must be online to use this method. If somehow the logs are lost you can recreate them with amfetchdump -i log <config>.
The amfetchdump syntax is:
amfetchdump [-pcClawns] [-d device] [-O directory] [-b blocksize] \
config hostname [disk [ date [ level [ hostname [...] ] ] ]]      \
[-o configoption]...
See man amfetchdump for more info.
The options hostname, diskname, date, level are pattern-matching regex. That means that you cannot use a date as reported by amadmin <conf> find <host> <disk> as it will be outputed like `2010–01–09–11–05–22’. You must remove the dashes. Also, amfetchdump doesn’t know about the history of a DLE and won’t help you to do a full restore up to a certain date. You have to walk through manually all the sessions (full and intermediate incrementals levels) and the tapes used in those to perform a full restore up to a specific date. To find those tapes use the amadmin command:
su amanda -c "~amanda/sbin/amadmin <CONF> info <HOST> <DLE>"
The amfetchdump command must be run as user ‘amanda’ (2.5.x doesn’t check the effective uid’s and gid’s but newer versions do enforce them) and it’s output is piped to gnutar as root.
Example of a full restore of DLE tutor:/raid/hrrt6 in (already existing) directory /holddisk/restore/hrrt6:
root@grumpy:$ su amanda -c "~amanda/sbin/amfetchdump -p -d tape:/dev/nst1 \
               up tullus /raid/hrrt6 20130921 " | tar -xpGf -
1 volume(s) needed for restoration
The following volumes are needed: av48-2_up_Q00007
Press enter when ready
At this point you have to load the tape(s) requested if they are not in the changer and update amanda’s knowledge of where they are by using amtape CONF update [what]. Manually loading the tape using mtx won’t do as amfetchdump uses the state file ~amanda/etc/amanda/av24-state as specified by the variable ‘changerfile’ in the amanda config file and it has to be updated before starting the restore.
So in this case you would load the tape in the library, in let say, slot 6, and type:
~# su amanda -c "~amanda/sbin/amtape down update 6"
scanning slot 6
update complete

~# su amanda -c "/opt/amanda/sbin/amtape up label av48-2_up_Q00007"
slot 6: av48-2_up_Q00007
slot   6: time 20130922201102 label av48-2_up_Q00007
label av48-2_up_Q00007 is now loaded from slot 6
Let the command finish and press enter in the window with the amfetchdump command. You should get an output like:
amfetchdump: 1: restoring split dumpfile: date 20130921201101 host tullus disk /raid/hrrt6 part 1/UNKNOWN lev 0 comp N program APPLICATION
41869312 kb
amfetchdump: 2: restoring split dumpfile: date 20130921201101 host tullus disk /raid/hrrt6 part 2/UNKNOWN lev 0 comp N program APPLICATION
...
If the tapes needed are already in the library then use the amfetchdump option -a rather then prompting the operator to load them. For multi-tapes restore you can just hit return after amfetchdump request the 2nd tape as it will just try to find it itself.
A final note: I tested the amfetchdump option -O (output restored files to this directory, instead of to the current working directory) in Amanda versions prior to 3.3.4 only to find that it didn’t work. Suffice to say that this is very dangerous. I will make a test with 3.3.4 to see it it works as documented in the man page.
Amfetchdump and Zmanda Enterprise Edition
- Zmanda server commands requires the use of
sudo -u amandabackup some_commandrather thansu amanda -c “some_command”. - This introduces a few quirks since in the pure Amanda case there are some permissions and ownerships to take care of and so the syntax is different.
~# sudo -u amandabackup amadmin isilon find edgar-xge

date                host      disk        lv tape or file          file part status
2017-09-07 00:15:06 edgar-xge /opt/amanda  0 isilon-NEO-T48-B00022    7  1/1 OK
2017-09-08 00:15:08 edgar-xge /opt/amanda  0 isilon-NEO-T48-B00025    8  1/1 OK
2017-09-09 00:15:07 edgar-xge /opt/amanda  0 isilon-NEO-T48-B00028    8  1/1 OK
2017-09-10 00:15:08 edgar-xge /opt/amanda  0 isilon-NEO-T48-B00033    7  1/1 OK
2017-09-11 00:15:07 edgar-xge /opt/amanda  0 isilon-NEO-T48-B00036   10  1/1 OK


~# sudo -u amandabackup /usr/sbin/amfetchdump -p isilon edgar-xge /opt/amanda 20170911 | tar -xpGf -

or

~# sudo -u amandabackup /usr/sbin/amfetchdump isilon edgar-xge /opt/amanda 20170911
Amrecover
amrecover uses the index files to know on which tape(s) is a particular file. This is the best way to proceed for a small restore.
Create a temp directory with sufficient disk space, do the restore, then if satisfied, move the stuff to it’s original location. Make sure to keep the ownerships and timestamps intact. Also, since the executables are compiled with some defaults that might not be applicable to the config in use for amrecover, YOU ABSOLUTELY HAVE TO SPECIFY THE CONFIG NAME ON THE COMMAND LINE, ‘-C <config>’. Again, as with amfetchdump, you have to update the amanda state file if the tapes required are not loaded in the library.
Summary: at the amrecover prompt you issue something like:
amrecover> listhost
amrecover> listdisk
amrecover> sethost <client>
amrecover> setdisk <dle_name>
amrecover> setdate <timestamps>
amrecover> setdevice -h <tape_server> changer
amrecover> cd <some_path>
amrecover> lpwd
amrecover> ls
amrecover> lcd <some_path>
amrecover> history
amrecover> add <some_file>
amrecover> extract
amrecover> quit
Here’s an example:
root@grumpy:$ ~amanda/sbin/amrecover -C right1 -s grumpy -t grumpy
AMRECOVER Version 2.6.0p2. Contacting server on grumpy ...
220 grumpy AMANDA index server (2.6.0p2) ready.
Setting restore date to today (2008-11-17)
200 Working date set to 2008-11-17.
200 Config set to left1.
501 Host grumpy is not in your disklist.
Trying host grumpy.bic.mni.mcgill.ca ...
501 Host grumpy.bic.mni.mcgill.ca is not in your disklist.
Trying host grumpy ...
501 Host grumpy is not in your disklist.
Trying host grumpy.bic.mni.mcgill.ca ...
501 Host grumpy.bic.mni.mcgill.ca is not in your disklist.
Use the sethost command to choose a host to recover
amrecover>

amrecover> listhost
200- List hosts for config left1
201- gertrude
201- yorick
201- gloria
201- shadow
201- bigbrain
201- gaspar
201- cicero
201- mail
200  List hosts for config left1
amrecover> sethost grumio
amrecover> setdisk /export_raid00/data-flob
200 Disk set to /export_raid00/data-flob.
amrecover> setdevice -h grumpy changer
Using tape "changer" from server grumpy.
amrecover> lpwd
/export_raid05/restore-test
amrecover> ls
2007-09-26 sebas/
2007-09-26 schad/
2007-09-26 marita/
2007-09-26 lost+found/
2007-09-26 jens/
2007-09-26 danielle/
2007-09-26 .
amrecover> cd schad
/export_raid00/data-flob/schad
amrecover> ls
2007-09-26 db027867/
2007-09-26 db025687.zip
2007-09-26 .
amrecover> add db025687.zip
amrecover> history
200- Dump history for config "right1" host "grumio" disk
/export_raid00/data-flob
201- 2007-09-26 0 av24-1_right1_T00009L3:39,40,41,42,43,44
201- 2007-09-25 1 av24-1_right1_T00008L3:41
201- 2007-09-24 1 av24-1_right1_T00006L3:19
201- 2007-09-23 1 av24-1_right1_T00005L3:83
201- 2007-09-22 1 av24-1_right1_T00029L3:52
201- 2007-09-21 1 av24-1_right1_T00028L3:87
201- 2007-09-20 0 av24-1_right1_T00027L3:7,8,9,10,11,12
201- 2007-09-19 1 av24-1_right1_T00026L3:63
201- 2007-09-18 1 av24-1_right1_T00025L3:15
201- 2007-09-17 1 av24-1_right1_T00024L3:45
201- 2007-09-16 1 av24-1_right1_T00014L3:83
201- 2007-09-15 1 av24-1_right1_T00013L3:62
201- 2007-09-14 0 av24-1_right1_T00012L3:14,15,16,17,18,19
201- 2007-09-13 1 av24-1_right1_T00022L3:44,45,46,47,48,49
201- 2007-09-12 1 av24-1_right1_T00017L3:90,91;av24-1_right1_T00018L3:1,2,3,4
201- 2007-09-10 0 av24-1_right1_T00002L3:70,71,72,73,74,75
201- 2007-09-09 0 av24-1_right1_T00011L3:98,99,100,101,102,103
200 Dump history for config "right1" host "grumio" disk
/export_raid00/data-flob
amrecover> setdate 2007-09-26
200 Working date set to 2007-09-26.
amrecover> extract

Extracting files using tape drive changer on host grumpy.
The following tapes are needed: av24-1_right1_T00009L3

Restoring files into directory /export_raid05/restore-test
Continue [?/Y/n]? y

Extracting files using tape drive changer on host grumpy.
Load tape av24-1_right1_T00009L3 now
Continue [?/Y/n/s/t]?
./schad/db025687.zip
amrecover> quit
200 Good bye.
Restore with Amanda Config But Without The Log and Index Files.
There are 2 ways to proceed:
- Extract the chunks with amrestore and manually reassemble them or
- Concatenate them together and pipe the result to GNUtar.
############### The only things required to be known for a succesfull restore are:
############### the application used for the backup: GNU tar version 1.26
############### the blocksize used to access the tape device: 2048KB or 2097152,
############### the "-b" argument of amrestore command used below.
Extract the chunks with amrestore and manually reassemble them
This way of proceeding will create a series of files in the current dir named like hostname.diskname.datestamp.dumplevel.chunknumber
If the dump is split across multiple tapes the last chunk on tape is truncated and is therefore not a good one and amrestore will name it with a ‘tmp’ extension. The first chunk on the next tape will rewrite it.
- Shown below is an example of an archive on tapes of a DLE called
tatania-xge:/raid/ai. - Make a tmpdir with proper ownerships and permissions for the Amanda user (amrestore need to be run as Amanda user).
- You must specify the tape blocksize used to create the archive, here we used
2048KiBor2097152 bytes. - An excerpts of the tape contents show that the chunks we are interested in are on tape file 22 and 23 on tape archive-ace-004 and tape file 1 and 2 on tape archive-ace-005, ie, the archived DLE spans 2 tapes:
edgar:~# cat ~amanda/usr/adm/amanda/archive-ace/log/archive-ace-004.toc
  #  Server:/partition                       date            lev  size[Kb]
  0  archive-ace-004:                        20160422153902    -         -
  1  tatania-xge:/raid/nihpd                 20160422153902    0        *0
  2  tatania-xge:/raid/nihpd                 20160422153902    0        *0
  3  tatania-xge:/raid/nihpd                 20160422153902    0        *0
  4  tatania-xge:/raid/nihpd                 20160422153902    0        *0
  5  tatania-xge:/raid/nihpd                 20160422153902    0        *0
  6  tatania-xge:/raid/nihpd                 20160422153902    0        *0
  7  tatania-xge:/raid/nihpd                 20160422153902    0        *0
  8  tatania-xge:/raid/nihpd                 20160422153902    0        *0
     tatania-xge:/raid/nihpd                 20160422153902    0 309757880
  9  tatania-xge:/raid/nih2                  20160422153902    0        *0
 10  tatania-xge:/raid/nih2                  20160422153902    0        *0
     tatania-xge:/raid/nih2                  20160422153902    0 194610220
 11  tullus-xge:/raid/nihpd_scratch01        20160422153902    0        *0
 12  tullus-xge:/raid/nihpd_scratch01        20160422153902    0        *0
 13  tullus-xge:/raid/nihpd_scratch01        20160422153902    0        *0
 14  tullus-xge:/raid/nihpd_scratch01        20160422153902    0        *0
 15  tullus-xge:/raid/nihpd_scratch01        20160422153902    0        *0
 16  tullus-xge:/raid/nihpd_scratch01        20160422153902    0        *0
 17  tullus-xge:/raid/nihpd_scratch01        20160422153902    0        *0
 18  tullus-xge:/raid/nihpd_scratch01        20160422153902    0        *0
 19  tullus-xge:/raid/nihpd_scratch01        20160422153902    0        *0
 20  tullus-xge:/raid/nihpd_scratch01        20160422153902    0        *0
 21  tullus-xge:/raid/nihpd_scratch01        20160422153902    0        *0
     tullus-xge:/raid/nihpd_scratch01        20160422153902    0 104914283
 22  tatania-xge:/raid/ai                    20160422153902    0        *0
 23  tatania-xge:/raid/ai                    20160422153902    0        *0
 23  total:on_tape                           -                 - 215768666

edgar:~# cat ~amanda/usr/adm/amanda/archive-ace/log/archive-ace-005.toc
  #  Server:/partition                       date            lev  size[Kb]
  0  archive-ace-005:                        20160422153902    -         -
  1  tatania-xge:/raid/ai                    20160422153902    0        *0
  2  tatania-xge:/raid/ai                    20160422153902    0        *0
     tatania-xge:/raid/ai                    20160422153902    0 246080870
  3  tatania-xge:/raid/neuralyse1            20160422153902    0        *0
     tatania-xge:/raid/neuralyse1            20160422153902    0 103002790
  3  total:on_tape                           -                 - 236115980
  -  total:origin                            -                 - 749586891
- Load the first required tape,
archive-ace-004:
~# su amanda -c "~amanda/sbin/amtape archive-ace label archive-ace-004"
slot 4: archive-ace-004
slot   4: time 20160422153902 label archive-ace-004
label archive-ace-004 is now loaded from slot 4
- Start the restore of tape file 22 and 23, starting to scan at file 22 (-f 22) to speed up things.
- Use a tape blocksize of 2048KiB (-b 2097152), the same used to create the archive.
- Use a tape device tape:/dev/nst0, as the volume might be a virtual tape on disk or even a Amazon S3 bucket.
~# su amanda -c "~amanda/sbin/amrestore -f 22 -b 2097152 tape:/dev/nst0 tatania-xge /raid/ai"
Restoring from tape archive-ace-004 starting with file 22.
amrestore: 22: restoring split dumpfile: date 20160422153902 host tatania-xge disk /raid/ai part 1/UNKNOWN lev 0 comp N program APPLICATION
amrestore: 23: restoring split dumpfile: date 20160422153902 host tatania-xge disk /raid/ai part 2/UNKNOWN lev 0 comp N program APPLICATION
- Verify that the chunks are there.
- Notice the first chunk size is
100GiB, as specified in the LTO5 tapetype definition of the Amanda config. - Notice also the the last chunk has been truncated but Amanda is now smart enough to cope with this. It didn’t used to be the case in versions previous to 3.X as explained above.
~# ls -la
total 167493448
drwxr-xr-x 2 amanda disk         4096 Apr 23 12:47 ./
drwxr-xr-x 3 root   root           41 Apr 23 11:11 ../
-rw------- 1 amanda disk 107374182400 Apr 23 12:14 tatania-xge._raid_ai.20160422153902.0.0000001
-rw------- 1 amanda disk   8304721920 Apr 23 12:15 tatania-xge._raid_ai.20160422153902.0.0000002
- We now get the first two tape files from tape archive-ace-005 to complete the chunks needed to reconstitute the archive.
- amrestore will stop restoring when it detects the chunk’s label doesn’t match the DLE specified on the command line.
~# su amanda -c "~amanda/sbin/amtape archive-ace label archive-ace-005"
slot 5: archive-ace-005
slot   5: time 20160422153902 label archive-ace-005
label archive-ace-005 is now loaded from slot 5
~# su amanda -c "~amanda/sbin/amrestore -b 2097152 /dev/nst0 tatania-xge /raid/ai"
Restoring from tape archive-ace-005 starting with file 1.
amrestore: 1: restoring split dumpfile: date 20160422153902 host tatania-xge disk /raid/ai part 3/UNKNOWN lev 0 comp N program APPLICATION
amrestore: 2: restoring split dumpfile: date 20160422153902 host tatania-xge disk /raid/ai part 4/UNKNOWN lev 0 comp N program APPLICATION
amrestore: 3: skipping split dumpfile: date 20160422153902 host tatania-xge disk /raid/neuralyse1 part 1/UNKNOWN lev 0 comp N program APPLICATION
- List the chunks files and concatenate them together, in the proper order, the create a tar archive.
- Verify that the tar file archive it is a good, healthy one:
~# ls -la
total 246081548
drwxr-xr-x 2 amanda disk         4096 Apr 23 12:59 ./
drwxr-xr-x 3 root   root           41 Apr 23 11:11 ../
-rw------- 1 amanda disk 107374182400 Apr 23 12:14 tatania-xge._raid_ai.20160422153902.0.0000001
-rw------- 1 amanda disk   8304721920 Apr 23 12:15 tatania-xge._raid_ai.20160422153902.0.0000002
-rw------- 1 amanda disk 107374182400 Apr 23 12:59 tatania-xge._raid_ai.20160422153902.0.0000003
-rw------- 1 amanda disk  28934406144 Apr 23 13:02 tatania-xge._raid_ai.20160422153902.0.0000004

~# file *
tatania-xge._raid_ai.20160422153902.0.0000001: POSIX tar archive (GNU)
tatania-xge._raid_ai.20160422153902.0.0000002: data
tatania-xge._raid_ai.20160422153902.0.0000003: data
tatania-xge._raid_ai.20160422153902.0.0000004: data
tatania-xge._raid_ai.20160422153902.0.tar:     POSIX tar archive (GNU)

~# cat tatania-xge._raid_ai.20160422153902.0.000000* > tatania-xge._raid_ai.20160422153902.0.tar
~# ls -la
total 492163088
drwxr-xr-x 2 amanda disk         4096 Apr 23 13:32 ./
drwxr-xr-x 3 root   root           41 Apr 23 11:11 ../
-rw------- 1 amanda disk 107374182400 Apr 23 12:14 tatania-xge._raid_ai.20160422153902.0.0000001
-rw------- 1 amanda disk   8304721920 Apr 23 12:15 tatania-xge._raid_ai.20160422153902.0.0000002
-rw------- 1 amanda disk 107374182400 Apr 23 12:59 tatania-xge._raid_ai.20160422153902.0.0000003
-rw------- 1 amanda disk  28934406144 Apr 23 13:02 tatania-xge._raid_ai.20160422153902.0.0000004
-rw-r--r-- 1 root   root 251987492864 Apr 23 13:40 tatania-xge._raid_ai.20160422153902.0.tar

~# tar tf tatania-xge._raid_ai.20160422153902.0.tar
~# echo $?
0
- Note that GNUtar will clobber the chunks as it completes if you do this ‘in place’, so better stow them in a safe place!
- You might want to supplement the GNU tar extract options with:
-C, —directory=DIR change to directory DIR. - Also note that using this technique requires 2 times the amount of disk space used by the DLE, so if you restore a 500GB DLE, you need 1TB, 1 for the chunks and 1TB for the DLE itself…
Concatenate The Tape Chunks Together and Pipe The Result to GNU Tar
- The other way is to let amrestore send the chunks directly to stdout and pipe them to gnutar.
- This is the way to go when the dump is not split across multiple tapes as amrestore is not aware of the tape changer.
- This will only works if the dump is contained in one and one chunk only, ie, this does not work for split dumps.
su amanda -c "~amanda/sbin/amrestore -p -f 4 -b 2097152 tape:/dev/nst0 gustav-xge /raid/nihpd1" | (cd /some/empty/dir && tar -xpGf - )
- The flag -p pipes the stream to stdout, and the -f 4 make amrestore skips directly to tape file 4 on the volume.
- It is very important to note that you must do this is an empty dir /some/empty/dir: any pre-existing files and dirs in there will be clobbered!
- Note that tar should be GNUtar and must be run as root so that permissions and ownerships are restored properly.
- The tape device can be specified as /dev/nst0 but this is a deprecated syntax and might go away in the future.
Raw, Bare-Metal Restore:
OK, so you don’t have Amanda installed: all you got are just some tapes from an Amanda archive that someone gave you and you want to restore some files from it. Hmmm.
- First, it is very easy to compile Amanda.
- No configuration is needed when doing a bare-metal restore as the only thing you really need is the Amanda utility amrestore.
- It will do all the fancy footwork explained below to extract the archive from the tapes.
- But lets just assume that for the sake of the argument: you can not or will not compile Amanda. So here we go.
Requirements
- A tape drive (not even a tape changer) that can read the tapes — we will assume here a LTO5 or LTO6 drive.
- The barebones Unix utilities and programs to manipulate the tape drive(s) and access tape files: mt, dd, cat, and of course, GNUtar to extract or list the archive content.
Amanda Volume Structure
First, lets explain the Amanda way of stuffing files on a volume, be it a tape or virtual tape/disk/volume.
- An Amanda volume is just a continuous stream of data with the following structure:
+------------------+----------------+----------+----------------+----------+------+------------------+
|Amanda Tape Label | Chunk Label #1 | Chunk #1 | Chunk Label #2 | Chunk #2 | .... | Last Chunk | EOT |
+------------------+----------------+----------+----------------+----------+------+------------------+
     2048KiB            2048KiB        100GiB        2048KiB       100GiB
- This assumes Amanda was configured to create volume archives with a tapetype blocksize of
2048KiBand dumptype chunksize of100GiB. This is how our local Amanda environment is configured. YMMV.
How To List an Amanda Volume Content
- Insert a tape, position the tape head to the BOT. Assume tape device is called /dev/nst0.
- List its content (assume a blocksize of
2048KiB) using the following shell script (lstape):
#!/bin/sh
TAPEDEV="$1"
if [ "$TAPEDEV" = "" ]; then
        echo "you must provide a tape device!"
        exit 1
    else
        while mt -f $TAPEDEV fsf 1 ; do
          dd if=$TAPEDEV bs=2048k count=1 | head -1
          sleep 1
        done
fi
- You will get an output similar to this, listing the content of the tape by date, DLE’s hostname and directory, chunk part number, backup level, compression and the application program used to create the chunk:
~# lstape /dev/nst0
AMANDA: SPLIT_FILE 20160422153902 tatania-xge /raid/utrecht  part 1/-1  lev 0 comp N program APPLICATION
AMANDA: SPLIT_FILE 20160422153902 tatania-xge /raid/utrecht  part 2/-1  lev 0 comp N program APPLICATION
AMANDA: SPLIT_FILE 20160422153902 tatania-xge /raid/utrecht  part 3/-1  lev 0 comp N program APPLICATION
AMANDA: SPLIT_FILE 20160422153902 gustav-xge /raid/nihpd1  part 1/-1  lev 0 comp N program APPLICATION
AMANDA: SPLIT_FILE 20160422153902 gustav-xge /raid/nihpd1  part 2/-1  lev 0 comp N program APPLICATION
AMANDA: SPLIT_FILE 20160422153902 gustav-xge /raid/nihpd1  part 3/-1  lev 0 comp N program APPLICATION
AMANDA: SPLIT_FILE 20160422153902 gustav-xge /raid/nihpd1  part 4/-1  lev 0 comp N program APPLICATION
AMANDA: SPLIT_FILE 20160422153902 gustav-xge /raid/nihpd1  part 5/-1  lev 0 comp N program APPLICATION
AMANDA: SPLIT_FILE 20160422153902 tatania-xge /raid/sendai1  part 1/-1  lev 0 comp N program APPLICATION
AMANDA: SPLIT_FILE 20160422153902 tatania-xge /raid/sendai1  part 2/-1  lev 0 comp N program APPLICATION
AMANDA: SPLIT_FILE 20160422153902 tatania-xge /raid/sendai1  part 3/-1  lev 0 comp N program APPLICATION
AMANDA: SPLIT_FILE 20160422153902 tatania-xge /raid/sendai1  part 4/-1  lev 0 comp N program APPLICATION
AMANDA: SPLIT_FILE 20160422153902 tatania-xge /raid/sendai1  part 5/-1  lev 0 comp N program APPLICATION
AMANDA: SPLIT_FILE 20160422153902 gustav-xge /raid/nih1  part 1/-1  lev 0 comp N program APPLICATION
AMANDA: SPLIT_FILE 20160422153902 gustav-xge /raid/nih1  part 2/-1  lev 0 comp N program APPLICATION
AMANDA: SPLIT_FILE 20160422153902 gustav-xge /raid/nih1  part 3/-1  lev 0 comp N program APPLICATION
AMANDA: SPLIT_FILE 20160422153902 gustav-xge /raid/nih1  part 4/-1  lev 0 comp N program APPLICATION
AMANDA: SPLIT_FILE 20160422153902 gustav-xge /raid/nih1  part 5/-1  lev 0 comp N program APPLICATION
AMANDA: SPLIT_FILE 20160422153902 gustav-xge /raid/nih1  part 6/-1  lev 0 comp N program APPLICATION
AMANDA: SPLIT_FILE 20160422153902 gustav-xge /raid/icbm-pedro  part 1/-1  lev 0 comp N program APPLICATION
AMANDA: SPLIT_FILE 20160422153902 tullus-xge /raid/nihpd_scratch02  part 1/-1  lev 0 comp N program APPLICATION
0+0 records in
0+0 records out
0 bytes (0 B) copied, 0.00687954 s, 0.0 kB/s
/dev/nst0: Input/output error
Going in more details:
- Place the tape head at the BOT and extract the tape label.
- Fast forward to the first tape mark.
- Extract the first chunk label, ie the first
2048KiB. - Rince and Repeat the last two steps until you hit EOT.
~# mt -f /dev/nst0 status
SCSI 2 tape drive:
File number=0, block number=0, partition=0.
Tape block size 0 bytes. Density code 0x58 (no translation).
Soft error count since last status=0
General status bits on (41010000):
 BOT ONLINE IM_REP_EN

~# dd if=/dev/nst0 count=1 bs=2048k
AMANDA: TAPESTART DATE 20160422153902 TAPE archive-ace-001


1+0 records in
1+0 records out
2097152 bytes (2.1 MB) copied, 2.55526 s, 821 kB/s

~# mt -f /dev/nst0 rewind
~# mt -f /dev/nst0 fsf 1

~# dd if=/dev/nst0 count=1 bs=2048k
AMANDA: SPLIT_FILE 20160422153902 tatania-xge /raid/utrecht  part 1/-1  lev 0 comp N program APPLICATION
APPLICATION=amgtar
ORIGSIZE=257885650
DLE=<<ENDDLE
<dle>
  <program>APPLICATION</program>
  <disk>/raid/utrecht</disk>
  <level>0</level>
  <auth>BSDTCP</auth>
  <record>NO</record>
  <datapath>AMANDA</datapath>
  <backup-program>
    <plugin>amgtar</plugin>
    <property>
      <name>ignore</name>
      <value encoding="raw" raw="OiBEaXJlY3RvcnkgaXMgbmV3JA==">:_Directory_is_new$</value>
<value encoding="raw" raw="OiBEaXJlY3RvcnkgaGFzIGJlZW4gcmVuYW1lZA==">:_Directory_has_been_renamed</value>
<value encoding="raw" raw="OiBmaWxlIGNoYW5nZWQgYXMgd2UgcmVhZCBpdCQ=">:_file_changed_as_we_read_it$</value>
<value encoding="raw" raw="OiBGaWxlIHJlbW92ZWQgYmVmb3JlIHdlIHJlYWQgaXQk">:_File_removed_before_we_read_it$</value>
<value encoding="raw" raw="OiBzb2NrZXQgaWdub3JlZCQ=">:_socket_ignored$</value>
<value encoding="raw" raw="OiBDYW5ub3Qgc3RhdDogTm8gc3VjaCBmaWxlIG9yIGRpcmVjdG9yeSQ=">:_Cannot_stat:_No_such_file_or_directory$</value>
<value encoding="raw" raw="OiBDYW5ub3Qgc2F2ZWRpcjogTm8gc3VjaCBmaWxlIG9yIGRpcmVjdG9yeSQ=">:_Cannot_savedir:_No_such_file_or_directory$</value>
    </property>
    <property>
      <name>check-device</name>
      <value>NO</value>
    </property>
  </backup-program>
</dle>
ENDDLE
To restore, position tape at start of file and run:
	dd if=<tape> bs=2048k skip=1 | /opt/amanda-3.3.0/libexec/amanda/application/amgtar restore [./file-to-restore]+


1+0 records in
1+0 records out
2097152 bytes (2.1 MB) copied, 0.101557 s, 20.7 MB/s
- The recipe to extract the content of the chunk is shown at the end of the chunk label above:
To restore, position tape at start of file and run:
	dd if=<tape> bs=2048k skip=1 | /opt/amanda-3.3.0/libexec/amanda/application/amgtar restore [./file-to-restore]+
- Well, sort of :).
- This is not tar archive, just one piece of the full one: one must first reassemble all the chunks, concatenate them together to recreate the tar archive and then we can proceed to extract files from it.
Example
- Extract chunk# 20 from tape archive-ace-001 above.
- It contains the archive of DLE gustav-xge:/raid/icbm-pedro in one chunk.
- First, using mt, position the tape head at tape file 20.
- Use dd to stream out the device content to a file, skipping the first
2048KiBused for the Amanda tape chunk label.
~# mt -f /dev/nst0 fsf 20
~# dd if=/dev/nst0 bs=2048k skip=1 of=_raid_icbm-pedro.001

dd: warning: working around lseek kernel bug for file (/dev/nst0)
  of mt_type=0x72 -- see <sys/mtio.h> for the list of types
dd: warning: working around lseek kernel bug for file (/dev/nst0)
  of mt_type=0x72 -- see <sys/mtio.h> for the list of types
20973+0 records in
20973+0 records out
43983568896 bytes (44 GB) copied, 179.655 s, 245 MB/s

~# ls -la
total 42952708
drwxr-x---  6 amanda disk         131 Apr 24 14:36 ./
drwxr-xr-x 59 root   root        4096 Apr  4  2015 ../
drwxr-x---  2 amanda disk           6 Apr 23 09:51 archive-ace/
drwxr-x---  2 amanda disk           6 Mar 14  2014 archive-hrrt/
drwxr-x---  2 amanda disk           6 Apr 24 07:18 charm/
-rw-r--r--  1 root   root 43983568896 Apr 24 14:39 _raid_icbm-pedro.001
drwxr-x---  2 root   root           6 Apr 23 14:14 restore/

~# file _raid_icbm-pedro.001
_raid_icbm-pedro.001: POSIX tar archive (GNU)

~# tar tf _raid_icbm-pedro.001
~# echo $?
0
- In the case of an archive containing multiple chunks, proceed as above and extract each chunk.
- Scanning multiple tapes will be necessary if the archive is spanning multiple tapes.
- When all chunks have been extracted, concatenate them to recreate the tar archive.
- Be careful to select a good lexicographic order when using cat, ie, choose a meaningful naming scheme!
- Finally, be careful of where you will extract/open the tar file, you might clobber already existing files!
~# cat chunk.* > archive.tar
How to Restore Data From a NDMP Client (BIC Isilon Cluster in this case) With Zmanda
NEVER NEVER NEVER EVER ATTEMPT TO RESTORE DATA IN PLACE, ON TOP OF THE ORIGINAL DATA, UNLESS YOU REALLY KNOW WHAT YOU ARE DOING!
YOU WILL WIPE OUT ALL THE PRE-EXISTING DATA.
RATHER CREATE A TEMPORARY DIRECTORY, RESTORE IN THERE AND COPY/MOVE THE DATA IN PLACE MANUALLY.
Directly on the NDMP Client Using the CLI
- Goal: restore some backup data to an alternate location on the Isilon cluster, preventing the erasure of the original source.
- Source: DLE /ifs/data/noel/noel9 on the BIC Isilon Cluster
- Target: /ifs/data/zmanda on the BIC Isilon Cluster. (It must already exist. If not, create it first then come back here).
- You MUST ABSOLUTELY set the directory property for the target name, otherwise you will do a restore in place and crush any existing data!!.
- Below, this is done with the amrecover command setproperty directory //nfs.isi-node.bic.mni.mcgill.ca/ifs/data/zmanda
- The target authentication information must be in /etc/amanda/isilon/ndmp_filer_shares configuration file:
"nfs.isi-node.bic.mni.mcgill.ca" "/ifs/data/dagher/dagher7" "ndmp" "******" md5
"nfs.isi-node.bic.mni.mcgill.ca" "/ifs/data/mica1" "ndmp" "******" md5
"nfs.isi-node.bic.mni.mcgill.ca" "/ifs/data/noel/noel10" "ndmp" "******" md5
"nfs.isi-node.bic.mni.mcgill.ca" "/ifs/data/noel/noel9" "ndmp" "******" md5
"nfs.isi-node.bic.mni.mcgill.ca" "/ifs/data/zmanda" "ndmp" "******" md5
- List the DLEs in the Backup Set isilon.
- Check the current info on the DLE to restore:
dow:~# sudo -u amandabackup amadmin isilon dles
dow172 //nfs.isi-node.bic.mni.mcgill.ca/ifs/data/mica1
dow172 //nfs.isi-node.bic.mni.mcgill.ca/ifs/data/mril/mril16
dow172 //nfs.isi-node.bic.mni.mcgill.ca/ifs/data/noel/noel9
dow172 //nfs.isi-node.bic.mni.mcgill.ca/ifs/data/noel/noel10
dow172 //nfs.isi-node.bic.mni.mcgill.ca/ifs/data/dagher/dagher7

dow:~# sudo -u amandabackup amadmin isilon find dow172 /ifs/data/noel/noel9$

date                host   disk                                                 lv tape or file          file part status
2017-03-29 12:33:07 dow172 //nfs.isi-node.bic.mni.mcgill.ca/ifs/data/noel/noel9  0 isilon-NEO-T48-B00081    6  1/6 OK
2017-03-29 12:33:07 dow172 //nfs.isi-node.bic.mni.mcgill.ca/ifs/data/noel/noel9  0 isilon-NEO-T48-B00081    7  2/6 OK
2017-03-29 12:33:07 dow172 //nfs.isi-node.bic.mni.mcgill.ca/ifs/data/noel/noel9  0 isilon-NEO-T48-B00081    8  3/6 OK
2017-03-29 12:33:07 dow172 //nfs.isi-node.bic.mni.mcgill.ca/ifs/data/noel/noel9  0 isilon-NEO-T48-B00081    9  4/6 OK
2017-03-29 12:33:07 dow172 //nfs.isi-node.bic.mni.mcgill.ca/ifs/data/noel/noel9  0 isilon-NEO-T48-B00081   10  5/6 OK
2017-03-29 12:33:07 dow172 //nfs.isi-node.bic.mni.mcgill.ca/ifs/data/noel/noel9  0 isilon-NEO-T48-B00081   11  6/6 OK
2017-03-31 09:41:33 dow172 //nfs.isi-node.bic.mni.mcgill.ca/ifs/data/noel/noel9  1 isilon-NEO-T48-B00082    2  1/1 OK
2017-04-01 00:15:06 dow172 //nfs.isi-node.bic.mni.mcgill.ca/ifs/data/noel/noel9  1 isilon-NEO-T48-B00083    2  1/1 OK
2017-04-02 00:15:07 dow172 //nfs.isi-node.bic.mni.mcgill.ca/ifs/data/noel/noel9  1 isilon-NEO-T48-B00084    2  1/1 OK
2017-04-03 00:15:07 dow172 //nfs.isi-node.bic.mni.mcgill.ca/ifs/data/noel/noel9  1 isilon-NEO-T48-B00085    3  1/1 OK
2017-04-04 00:15:07 dow172 //nfs.isi-node.bic.mni.mcgill.ca/ifs/data/noel/noel9  1 isilon-NEO-T48-B00086    4  1/1 OK
2017-04-05 00:15:07 dow172 //nfs.isi-node.bic.mni.mcgill.ca/ifs/data/noel/noel9  1 isilon-NEO-T48-B00087    4  1/1 OK
2017-04-06 00:15:08 dow172 //nfs.isi-node.bic.mni.mcgill.ca/ifs/data/noel/noel9  0 isilon-NEO-T48-B00088    4  1/6 OK
2017-04-06 00:15:08 dow172 //nfs.isi-node.bic.mni.mcgill.ca/ifs/data/noel/noel9  0 isilon-NEO-T48-B00088    5  2/6 OK
2017-04-06 00:15:08 dow172 //nfs.isi-node.bic.mni.mcgill.ca/ifs/data/noel/noel9  0 isilon-NEO-T48-B00088    6  3/6 OK
2017-04-06 00:15:08 dow172 //nfs.isi-node.bic.mni.mcgill.ca/ifs/data/noel/noel9  0 isilon-NEO-T48-B00088    7  4/6 OK
2017-04-06 00:15:08 dow172 //nfs.isi-node.bic.mni.mcgill.ca/ifs/data/noel/noel9  0 isilon-NEO-T48-B00088    8  5/6 OK
2017-04-06 00:15:08 dow172 //nfs.isi-node.bic.mni.mcgill.ca/ifs/data/noel/noel9  0 isilon-NEO-T48-B00088    9  6/6 OK
2017-04-07 00:15:08 dow172 //nfs.isi-node.bic.mni.mcgill.ca/ifs/data/noel/noel9  1 isilon-NEO-T48-B00089    2  1/1 OK
2017-04-08 00:15:07 dow172 //nfs.isi-node.bic.mni.mcgill.ca/ifs/data/noel/noel9  1 isilon-NEO-T48-B00090    2  1/1 OK
2017-04-09 00:15:08 dow172 //nfs.isi-node.bic.mni.mcgill.ca/ifs/data/noel/noel9  1 isilon-NEO-T48-B00091    3  1/1 OK
2017-04-10 00:15:09 dow172 //nfs.isi-node.bic.mni.mcgill.ca/ifs/data/noel/noel9  1 isilon-NEO-T48-B00092    4  1/1 OK
2017-04-11 00:15:09 dow172 //nfs.isi-node.bic.mni.mcgill.ca/ifs/data/noel/noel9  1 isilon-NEO-T48-B00093    3  1/1 OK
2017-04-12 00:15:07 dow172 //nfs.isi-node.bic.mni.mcgill.ca/ifs/data/noel/noel9  1 isilon-NEO-T48-B00094    3  1/1 OK
- Here we go. Start the Amanda recover process amrecover -C isilon as root on the Amanda server.
- You must specify the configuration name on the command line, -C isilon.
- Essentially, the process is the following:
- Select the host: sethost dow172
- Select the DLE: setdisk //nfs.isi-node.bic.mni.mcgill.ca/ifs/data/noel/noel9
- View history and select a date:
- history
- setdate 2017–04–12. (The date input syntax is YYYY-MM-DD-HH-MM[-SS] | YYYY-MM-DD, default: now)
- Select the target dir: setproperty directory //nfs.isi-node.bic.mni.mcgill.ca/ifs/data/zmanda THIS IS VERY IMPORTANT!
- Select the files to extract: add somefiles_or_dirs. (This is a shell glob NOT a regex)
- Start the extract: extract.
- If the tapes/volumes are in the changer or on the holddisk, they will be made available automatically.
- If not, load the needed volumes and in another shell, update the changer inventory:
- sudo -u amandabackup amtape isilon update slotX-slotY, specify the slot range to update.
/usr/sbin/amrecover -C isilon
AMRECOVER Version 3.3.9. Contacting server on localhost ...
220 dow AMANDA index server (3.3.9) ready.
Setting restore date to today (2017-03-14)
200 Working date set to 2017-03-14.
200 Config set to isilon.
501 Host dow is not in your disklist.
Trying host dow.bic.mni.mcgill.ca ...
501 Host dow.bic.mni.mcgill.ca is not in your disklist.
Trying host dow ...
501 Host dow is not in your disklist.
Trying host dow.bic.mni.mcgill.ca ...
501 Host dow.bic.mni.mcgill.ca is not in your disklist.
Use the sethost command to choose a host to recover
amrecover> listhost
200- List hosts for config isilon
201- dow172
201- 127.0.0.1
200  List hosts for config isilon
amrecover> sethost dow172
200 Dump host set to dow172.
amrecover> listdisk
200- List of disk for host dow172
201- //nfs.isi-node.bic.mni.mcgill.ca/ifs/data/mica1
201- //nfs.isi-node.bic.mni.mcgill.ca/ifs/data/mril/mril16
201- //nfs.isi-node.bic.mni.mcgill.ca/ifs/data/noel/noel9
201- //nfs.isi-node.bic.mni.mcgill.ca/ifs/data/noel/noel10
201- //nfs.isi-node.bic.mni.mcgill.ca/ifs/data/dagher/dagher7
200 List of disk for host dow172
amrecover> setdisk //nfs.isi-node.bic.mni.mcgill.ca/ifs/data/noel/noel9
200 Disk set to //nfs.isi-node.bic.mni.mcgill.ca/ifs/data/noel/noel9.
amrecover> history
200- Dump history for config "isilon" host "dow172" disk //nfs.isi-node.bic.mni.mcgill.ca/ifs/data/noel/noel9
201- 2017-04-12-00-15-07 1 isilon-NEO-T48-B00094:3
201- 2017-04-11-00-15-09 1 isilon-NEO-T48-B00093:3
201- 2017-04-10-00-15-09 1 isilon-NEO-T48-B00092:4
201- 2017-04-09-00-15-08 1 isilon-NEO-T48-B00091:3
201- 2017-04-08-00-15-07 1 isilon-NEO-T48-B00090:2
201- 2017-04-07-00-15-08 1 isilon-NEO-T48-B00089:2
201- 2017-04-06-00-15-08 0 isilon-NEO-T48-B00088:4,5,6,7,8,9
201- 2017-04-05-00-15-07 1 isilon-NEO-T48-B00087:4
201- 2017-04-04-00-15-07 1 isilon-NEO-T48-B00086:4
201- 2017-04-03-00-15-07 1 isilon-NEO-T48-B00085:3
201- 2017-04-02-00-15-07 1 isilon-NEO-T48-B00084:2
201- 2017-04-01-00-15-06 1 isilon-NEO-T48-B00083:2
201- 2017-03-31-09-41-33 1 isilon-NEO-T48-B00082:2
201- 2017-03-29-12-33-07 0 isilon-NEO-T48-B00081:6,7,8,9,10,11
200 Dump history for config "isilon" host "dow172" disk //nfs.isi-node.bic.mni.mcgill.ca/ifs/data/noel/noel9
amrecover> setdate 2017-04-12
200 Working date set to 2017-04-12.
amrecover> setproperty directory //nfs.isi-node.bic.mni.mcgill.ca/ifs/data/zmanda
amrecover> pwd
//nfs.isi-node.bic.mni.mcgill.ca/ifs/data/noel/noel9
amrecover> ls
2017-04-06-00-15-08 TLE_prepost_project/
2017-04-06-00-15-08 TLE_3T_Trio/
2017-04-06-00-15-08 TEST-virtual-machine/
2017-04-06-00-15-08 SoftWares/
2017-04-06-00-15-08 Controls_3T_Trio/
2017-04-06-00-15-08 ._.DS_Store
2017-04-06-00-15-08 .Trash-2551/
2017-04-06-00-15-08 .DS_Store
2017-04-06-00-15-08 .
amrecover> add .
Added dir /. at date 2017-04-06-00-15-08
amrecover> extract

Extracting files using tape drive changer on host localhost.
The following tapes are needed: isilon-NEO-T48-B00088

Extracting files using tape drive changer on host localhost.
Load tape isilon-NEO-T48-B00088 now

Continue [?/Y/n/s/d]? y
Restoring files into target host //nfs.isi-node.bic.mni.mcgill.ca/ifs/data/zmanda
All existing files in //nfs.isi-node.bic.mni.mcgill.ca/ifs/data/zmanda can be deleted
Continue [?/Y/n]? y

DLMn "\n\tIsilon NDMP 2.3.0\n\tOneFS: B_MR_8_0_0_1_131\n\tSession ID: 4.51773"
CLMd "mover going active"
DLMn "Filetransfer: Transferred 130400317440 bytes in 655.594 seconds throughput of 194242.344 KB/s"
DLMn "\n\tObjects (scanned/recovered):\n\t----------------------------\n\tRegular Files:\t\t(129062/129062)\n\tSparse Files:\t\t(0/0)\n\tStub Files:\t\t(0/0)\n\tDirectories:\t\t(686/686)\n\tADS Entries:\t\t(0/0)\n\tADS Containers:\t\t(0/0)\n\tSoft Links:\t\t(0/0)\n\tHard Links:\t\t(60/60)\n\tBlock Device:\t\t(0/0)\n\tChar Device:\t\t(0/0)\n\tFIFO:\t\t\t(0/0)\n\tSocket:\t\t\t(0/0)\n\tWhiteout:\t\t(0/0)\n\tUnknown:\t\t(0/0)\n"
DLMn "\n\tFile Size (count)\n\t----------------------------\n\t== 0\t\t\t89\n\t<= 8k\t\t\t3734\n\t<= 64k\t\t\t711\n\t<= 1M\t\t\t119550\n\t<= 20M\t\t\t4535\n\t<= 100M\t\t\t447\n\t<= 1G\t\t\t55\n\t > 1G\t\t\t1\n\t-------------------------\n\tTotal Files:\t\t129122\n\tTotal Bytes:\t\t130104474516\n\tMax Size:\t\t1657866240\n\tMean Size:\t\t1007608\n"
SESS "Operation ended OKAY"
SESS "LOG_FILE messages: 1 OK, 0 ERROR, total 1 of 1"
amrecover> quit
Away from the NDMP Client on the Amanda (Linux) Server Itself
- This is possible because the NDMP backups are done on the client using bsdtar and gnutar can understand and extract bsdtar archives.
- Some meta-attributes are tagged in when that backup is created on the NDMP client and must be removed to make Gnutar happy.
- This entails some loss of info, like the Cluster ID and file ‘birthtime’ and probably some other extra tokens put by the OneFS filesystem related to Samba, etc.
- However, the data itself, filenames, directories, etc, along with their ownerships and atime,ctime,mtime are all extracted correctly and this is all and only what we want.
- Below, I have extracted the dump file ./dow172.__nfs.isi-node.bic.mni.mcgill.ca_ifs_data_noel_noel9.20170310113914.0 for a DLE using amfetchdump -p as explained above.
- Create a temporary directory, say /holddisk/restore/noel9 and use the command:
tar --pax-option="delete=ISI.enc_path"       \
    --pax-option="delete=ISI.archive_ver"    \
    --pax-option="delete=ISI.clusterID"      \
    --pax-option="delete=ISI.symlink_enc"    \
    --pax-option="delete=ISI.sparse.mapsize" \
    --pax-option="delete=birthtime"          \
    --pax-option="delete=linkoffset"         \
    --pax-option="delete=SCHILY.nlink"       \
    --pax-option="delete=SCHILY.ino"         \
    --pax-option="delete=SCHILY.fflags"      \
    --pax-option="delete=SCHILY.dev"         \
    -C /holddisk/restore/noel9 -xf ./dow172.__nfs.isi-node.bic.mni.mcgill.ca_ifs_data_noel_noel9.20170310113914.0
Using ZMC, the Zmanda Management Console, aka the Web Interface
- OK, so I’ll have to put pretty snapshots of the ZMC…
- Start a browser and point to the Amanda server URI, dow.bic.mni.mcgill.ca
- Login using the Amanda ZMC user amanda. You will need the proper credentials.
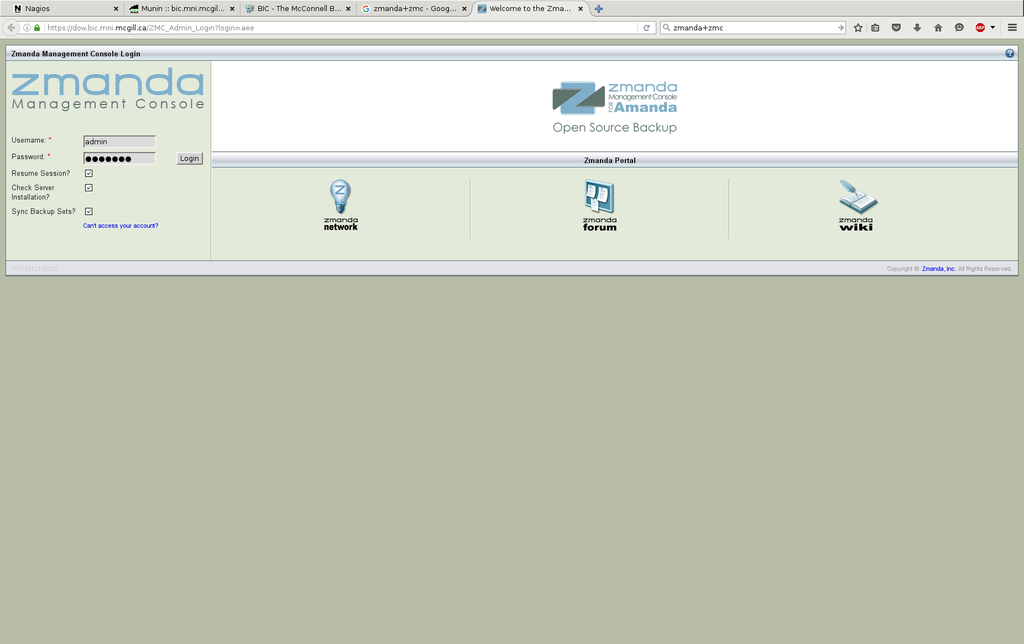
- You can skip the Resume Session, Check Server Installation or Sync Backup Sets stuff if you want.
- Select the Backup Set isilon;, ie, the Amanda configuration name you want to restore a DLE from.
- isilon is the default one for the moment and the only you can choose from as it is unique for the time being.
- Click on the Restore tab.
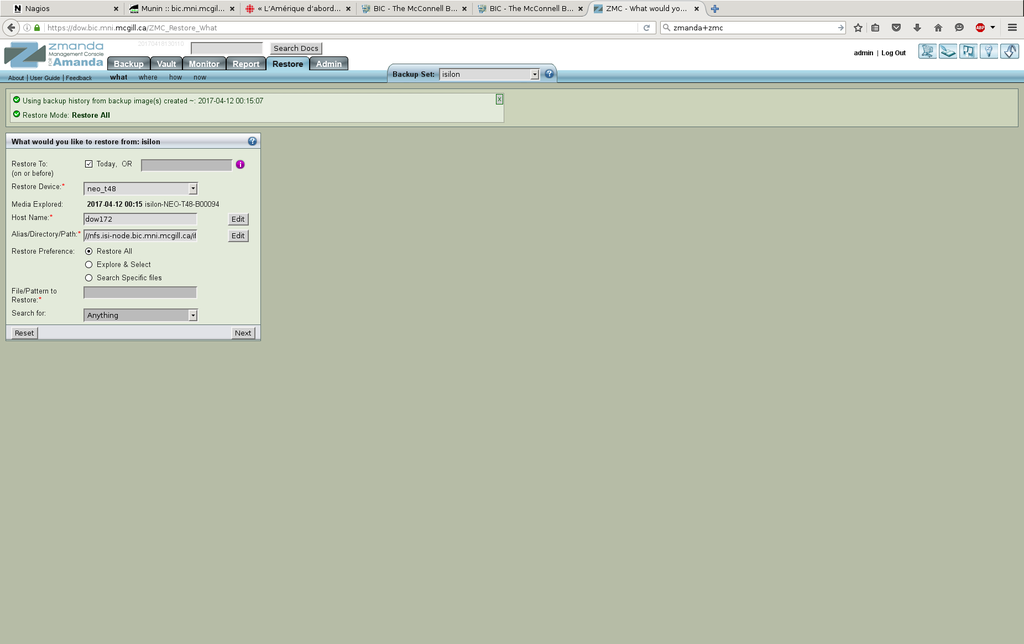
- At this point you are ready to select:
- the time of the restore
- the restore device (only one choice, as there is only one changer to choose from: neo_t48)
- the alias/directory path
- the files/dirs selection from the DLE (Restore All, Explore and Select, Search Specific Files)
- Clicking in the Alias/Directory Path will bring a popup at the right.
- Select which DLE you want to restore from. (Here I selected //nfs.isi-node.bic.mni.mcgill.ca/ifs/data/dagher/dagher7).
- I choose Today as time of the restore and Restore All.

- Click Next to select where the restore will end up.
DO NOT SELECT THE ORIGINAL DLE PATH FOR THE DESTINATION OF THE RESTORE: YOU WILL CLOBBER THE DLE IF YOU DO SO!!!
- Here I selected Volume Name /ifs and Directory /data/zmanda:
- Make sure /ifs/data/zmanda exists on the Isilon Cluster: the restore will fail if doesn’t.
- Use the NDMP username ndmp (you will need its credentials) and select MD5 as Auth type.
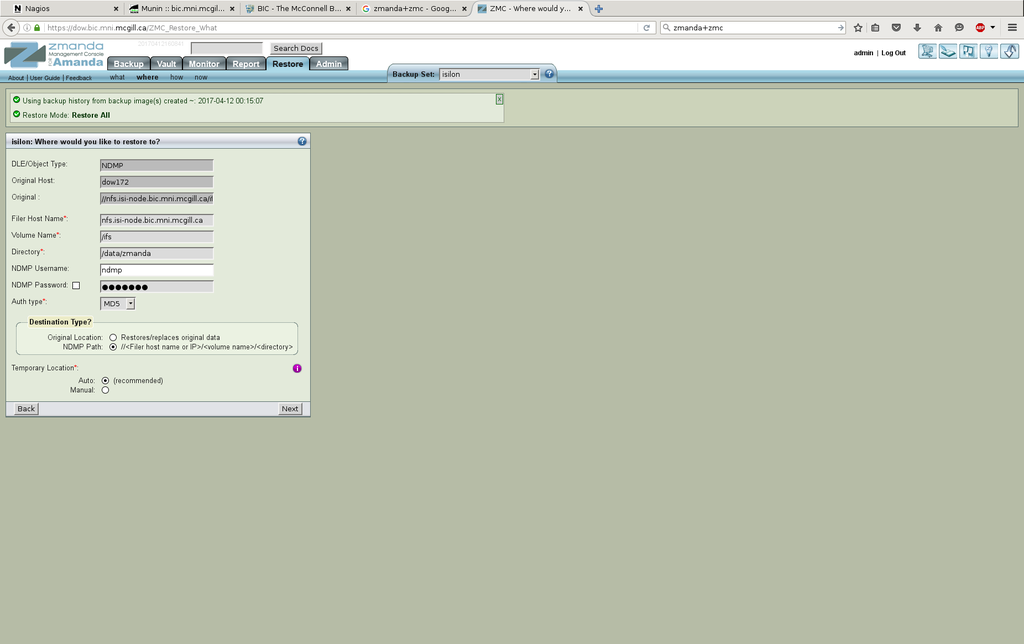
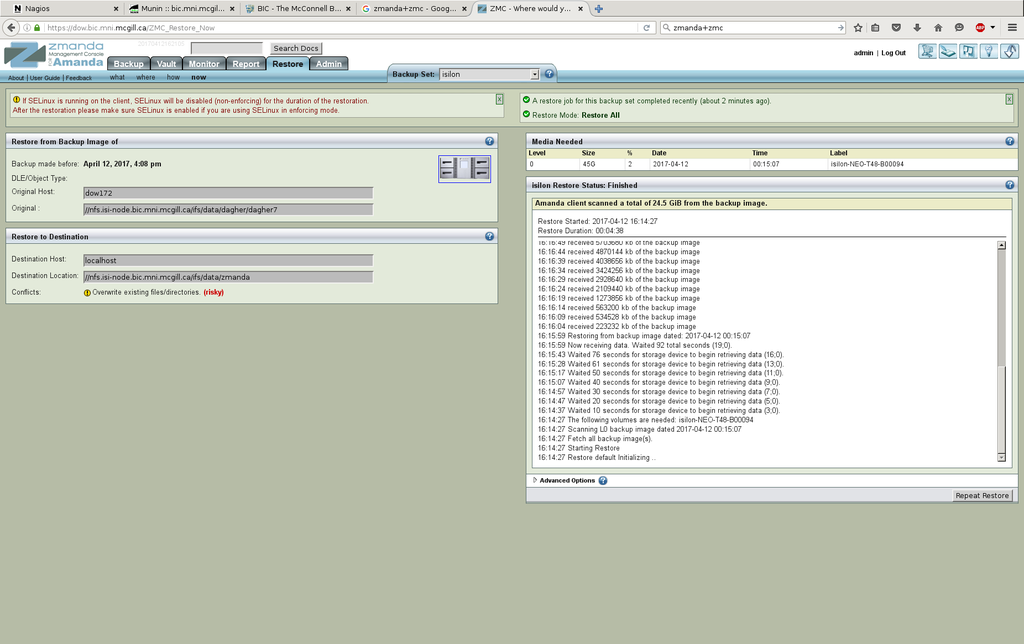
- Clicking Next gets you to this:
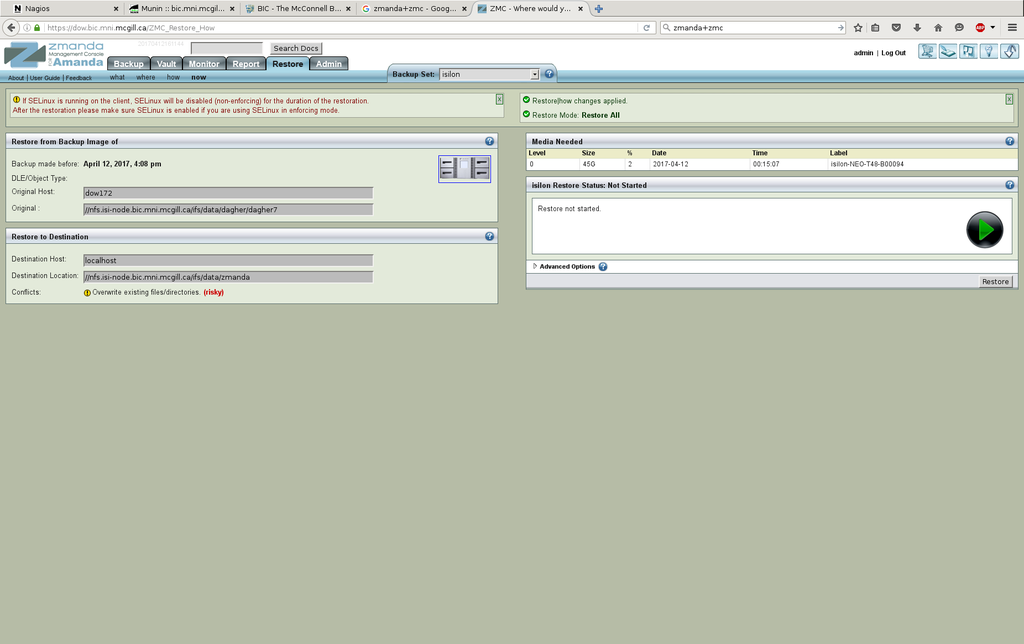
- A few notes about the above:
- Verify the sub-panel Restore from Backup Image of really contains what you previously selected.
- The sub-panel Restore to Destination will contain localhost as the Destination Host. That’s fine.
- The sub-panel Media Needed will tell you which tape/volumes are necessary to perform the restore.
- Make sure they are all loaded in the changer slots allocated to the Amanda configuration.
- Click on the big green arrow to start the restore:
- When the restore ends:
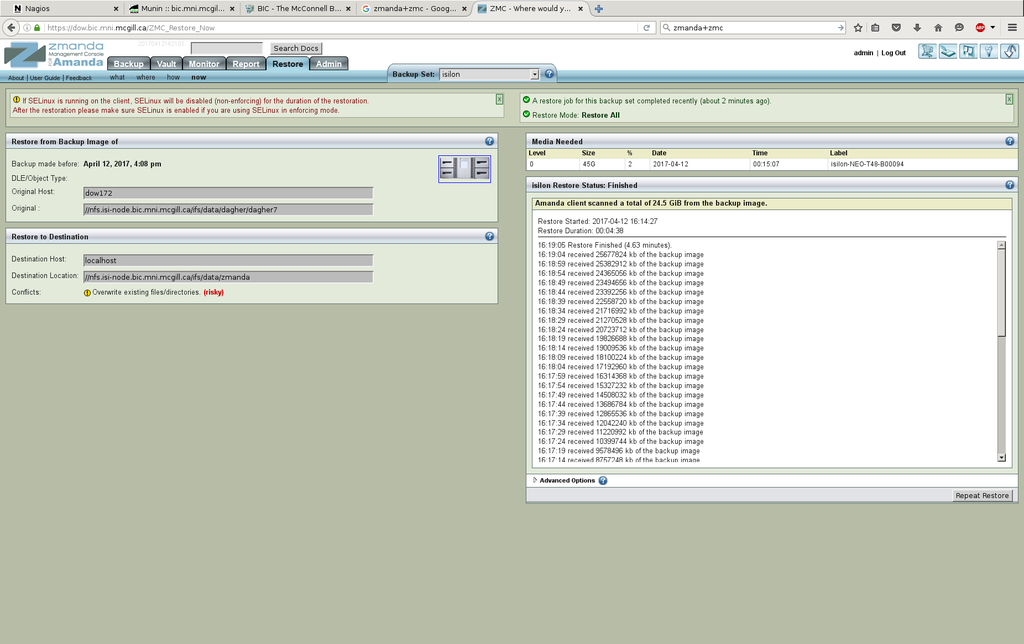
- You can check the state of NDMP session on the Isilon Cluster when the restore is under way by login to the management CLI on the cluster and running the command:
BIC-Isilon-Cluster-4# isi ndmp sessions ls
Session  Data   Mover  OP   Elapsed Time  Bytes Moved  Throughput
------------------------------------------------------------------
5.19383  ACTIVE IDLE   R(F) 1m 0s         6.965GB      136.81MB/s
------------------------------------------------------------------
Total: 1
- Congratulations. You now know how to restore stuff from ZMC.