
This is a disclaimer:
Using the notes below is dangerous for both your sanity and peace of mind.
If you still want to read them beware of the fact that they may be "not even wrong".

Everything I write in there is just a mnemonic device to give me a chance to
fix things I badly broke because I'm bloody stupid and think I can tinker with stuff
that is way above my head and go away with it. It reminds me of Gandalf's warning:
"Perilous to all of us are the devices of an art deeper than we ourselves possess."

Moreover, a lot of it I blatantly stole on the net from other obviously cleverer
persons than me -- not very hard. Forgive me. My bad.

Please consider it and go away. You have been warned!
Pacemaker/Corosync/OpenAIS Cluster + OCFS2 + DRBD + STONITH + Xen live migration: Requirements and Installation Notes
THIS IS NOW OBSOLETE AND NOT TO BE USED!
This is just a mostly random collection of notes I took while building my first HA cluster.
Do not use anything here unless you are willing and able to take responsibility for your own actions.
Those are my personnal notes and musings on configuring an active/active pacemaker/corosync 2-node High-Availabilty (HA) virtual Xen cluster using DRBD and STONITH over IPMI.
The ultimate goal is to have a few virtual domains running services with live Xen migration enabled. This last bit requires a cluster filesystem.
Most of the info comes from shameless cut-and-paste from ClusterLabs Wiki and the very good DRBD user guide and other sites blogs and mailing lists. This is not meant to be exaustive nor complete and any errors are mine truly.
Also note that since I started this (a LONG time ago) Debian/Squeeze state has changed from testing to stable so soon one should see some backported packages from the new Debian/wheezy ‘testing’ distro.
(:#toc:)
Packages Installation Base
ii  drbd8-module-2.6.32-5-xen-amd64                         2:8.3.8-0+2.6.32-30            RAID 1 over tcp/ip for Linux kernel module
ii  drbd8-module-source                                     2:8.3.8-0                      RAID 1 over tcp/ip for Linux module source
ii  drbd8-utils                                             2:8.3.8-0                      RAID 1 over tcp/ip for Linux utilities

ii  libxenstore3.0                                          4.0.1-2                        Xenstore communications library for Xen

ii  linux-headers-2.6.32-5-common-xen                       2.6.32-34squeeze1              Common header files for Linux 2.6.32-5-xen
ii  linux-headers-2.6.32-5-xen-amd64                        2.6.32-34squeeze1              Header files for Linux 2.6.32-5-xen-amd64
ii  linux-image-2.6.32-5-xen-amd64                          2.6.32-34squeeze1              Linux 2.6.32 for 64-bit PCs, Xen dom0 support

ii  linux-headers-2.6.32-5-common-xen                       2.6.32-31                      Common header files for Linux 2.6.32-5-xen
ii  linux-headers-2.6.32-5-xen-amd64                        2.6.32-31                      Header files for Linux 2.6.32-5-xen-amd64
ii  linux-image-2.6.32-5-xen-amd64                          2.6.32-31                      Linux 2.6.32 for 64-bit PCs, Xen dom0 support

ii  xen-hypervisor-4.0-amd64                                4.0.1-2                        The Xen Hypervisor on AMD64
ii  xen-tools                                               4.2-1                          Tools to manage Xen virtual servers
ii  xen-utils-4.0                                           4.0.1-2                        XEN administrative tools
ii  xen-utils-common                                        4.0.0-1                        XEN administrative tools - common files
ii  xenstore-utils                                          4.0.1-2                        Xenstore utilities for Xen
ii  xenwatch                                                0.5.4-2                        Virtualization utilities, mostly for Xen

ii  libvirt-bin                                             0.8.3-5                        the programs for the libvirt library
ii  libvirt-doc                                             0.8.3-5                        documentation for the libvirt library
ii  libvirt0                                                0.8.3-5                        library for interfacing with different virtualization systems
ii  python-libvirt                                          0.8.3-5                        libvirt Python bindings
ii  virt-manager                                            0.8.4-8                        desktop application for managing virtual machines
ii  virt-viewer                                             0.2.1-1                        Displaying the graphical console of a virtual machine
ii  virtinst                                                0.500.3-2                      Programs to create and clone virtual machines

ii  ocfs2-tools                                             1.4.4-3                        tools for managing OCFS2 cluster filesystems
ii  ocfs2-tools-pacemaker                                   1.4.4-3                        tools for managing OCFS2 cluster filesystems - pacemaker support
ii  ocfs2console                                            1.4.4-3                        tools for managing OCFS2 cluster filesystems - graphical interface

ii  corosync                                                1.2.1-4                        Standards-based cluster framework (daemon and modules)
ii  pacemaker                                               1.0.9.1+hg15626-1              HA cluster resource manager
ii  libopenais3                                             1.1.2-2                        Standards-based cluster framework (libraries)
ii  openais                                                 1.1.2-2                        Standards-based cluster framework (daemon and modules)
ii  dlm-pcmk                                                3.0.12-2                       Red Hat cluster suite - DLM pacemaker module
ii  libdlm3                                                 3.0.12-2                       Red Hat cluster suite - distributed lock manager library
ii  libdlmcontrol3                                          3.0.12-2                       Red Hat cluster suite - distributed lock manager library

ii  ipmitool                                                1.8.11-2                       utility for IPMI control with kernel driver or LAN interface
ii  libopenipmi0                                            2.0.16-1.2                     Intelligent Platform Management Interface - runtime
ii  openhpi-plugin-ipmidirect                               2.14.1-1                       OpenHPI plugin module for direct IPMI over LAN (RMCP) or SMI
ii  openipmi                                                2.0.16-1.2                     Intelligent Platform Management Interface (for servers)

ii  libopenhpi2                                             2.14.1-1                       OpenHPI libraries (runtime and support files)
ii  openhpi-plugin-ipmidirect                               2.14.1-1                       OpenHPI plugin module for direct IPMI over LAN (RMCP) or SMI
ii  openhpid                                                2.14.1-1                       OpenHPI daemon, supports gathering of manageability information
Power and Physical network connections
The goal here is to have no single point of failure (SPOF). Right off the bat there is one: both nodes have a single PSU (cash constraint!) so it is important to have all the power feeds as distributed as possible. The nodes should be connected to different UPS’s and all the network switches powered from yet another sets of UPS’s.
helena: power feed from UPS-A
    eth0            eth1       eth2          IPMI
 132.206.178.60   10.0.0.2   192.168.1.19  192.168.1.17
    (s3p22)        p-to-p      (s7p23)      (s7p21)

puck: power feed from UPS-B

    eth0            eth1       eth2          IPMI
 132.206.178.61   10.0.0.1   192.168.1.18  192.168.1.16
    (s6p18)        p-to-p      (s7p24)      (s7p22)

s3: power feed from UPS-C
s7: power feed from UPS-R2-1
s6: power feed from UPS-R2-2
Cluster Physical/Logical/Virtual Disk Layout
NOTE: I changed my mind many times on the cluster layout due to performance reasons and a slew of other concerns like stonith with multiple drbd resources in an active/active dual-primary cluster. Here are a few that I tested. Some can’t work as a dual-primary active/active cluster so I didn’t bother including the relevent bits in Cluster Stack Logic: Failures and Success but I left them here for future reference purposes.
[ raid1 md0 ] → [ drbd ] → [ LVM ] → [ OCFS2 ] → [ Xen ] with dual-primary drbd and active-active cluster
The Xen guest lives on 2 OCFS2 filesystems, one for its disk image and the other for a swap file image. OCFS2 (or any cluster aware filesystem, GlusterFS, RedHat Cluster Suite, etc) is required if one wants to be able to perform live migrations between 2 nodes. The OCFS2 filesystems are sitting on top of Logical Volumes which in turn are sitting on top of 2 DRBD replication block devices between the 2 nodes. Finally the drbd devices are on top of the raid device /dev/md0, a raid1 (mirror) array on 2 physical disks, /dev/sdc and /dev/sdd. Note that having the disk and swap image on separated filesystem is an unnecessary complication and I have since then removed that bit.
+----------+  +----------+             +----------+  +----------+
|   domU   |  |   domU   |             |   domU   |  |   domU   |
+----------+  +----------+             +----------+  +----------+
     ||            ||                       ||            ||
+----------+  +----------+             +----------+  +----------+
|   ocfs2  |  |   ocfs2  |             |   ocfs2  |  |   ocfs2  |
+----------+  +----------+             +----------+  +----------+
| xen_lv1  |  | xen_lv2  |             |  xen_lv1 |  | xen_lv2  |
+----------+--+----------+             +----------+--+----------+
|  volume group xen_vg   |             |   volume group xen_vg  |
+------------------------+             +------------------------+
|     physical volume    |             |     physical volume    |
+------------------------+             +------------------------+
|      drbd r1           |<~~~~~~~~~~~>|       drbd r1          |
+------------------------+             +------------------------+
|       mirror md0       |             |       mirror md0       |
+----------+--+----------+             +----------+--+----------+
|   sdc    |  |   sdd    |             |   sdc    |  |   sdd    |
+----------+--+----------+             +----------+--+----------+
Truly, one needs the entire cluster filesystem suite with o2cb and the DLM (Distributed Lock Daemon) stuff included and all managed by the cluster stack. See http://www.clusterlabs.org/wiki/Dual_Primary_DRBD_%2B_OCFS2 for more info. It looks like this is not possible with Debian/Squeeze as its stands now. Either all the hooks needed to make it it work are not all there, or I’m just too dumb to figure it out. I lean towards the later. See An attempt to have OCFS2 and DLM managed by the cluster for the errors I’m getting. To bypass this I will just starting the OCFS o2cb service at boot time. Obviously, in case of failure to start and if it dies (OOM or whatever) the cluster will just implode with most probably catastrophic filesystem corruption.
The cluster logic is (timeouts, etc removed) something along those lines:
(:source:) primitive resDRBDr1 ocf:linbit:drbd params drbd_resource=“r1” … primitive resLVM ocf:heartbeat:LVM params volgrpname=“xen_vg” … primitive resOCFS2 ocf:heartbeat:Filesystem fstype=“ocfs2” … primitive resXen1 ocf:heartbeat:Xen params xmfile=“/etc/xen/xen1cfg” name=“xen1” meta allow-migrate=“true” group groLVM-OCFS resLVM resOCFS2 ms msDRBDr1 resDRBDr1 meta notify=“true” master-max=“2” interleave=“true” colocation colLVM-OCFS-on-DRBDr1Master inf: groLVM-OCFS msDRBDr1:Master colocation colXen-with-OcfsXen inf: resXen1 groLVM-OCFS order ordDRBDr1-before-LVM inf: msDRBDr1:promote groLVM-OCFS:start order ordLVM-OCFS-before-Xen inf: groLVM-OCFS:start resXen1:start (:sourceend:)
DRBD is configured with ‘allow-two-primary’. When I try to live migrate the Xen guest (with crm resource move resXen1) I get:
pengine: [11978]: notice: check_stack_element: Cannot migrate resXen1 due to dependency on group groLVM-OCFS (coloc)
and the guest is shutdown and restarted on the other node. Not quite sure why it is so.
—
The simplest/dummiest (and dangerous!) approach: active-passive cluster with a primary-secondary drbd setup.
In any case, one can get rid of the OCFS2 layer in the diagram above, and just build the domUs on top of the LVs. This is the simplest (dum?) way of having multiple guests hosted on one host (DRBD is NOT in an dual-primary state and the cluster is active/passive).
The immediate drawback is that all guests are now tied up to one node as DRBD is not in a dual-primary configuration: you cannot have multiple guests running on different nodes since the drbd device can be primary on only one node at any time. That means migrating one will migrate them all. And note that this will not be live migration: each guest will, one after the other, be shutdown and restarted on the other node.
As a final note, having this setup managed by pacemaker is disaster in store: since the guest hosts are grouped together (using a crm resource like group groupXen resXen1 resXen2 resXen3) under pacemaker, failure to start one in the chain will break the chain. In this case resXen2 and resXen3 won’t start if resXen1 somehow doesn’t/cannot start. They have to be grouped as there is only onde drbd device in primary role. I haven’t explicitely tested this ( having multiple guest NOT grouped) but I suspect it would fun to watch the cluster implode when migrating one guest :)
+----------+  +----------+             +----------+  +----------+
|   domU   |  |   domU   |             |   domU   |  |   domU   |
+----------+  +----------+             +----------+  +----------+
     ||            ||                       ||            ||
+----------+  +----------+             +----------+  +----------+
| xen_lv1  |  | xen_lv2  |             |  xen_lv1 |  | xen_lv2  |
+----------+--+----------+             +----------+--+----------+
|  volume group xen_vg   |             |   volume group xen_vg  |
+------------------------+             +------------------------+
|      drbd r1           |<~~~~~~~~~~~>|       drbd r1          |
+------------------------+             +------------------------+
|       mirror md0       |             |       mirror md0       |
+----------+--+----------+             +----------+--+----------+
|   sdc    |  |   sdd    |             |   sdc    |  |   sdd    |
+----------+--+----------+             +----------+--+----------+
—
Active-Active Cluster with Dedicated drbd block devices for each Xen guest without OCFS2
A different setup I will explore below is to have multiple DRBD replication block devices /dev/drbd<X> X=0,1,2…, one for each Xen guest. Those replication devices sit on top of their own Logical Volumes /dev/vg_xen/xen_lv<X>, all from a volume group vg_xen created on the underlying mirror/raid1 device. The Xen guests in this case are created using logical volumes (those will hold the system disk and swap and will be made available to the guest as virtual devices) on volume groups vg<X> sitting on top of the replicating block device /dev/drbd<X> X=0,1,2… and use physical devices (lv<X> below) as their virtual disk devices rather than sparse disk images, as was done above. In order to have live migration the DRBD resources must be configured with allow-two-primaries and with become-primary-on both. Moreover it is important to note that the volume group vg<X> must be available (vgchange -ay xen_vg) as in the case of the demotion of the replication block device to secondary role, the kernel will lose track of any volume group living on top of it (because the devices will have disappeared) and the Xen guest host won’t start. Also a volume group scan has to be done when drbd change role from secondary to primary. In order for this to succeed one must modify the filter setting of LVM in /etc/lvm/lvm.conf and add the drbd devices regex, followed by rm /etc/lvm/cache/.cache ; vgscan.
+----------+  +----------+             +----------+  +----------+
|   domU   |  |   domU   |             |   domU   |  |   domU   |
+----------+  +----------+             +----------+  +----------+
     ||            ||                       ||            ||
+----------+  +----------+             +----------+  +----------+
|   lv0    |  |   lv1    |             |   lv1    |  |   lv0    |
+----------+  +----------+             +----------+  +----------+
|   vg0    |  |   vg1    |             |   vg1    |  |   vg0    |
+----------+  +----------+             +----------+  +----------+
| drbd r0  |  | drbd r1  |<~~~~~~~~~~~>| drbd r1  |  | drbd r0  |
+-----+----+  +----------+             +----------+  +-----+----+
|     ^    |  |          |             |          |  |     ^    |
|     |    |  |          |             |          |  |     |    |
|     ~~~~~~~~~~~~~~~~~~~~~~~~~~~~~~~~~~~~~~~~~~~~~~~~~~~~~~    |
|          |  |          |             |          |  |          |
+----------+  +----------+             +----------+  +----------+
| xen_lv0  |  |  xen_lv1 |             | xen_lv1  |  |  xen_lv0 |
+----------+--+----------+             +----------+--+----------+
|         vg_xen         |             |         vg_xen         |
+------------------------+             +------------------------+
|       mirror dm0       |             |       mirror dm0       |
+----------+--+----------+             +----------+--+----------+
|   sdc    |  |   sdd    |             |   sdc    |  |   sdd    |
+----------+--+----------+             +----------+--+----------+
Note that by removing the Active-Active cluster bit above, and not allowing guest live migration (by commenting out the allow-two-primary for the drbd block devices) one can get a very simple and robust cluster. This is what I’ve finally implemented using a cluster login like
(:source:) primitive resDRBDr0 ocf:linbit:drbd params drbd_resource=“r0” op start interval=“0” timeout=“240s” op stop interval=“0” timeout=“120s” op monitor interval=“20s” role=“Master” timeout=“240s” meta migration-threshold=“3” failure-timeout=“60s” primitive resLVM0 ocf:heartbeat:LVM params volgrpname=“vg0” op monitor interval=“10s” timeout=“60s” op start interval=“0” timeout=“60s” op stop interval=“0” timeout=“60s” meta migration-threshold=“3” failure-timeout=“60s” primitive resXen0 ocf:heartbeat:Xen params xmfile=“/etc/xen/matsya.bic.mni.mcgill.ca.cfg” name=“matsya.bic.mni.mcgill.ca” op monitor interval=“20s” timeout=“60s” op start interval=“0” timeout=“90s” op stop interval=“0” timeout=“90s” meta migration-threshold=“3” failure-timeout=“60s” ms msDRBDr0 grpDRBDr0 meta notify=“true” interleave=“true” colocation colLVM0-on-DRBDMaster0 inf: resLVM0 msDRBDr0:Master colocation colXen0-on-LVM0 inf: resXen0 resLVM0 order ordDRBDr0-before-LVM0 inf: msDRBDr0:promote resLVM0:start order ordLVM0-before-Xen0 inf: resLVM0 resXen0 (:sourceend:)
—
Dedicated drbd block devices for each Xen guest WITH OCFS2
OK, so back to the [ md0 ] -> [ LVM ] -> [ drbd ] -> [ ocfs2 ] -> [ Xen ] game with the replication devices in dual-primary mode along with an active/active cluster to allow live migration. Each guest lives on a sparse disk image located on a OCFS2 filesystem, with one dedicated drbd device for each guest host.
+----------+  +----------+             +----------+  +----------+
|   domU   |  |   domU   |             |   domU   |  |   domU   |
+----------+  +----------+             +----------+  +----------+
     ||            ||                       ||            ||
+----------+  +----------+             +----------+  +----------+
|   ocfs   |  |   ocfs   |             |   ocfs   |  |   ocfs   |
+----------+  +----------+             +----------+  +----------+
| drbd r0  |  | drbd r1  |<~~~~~~~~~~~>| drbd r1  |  | drbd r0  |
+-----+----+  +----------+             +----------+  +-----+----+
|     ^    |  |          |             |          |  |     ^    |
|     |    |  |          |             |          |  |     |    |
|     ~~~~~~~~~~~~~~~~~~~~~~~~~~~~~~~~~~~~~~~~~~~~~~~~~~~~~~    |
|          |  |          |             |          |  |          |
+----------+  +----------+             +----------+  +----------+
| xen_lv0  |  |  xen_lv1 |             | xen_lv1  |  |  xen_lv0 |
+----------+--+----------+             +----------+--+----------+
|         vg_xen         |             |         vg_xen         |
+------------------------+             +------------------------+
|       mirror dm0       |             |       mirror dm0       |
+----------+--+----------+             +----------+--+----------+
|   sdc    |  |   sdd    |             |   sdc    |  |   sdd    |
+----------+--+----------+             +----------+--+----------+
This design allows much more flexibility: under pacemaker control one can live migrate any guest host independantly of any other one (crm resource move resXen1) and do rollback upgrades of the nodes by taking them offline from the cluster (crm node standby node1), upgrade etc, then return them back online with crm node online node1. One can also split the load between the 2 Dom0s if one is overloaded either from disk I/O or network contention. See Cluster Resource Management for details on managing nodes and resources with pacemaker.
There is one very important thing to note though: the replication devices being in dual-primary mode, split-brain can be easily obtained by managing the Xen resources from tools not under pacemaker’s wing. DONT DO IT!. Trying to migrate a guest using xm migrate —live Xen1 while it is managed by pacemaker will lead right away to the Xen host virtual disk corruption. DRBD will simply duplicate the mess —DRBD is not aware of what is lying above him: it just does what it is supposed to do: replicate. At that point the Xen host will eventually crash with a bogus internal disk state which is always impossible to fix. I know, I tried it :)
System Disk Migration to Software Raid1 (mirror)
In order to remove the possibility of a disk failure bringing down a node the system disks for both nodes are migrated to a raid1 (mirror) device to ensure no SPOF for the Dom0 Xen control domain. I will essentially follow the hints
from
http://www.howtoforge.com/software-raid1-grub-boot-debian-etch
http://www.linuxconfig.org/Linux_Software_Raid_1_Setup
http://wiki.xtronics.com/index.php/Raid
Note that those contains info that is, imho, either obsolete, confusing and/or plainly wrong. Use it at your own risks!!
What follows below is a procedure gleaned from the urls above and adapted to our local environment.
The OS on both systems were initially installed using our in-house FAI-installation base (Debian/Lenny) and subsequently upgraded to Debian/Squeeze (testing). It is imperative that both systems have the same exact installation base. In retrospect I should have gone straight for a Squeeze install using a net-boot usb key and choose to install the OS on a raid1. All of the following would have been avoided, along with a lot of grief.
This being said the following steps should be done on both nodes.
Initial verification of devices
helena:~# lsscsi
[0:0:0:0]    disk    ATA      ST3250310NS      SN06  /dev/sda
[1:0:0:0]    disk    ATA      ST3250310NS      SN06  /dev/sdb
[2:0:0:0]    disk    ATA      ST3500320NS      SN06  /dev/sdc
[3:0:0:0]    disk    ATA      ST3500320NS      SN06  /dev/sdd
We will use /dev/sd[ab] as the components of the mirror. /dev/sda is currently the system disk with the following partitions:
helena:~# fdisk -l

Disk /dev/sda: 250.1 GB, 250059350016 bytes
255 heads, 63 sectors/track, 30401 cylinders
Units = cylinders of 16065 * 512 = 8225280 bytes
Sector size (logical/physical): 512 bytes / 512 bytes
I/O size (minimum/optimal): 512 bytes / 512 bytes
Disk identifier: 0x00000000

   Device Boot      Start         End      Blocks   Id  System
/dev/sda1   *           1         238     1911703+  83  Linux
/dev/sda2             239       30401   242284297+   5  Extended
/dev/sda5             239         761     4200966   82  Linux swap / Solaris
/dev/sda6             762        1236     3815406   83  Linux
/dev/sda7            1237        2150     7341673+  83  Linux
/dev/sda8            2151        2269      955836   83  Linux
/dev/sda9            2270        2743     3807373+  83  Linux
/dev/sda10           2744        4237    12000523+  83  Linux
/dev/sda11           4238       30401   210162298+  83  Linux

Disk /dev/sdb: 250.1 GB, 250059350016 bytes
255 heads, 63 sectors/track, 30401 cylinders
Units = cylinders of 16065 * 512 = 8225280 bytes
Sector size (logical/physical): 512 bytes / 512 bytes
I/O size (minimum/optimal): 512 bytes / 512 bytes
Disk identifier: 0x00000000

Disk /dev/sdb doesn't contain a valid partition table
The partition sizes in human-readable form:
helena:~# df -h

Filesystem            Size  Used Avail Use% Mounted on
/dev/sda1             1.8G  259M  1.5G  15% /
tmpfs                 507M     0  507M   0% /lib/init/rw
udev                  454M  176K  454M   1% /dev
tmpfs                 507M  4.0K  507M   1% /dev/shm
/dev/sda11            198G  188M  188G   1% /export01
/dev/sda9             3.6G  1.1G  2.4G  32% /opt
/dev/sda7             6.9G   16M  6.9G   1% /tmp
/dev/sda10             12G  3.5G  7.3G  32% /usr
/dev/sda6             3.6G  2.1G  1.4G  60% /var
/dev/sda8             919M   13M  860M   2% /var/tmp
Prepare /dev/sdb
The /dev/sdb disk must have exactly the same layout as the already partitioned disk /dev/sda.
helena:~# sfdisk -d /dev/sda | sfdisk /dev/sdb
Checking that no-one is using this disk right now ...
OK

Disk /dev/sdb: 30401 cylinders, 255 heads, 63 sectors/track

sfdisk: ERROR: sector 0 does not have an msdos signature
 /dev/sdb: unrecognized partition table type
Old situation:
No partitions found
New situation:
Units = sectors of 512 bytes, counting from 0

   Device Boot    Start       End   #sectors  Id  System
/dev/sdb1   *        63   3823469    3823407  83  Linux
/dev/sdb2       3823470 488392064  484568595   5  Extended
/dev/sdb3             0         -          0   0  Empty
/dev/sdb4             0         -          0   0  Empty
/dev/sdb5       3823533  12225464    8401932  82  Linux swap / Solaris
/dev/sdb6      12225528  19856339    7630812  83  Linux
/dev/sdb7      19856403  34539749   14683347  83  Linux
/dev/sdb8      34539813  36451484    1911672  83  Linux
/dev/sdb9      36451548  44066294    7614747  83  Linux
/dev/sdb10     44066358  68067404   24001047  83  Linux
/dev/sdb11     68067468 488392064  420324597  83  Linux
Successfully wrote the new partition table

Re-reading the partition table ...

If you created or changed a DOS partition, /dev/foo7, say, then use dd(1)
to zero the first 512 bytes:  dd if=/dev/zero of=/dev/foo7 bs=512 count=1
(See fdisk(8).)
Double check with fdisk -l that both /dev/sda and /dev/sdb have the same layout. Change the partition type of the partitions on /dev/sdb to Linux raid autodetect (0xfd):
for partition in 1 5 6 7 8 9 10 11; do sfdisk --change-id /dev/sdb $partition fd; done
Zap any previous RAID installations on /dev/sdb by running:
helena:~# for partition in 1 5 6 7 8 9 10 11; do mdadm --zero-superblock /dev/sdb$partition; done
mdadm: Unrecognised md component device - /dev/sdb1
mdadm: Unrecognised md component device - /dev/sdb5
mdadm: Unrecognised md component device - /dev/sdb6
mdadm: Unrecognised md component device - /dev/sdb7
mdadm: Unrecognised md component device - /dev/sdb8
mdadm: Unrecognised md component device - /dev/sdb9
mdadm: Unrecognised md component device - /dev/sdb10
mdadm: Unrecognised md component device - /dev/sdb11
The errors are nothing to be worried about.
Create the raid array
Because /dev/sda is currently in use we can’t include it in the mirror creation. We rather use a placeholder until we are able to integrate it. Note that the /dev/sda1 partition is bootable so we must take care to specify a non-default (0.90) metadata value to amadm:
helena:~# mdadm --create /dev/md1 --metadata=0.90 --level=1 --raid-disks=2 missing /dev/sdb1
mdadm: array /dev/md1 started.
No such thing is necessary for /dev/sdb[5–11].
helena:~# for partition in 5 6 7 8 9 10 11; do mdadm --create /dev/md$partition --level=1 --raid-disks=2 missing /dev/sdb$partition; done
helena:~# mdadm --create /dev/md<X> --level=1 --raid-disks=2 missing /dev/sdb<X>
mdadm: Note: this array has metadata at the start and
    may not be suitable as a boot device.  If you plan to
    store '/boot' on this device please ensure that
    your boot-loader understands md/v1.x metadata, or use
    --metadata=0.90
Continue creating array? y
mdadm: Defaulting to version 1.2 metadata
mdadm: array /dev/md5 started.
The /proc/mdstat should show:
helena:~# cat /proc/mdstat
Personalities : [linear] [multipath] [raid0] [raid1] [raid6] [raid5] [raid4] [raid10]
md11 : active (auto-read-only) raid1 sdb11[1]
      210161138 blocks super 1.2 [2/1] [_U]

md10 : active (auto-read-only) raid1 sdb10[1]
      11999427 blocks super 1.2 [2/1] [_U]

md9 : active (auto-read-only) raid1 sdb9[1]
      3806337 blocks super 1.2 [2/1] [_U]

md8 : active (auto-read-only) raid1 sdb8[1]
      955824 blocks super 1.2 [2/1] [_U]

md7 : active (auto-read-only) raid1 sdb7[1]
      7340637 blocks super 1.2 [2/1] [_U]

md6 : active (auto-read-only) raid1 sdb6[1]
      3814370 blocks super 1.2 [2/1] [_U]

md5 : active (auto-read-only) raid1 sdb5[1]
      4199930 blocks super 1.2 [2/1] [_U]

md1 : active (auto-read-only) raid1 sdb1[1]
      1911616 blocks [2/1] [_U]

unused devices: <none>
Create filesystems on the RAID arrays (ext3 on /dev/md{1,5,6,9,10,11}, ext2 on /dev/md{7,8} and swap on /dev/md5):
helena:~# for i in 1 6 9 10 11; do mkfs.ext3 /dev/md$i ; done

mkfs.ext3 /dev/md1
mke2fs 1.41.12 (17-May-2010)
Filesystem label=
OS type: Linux
Block size=4096 (log=2)
Fragment size=4096 (log=2)
Stride=0 blocks, Stripe width=0 blocks
119520 inodes, 477904 blocks
23895 blocks (5.00%) reserved for the super user
First data block=0
Maximum filesystem blocks=490733568
15 block groups
32768 blocks per group, 32768 fragments per group
7968 inodes per group
Superblock backups stored on blocks:
        32768, 98304, 163840, 229376, 294912

Writing inode tables: done
Creating journal (8192 blocks): done
Writing superblocks and filesystem accounting information: done

This filesystem will be automatically checked every 25 mounts or
180 days, whichever comes first.  Use tune2fs -c or -i to override.

[...]

helena:~# for i in 7 8; do mkfs.ext2 /dev/md$i ; done

helena:~# mkswap /dev/md5
mkswap: /dev/md5: warning: don't erase bootbits sectors
        on whole disk. Use -f to force.
Setting up swapspace version 1, size = 4199924 KiB
no label, UUID=bbaf0967-190c-423d-8356-75a6d5e1d20a
Update /etc/mdadm/mdadm.conf to reflect our new raid arrays:
helena:~# mdadm --examine --scan >> /etc/mdadm/mdadm.conf
The file created above will contain raid devices like /dev/md/5. I think that even if the devices do not exist at the moment, at the next reboot udev will make them. And maybe it’s an effect of having metadata version value to 0.90 for /dev/md1 and 1.2 for the other devices. Feel free to enlighten me!
helena:~# cat /etc/mdadm/mdadm.conf
# mdadm.conf
#
# Please refer to mdadm.conf(5) for information about this file.
#

# by default, scan all partitions (/proc/partitions) for MD superblocks.
# alternatively, specify devices to scan, using wildcards if desired.
DEVICE partitions

# auto-create devices with Debian standard permissions
CREATE owner=root group=disk mode=0660 auto=yes

# automatically tag new arrays as belonging to the local system
HOMEHOST <system>

# instruct the monitoring daemon where to send mail alerts
MAILADDR root

# This file was auto-generated on Tue, 07 Sep 2010 21:08:30 +0000
# by mkconf $Id$
ARRAY /dev/md1 UUID=44a49686:11c13704:c2adfd08:852098b4
ARRAY /dev/md/5 metadata=1.2 UUID=5e0d6cb4:b91045ca:ce066634:2d73cf0a name=helena:5
ARRAY /dev/md/6 metadata=1.2 UUID=df47da9a:8d9876a5:37e454a6:488ea34a name=helena:6
ARRAY /dev/md/7 metadata=1.2 UUID=220b5da4:09d44668:a0ac98a8:878e66fb name=helena:7
ARRAY /dev/md/8 metadata=1.2 UUID=efd8d357:99aa024b:7a8eaaf6:3aa49ae4 name=helena:8
ARRAY /dev/md/9 metadata=1.2 UUID=a48e31e5:12a16f96:1a062c71:01a32928 name=helena:9
ARRAY /dev/md/10 metadata=1.2 UUID=8cf6d87c:10e2b495:24fd62f7:695cc01b name=helena:10
ARRAY /dev/md/11 metadata=1.2 UUID=f39c5e3a:a0d1d0b3:024609d6:e3a0384b name=helena:11
Add the following to /etc/initramfs-tools/modules
raid1
md_mod
It’s not enterily clear to me if the md_mod module has to be included…
Reconfigure mdadm
helena:~# dpkg-reconfigure mdadm
Make sure to select ‘all’ for the boot device scanning when you reconfigure mdadm. Note that the ramdisk image should be rebuilt at the last stage of the reconfigure step.
Update GRUB’s menu.lst file
Edit /boot/grub/menu.lst and make an extra copy of the first boot entry and change the root entry to refer the second disk (hd1,0) and replace the root=UUID in the kernel stanza to refer the UUID of the device /dev/md1
title Debian GNU/Linux, kernel 2.6.32–5−686 Raid (hd1)
root (hd1,0)
kernel /boot/vmlinuz-2.6.32–5−686 root=UUID=4470430f-0b61–41b5–97b7-ba2f209aff55 ro quiet
initrd /boot/initrd.img-2.6.32–5−686
title Debian GNU/Linux, kernel 2.6.32–5−686
root (hd0,0)
kernel /boot/vmlinuz-2.6.26–2−686 root=UUID=f91fb906-f144–423d-a5db-b3a917f16155 ro quiet
initrd /boot/initrd.img-2.6.26–2−686
title Debian GNU/Linux, kernel 2.6.32–5−686 (single-user mode)
root (hd0,0)
kernel /boot/vmlinuz-2.6.32–5−686 root=UUID=f91fb906-f144–423d-a5db-b3a917f16155 ro single
initrd /boot/initrd.img-2.6.32–5−686
(:sourceend:)
Finally add the line fallback 1 at the top.
Setup the GRUB bootloader
helena~:# grub
Probing devices to guess BIOS drives. This may take a long time.


    GNU GRUB  version 0.97  (640K lower / 3072K upper memory)

       [ Minimal BASH-like line editing is supported.   For
         the   first   word,  TAB  lists  possible  command
         completions.  Anywhere else TAB lists the possible
         completions of a device/filename. ]
grub> root (hd0,0)
root (hd0,0)
 Filesystem type is ext2fs, partition type 0x83
grub> setup (hd0)
setup (hd0)
 Checking if "/boot/grub/stage1" exists... yes
 Checking if "/boot/grub/stage2" exists... yes
 Checking if "/boot/grub/e2fs_stage1_5" exists... yes
 Running "embed /boot/grub/e2fs_stage1_5 (hd0)"...  17 sectors are embedded.
succeeded
 Running "install /boot/grub/stage1 (hd0) (hd0)1+17 p (hd0,0)/boot/grub/stage2 /boot/grub/menu.lst"... succeeded
Done.
grub> root (hd1,0)
root (hd1,0)
 Filesystem type is ext2fs, partition type 0xfd
grub> setup (hd1)
setup (hd1)
 Checking if "/boot/grub/stage1" exists... yes
 Checking if "/boot/grub/stage2" exists... yes
 Checking if "/boot/grub/e2fs_stage1_5" exists... yes
 Running "embed /boot/grub/e2fs_stage1_5 (hd1)"...  17 sectors are embedded.
succeeded
 Running "install /boot/grub/stage1 (hd1) (hd1)1+17 p (hd1,0)/boot/grub/stage2 /boot/grub/menu.lst"... succeeded
Done.
grub> quit
quit
List the stuff in the init ramdisk
helena:~# lsinitramfs /boot/initrd.img-$(uname -r)
and make absolutely sure that the raid1 and md_mod kernel modules are included in the ramdisk. If they are not there the system won’t be able to boot because it won’t find where to boot from: the chicken and egg problem. Make also sure that the udev rules for the md devices are there /lib/udev/rules.d/64-md-raid.rules.
You can also double check that the initramfs image on /boot/initrd.img-`uname -r` has a /etc/mdadm/mdadm.conf that contains the right information.
Check the device.map file
Make sure that /boot/grub/device.map contains the right devices for your first and second drive as otherwize an eventual update-grub will fail.
helena:~# cat /boot/grub/device.map
(hd0)   /dev/sda
(hd1)   /dev/sdb
The full story is described in http://www.mail-archive.com/debian-bugs-dist@lists.debian.org/msg573946.html
You can fix that by running the command grub-mkdevicemap --no-floppy.
Update /etc/fstab
Use the command blkid to get the UUIDs of the raid devices.
helena:~# blkid /dev/md{1,5,6,7,8,9,10,11}
/dev/md1: UUID="02235287-8562-4eda-be41-08c9fe4913ac" SEC_TYPE="ext2" TYPE="ext3"
/dev/md5: UUID="88503ff7-dba6-435d-96d6-477aeb8f60d0" TYPE="swap"
/dev/md6: UUID="98a6162a-477e-4e9e-a522-c33b752cf3d0" SEC_TYPE="ext2" TYPE="ext3"
/dev/md7: UUID="216ea663-8e8e-4bb4-a4ee-3f393c7d3dd0" TYPE="ext2"
/dev/md8: UUID="bda0ab2e-28bd-44ec-8bd5-a6aa7d0cd857" TYPE="ext2"
/dev/md9: UUID="e2bf73ec-e761-4c8d-bfc7-eeb5e8806bc7" SEC_TYPE="ext2" TYPE="ext3"
/dev/md10: UUID="2d4081b2-b81a-421b-9fe7-7d1a60eade7c" SEC_TYPE="ext2" TYPE="ext3"
/dev/md11: UUID="da454951-0a7b-48f6-9e40-c9a89ac5aadd" SEC_TYPE="ext2" TYPE="ext3"
and replace the fstab entries with them.
helena:~# cat /etc/fstab
# /etc/fstab: static file system information.
#
#<file sys>          <mount point>     <type>   <options>   <dump>   <pass>
#/dev/sda1    /                 ext3    rw,errors=remount-ro  0    1
#UUID=932a6195-29c0-4ae4-866c-9f942f88232c    /                 ext3    rw,errors=remount-ro  0    1
#/dev/sda5    none              swap    rw        0    0
#UUID=caa5ec52-0acb-4aeb-9619-10cf83ac1f4c    none              swap    rw        0    0
#proc         /proc             proc    rw,nosuid,noexec  0    0
#/dev/sda11   /export01         ext3    rw        0    2
#UUID=cf8a596c-ceb7-4660-a6cc-0b45bd5aa777   /export01         ext3    rw        0    2
#/dev/sda9    /opt              ext3    rw        0    2
#UUID=37e53cc6-0962-435c-9dfd-11f4f06e5580    /opt              ext3    rw        0    2
#/dev/sda7    /tmp              ext2    rw        0    2
#UUID=4c5e59a5-e518-4ab5-a7c1-91156a3a6a8e    /tmp              ext2    rw        0    2
#/dev/sda10   /usr              ext3    rw        0    2
#UUID=b847e157-062f-44c5-baca-c35aadb4446b   /usr              ext3    rw        0    2
#/dev/sda6    /var              ext3    rw        0    2
#UUID=5360a59d-26b4-42eb-ba07-3ebad5a1e2d5    /var              ext3    rw        0    2
#/dev/sda8    /var/tmp          ext2    rw        0    2
#UUID=27f1dae1-3224-4295-8cbf-2bdf2bd4ea7a    /var/tmp          ext2    rw        0    2
#
# Raid1 mirror
#

# /dev/md1    /                 ext3    rw,errors=remount-ro  0    1
UUID=02235287-8562-4eda-be41-08c9fe4913ac    /                 ext3    rw,errors=remount-ro  0    1
# /dev/md5    none              swap    rw        0    0
UUID=88503ff7-dba6-435d-96d6-477aeb8f60d0    none              swap    rw        0    0
proc         /proc             proc    rw,nosuid,noexec  0    0
# /dev/md11   /export01         ext3    rw        0    2
UUID=da454951-0a7b-48f6-9e40-c9a89ac5aadd   /export01         ext3    rw        0    2
# /dev/md9    /opt              ext3    rw        0    2
UUID=e2bf73ec-e761-4c8d-bfc7-eeb5e8806bc7    /opt              ext3    rw        0    2
# /dev/md7    /tmp              ext2    rw        0    2
UUID=216ea663-8e8e-4bb4-a4ee-3f393c7d3dd0    /tmp              ext2    rw        0    2
# /dev/md10   /usr              ext3    rw        0    2
UUID=2d4081b2-b81a-421b-9fe7-7d1a60eade7c   /usr              ext3    rw        0    2
# /dev/md6    /var              ext3    rw        0    2
UUID=98a6162a-477e-4e9e-a522-c33b752cf3d0    /var              ext3    rw        0    2
# /dev/md8    /var/tmp          ext2    rw        0    2
UUID=bda0ab2e-28bd-44ec-8bd5-a6aa7d0cd857    /var/tmp          ext2    rw        0    2

usbfs  /proc/bus/usb  usbfs  defaults
/dev/fd0  /floppy  auto  users,noauto 0 0
Mount the raid devices on a temporary mount point and copy data sda → sdb
helena:~# for i in 1 6 9 10 11; do mkdir /mnt/md$i; mount -t ext3 /dev/md$i /mnt/md$i ; done
helena:~# for i in 7 8; do mkdir /mnt/md$i; mount -t ext2 /dev/md$i /mnt/md$i ; done
helena:~# cd /
helena:/# cp -dpRx . /mnt/md1
and repeat for all the mirror pieces. You can use rsync if you want. Just make sure not to cross mount points while duplicating /dev/sda to /dev/sdb.
Take a cortico-thalamic pause, pray, and reboot.
First, let’s review what has been done above.
- The /dev/sda partition layout is duplicated to a new disk that will used for the new raid1.
- A raid1 in degraded mode is created with the new disk, the missing mirror part being the currently-in-use system disk /dev/sda.
- The grub configuration menu is updated by adding a new entry using the degraded mirror for the root= parameter.
- The grub boot loader is written on both disk.
- The fstab is updated by using the UUIDs of the degraded mirror for the system disks entries.
- The degraded mirror in mounted on a temporary mount point and the system disk is duplicated on it.
Reboot using the degraded mirror disk containing only /dev/sdb. The next sections will show how to insert /dev/sda in the mirror.
Update the partition type for the 1st disk /dev/sda
helena:~# for partition in 1 5 6 7 8 9 10 11; do sfdisk --change-id /dev/sda $partition fd; done
Complete the mirrors
helena:~# for p in 1 5 6 7 8 9 10 11; do mdadm --add /dev/md$p /dev/sda$p; done
mdadm: re-added /dev/sda1
mdadm: re-added /dev/sda5
mdadm: re-added /dev/sda6
mdadm: re-added /dev/sda7
mdadm: re-added /dev/sda8
mdadm: re-added /dev/sda9
mdadm: re-added /dev/sda10
mdadm: re-added /dev/sda11

helena:~# cat /proc/mdstat
Personalities : [raid1]
md11 : active raid1 sda11[2] sdb11[1]
      210161138 blocks super 1.2 [2/2] [UU]

md10 : active raid1 sda10[2] sdb10[1]
      11999427 blocks super 1.2 [2/2] [UU]

md9 : active raid1 sda9[2] sdb9[1]
      233367031 blocks super 1.2 [2/1] [_U]
        resync=DELAYED

md8 : active raid1 sda8[2] sdb8[1]
      393549 blocks super 1.2 [2/1] [_U]
        resync=DELAYED

md7 : active (auto-read-only) raid1 sda7[2] sdb7[1]
      2272130 blocks super 1.2 [2/2] [UU]

md6 : active raid1 sda6[2] sdb6[1]
      2930795 blocks super 1.2 [2/1] [_U]
        resync=DELAYED

md5 : active raid1 sda5[2] sdb5[1]
      4882692 blocks super 1.2 [2/1] [_U]
        resync=DELAYED

md1 : active raid1 sda1[2] sdb1[1]
      345280 blocks [2/1] [_U]
      [===>.................]  recovery = 18.6% (64896/345280) finish=0.2min speed=21632K/sec

unused devices: <none>
Update /etc/mdadm/mdadm.conf
helena~:# /usr/share/mdadm/mkconf > /etc/mdadm/mdadm.conf
Final update to GRUB
Update the grub menu.lst for the second entry (the one for hd0) such that it has the right UUID argument value in root=UUID= corresponding to the UUID of the raid1 block device /dev/md1. While at it, might as well add a 4th entry for a single-user mode using the second disk hd1.
title Debian GNU/Linux, kernel 2.6.32–5−686 Raid (hd1)
root (hd1,0)
kernel /boot/vmlinuz-2.6.32–5−686 root=UUID=4470430f-0b61–41b5–97b7-ba2f209aff55 ro quiet
initrd /boot/initrd.img-2.6.32–5−686
title Debian GNU/Linux, kernel 2.6.32–5−686 Raid (hd0)
root (hd0,0)
kernel /boot/vmlinuz-2.6.26–2−686 root=UUID=4470430f-0b61–41b5–97b7-ba2f209aff55 ro quiet
initrd /boot/initrd.img-2.6.26–2−686
title Debian GNU/Linux, kernel 2.6.32–5−686 (single-user mode) (hd1)
root (hd1,0)
kernel /boot/vmlinuz-2.6.32–5−686 root=UUID=4470430f-0b61–41b5–97b7-ba2f209aff55 ro single
initrd /boot/initrd.img-2.6.32–5−686
title Debian GNU/Linux, kernel 2.6.32–5−686 (single-user mode) (hd0)
root (hd0,0)
kernel /boot/vmlinuz-2.6.32–5−686 root=UUID=4470430f-0b61–41b5–97b7-ba2f209aff55 ro single
initrd /boot/initrd.img-2.6.32–5−686
(:sourceend:)
Testing, Testing, 1,2 3…
- Test if you can boot from all the grub menu entries.
- Redo the above without the first disk. If the host has hot-swappable disks, just pop the first one. If not, power off the host and disconnect the first drive and restart the system.
- Test if you can boot from all the grub menu entries (the ones with Raid1 (hd0) should fail to boot).
- Reinsert the first drive (or power off the system and reconnect the first drive).
- Rebuild the mirror array with
mdadm --add /dev/md<X> /dev/sda<X>. Make sure to pick the right scsi disc device! - Check status with cat /proc/mdstat and power off the host only once the disk array is fully back online!
- Redo the same tests above but without the second drive.
- The fallback 1 from the grub menu.lst should allow the system to automatically boot from the second grub entry Raid1 (hd0) if the second disk is ever missing/dead.
Mirror Drive replacement procedure in case of failure
If you have read and understood all the above, then the procedure is self-evident:
- Remove failed drive and insert a new one.
- Partition it exactly as the living one.
- Change the partition type to 0xfd.
- Zero-in the superblocks of all the new disk partitions with
mdadm --zero-superblock. - Make the partitions filesystems.
- Add the the new disk partitions to the existing degraded mirror array:
mdadm --add /dev/md<X> /dev/sd<Y><X>. Replace X and Y by relevant values! - Add the grub bootloader to the new disk
Upgrades and updates
Be extremely careful if you run update-grub or if you upgrade the kernel. The first might clobber /boot/grub/menu.lst and render your system incapable of booting!
Network Configuration
Stuff the following in the file /etc/network/interfaces for helena:
- local loopback
auto lo
iface lo inet loopback
- eth0 - wan
auto eth0
iface eth0 inet static
  address 132.206.178.60
  netmask 255.255.255.0
  broadcast 132.206.178.255
  gateway 132.206.178.1
- eth1 - drbd pt2pt replication link
auto eth1
iface eth1 inet static
  address 10.0.0.2
  netmask 255.0.0.0
  broadcast 10.0.0.255
  pointopoint 10.0.0.1
- eth2 - corosync ring
auto eth2
iface eth2 inet static
  address 192.168.1.19
  netmask 255.255.255.0
  broadcast 192.168.1.1
(:sourceend:)
Make sure to change the relevant IP’s for puck.
DRBD Installation and Configuration
Important note: the modules compilations and installation are dependent upon the kernel installed! In this case I have:
ii  libxenstore3.0                                          4.0.1-2                        Xenstore communications library for Xen
ii  linux-headers-2.6.32-5-common-xen                       2.6.32-30                      Common header files for Linux 2.6.32-5-xen
ii  linux-headers-2.6.32-5-xen-amd64                        2.6.32-30                      Header files for Linux 2.6.32-5-xen-amd64
ii  linux-image-2.6.32-5-xen-amd64                          2.6.32-30                      Linux 2.6.32 for 64-bit PCs, Xen dom0 support
ii  xen-hypervisor-4.0-amd64                                4.0.1-2                        The Xen Hypervisor on AMD64
ii  xen-qemu-dm-4.0                                         4.0.1-2                        Xen Qemu Device Model virtual machine hardware emulator
ii  xen-tools                                               4.2-1                          Tools to manage Xen virtual servers
ii  xen-utils-4.0                                           4.0.1-2                        XEN administrative tools
ii  xen-utils-common                                        4.0.0-1                        XEN administrative tools - common files
ii  xenstore-utils                                          4.0.1-2                        Xenstore utilities for Xen
ii  xenwatch                                                0.5.4-2                        Virtualization utilities, mostly for Xen
Check out sources from the public DRBD source repository
(Do this as a non-privileged user)
malin::~> git clone git://git.drbd.org/drbd-8.3.git
malin::~> cd drbd-8.3
malin::~> git checkout drbd-8.3.8
malin::~> dpkg-buildpackage -rfakeroot -b -uc
This build process will create two Debian packages:
- A package containing the DRBD userspace tools, named drbd8-utils_x.y.z-BUILD_ARCH.deb
- A module source package suitable for module-assistant named drbd8-module-source_x.y.z-BUILD_all.deb.
Packages installation and module installation
Install the packages with dpkg and then run module-assistant:
~# module-assistant --text-mode --force auto-install drbd8
I’ve had problems loading the out-of-tree new drbd module on helena when doing an upgrade. I don’t know why but it seems that the in-tree drbd module (8.3.7) requires lru_cache module and while this one is loaded, modprobe will fail to load drbd-8.3.8. My solution is to unload the drbd module, then unload lru_cache, move the in-tree kernel drbd module away, rebuild the depmod file and modprobe drbd. Weird.
Nov  1 15:58:13 helena kernel: [ 1920.589633] drbd: exports duplicate symbol lc_seq_dump_details (owned by lru_cache)
Nov  1 16:10:36 helena kernel: [ 2663.655588] drbd: exports duplicate symbol lc_seq_dump_details (owned by lru_cache)

~# rmmod drbd
~# rmmod lru_cache
~# mv /lib/modules/2.6.32-5-xen-amd64/kernel/drivers/block/drbd/drbd.ko{,8.3.7}
~# depmod -a
~# modprobe drbd
After that the system modules.dep file should contain the following:
~# grep drbd /lib/modules/`uname -r`/modules.dep
kernel/drivers/block/drbd.ko: kernel/drivers/connector/cn.ko
DRBD Storage configuration
Create a raid1 (mirror) with /dev/sdc1 and /dev/sdd1. Just follow the recipe given above in System disk migration to software raid1 (mirror).
The goal here is to utimately have Xen live migration under pacemaker. In order to do this we will create Xen VMs using disk images on a OCFS2 cluster filesystem.
Create one volume group vg_xen spanning the entire raid1 /dev/md0 and create a 24Gb logical volume on it for the VM disk image and the swap file. (Create as many LVMs as you will need Xen guests).
helena:~# pvcreate /dev/md0
  Physical volume "/dev/md0" successfully created

helena:~# vgcreate vg_xen /dev/md0
  Volume group "vg_xen" successfully created

helena:~# lvcreate --size 24G --name xen_lv0 vg_xen
  Logical volume "xen_lv0" created

helena:~# lvcreate --size 24G --name xen_lv1 vg_xen
  Logical volume "xen_lv1" created

helena:~# lvcreate --size 24G --name xen_lv2 vg_xen
  Logical volume "xen_lv2" created

helena:~# pvs
  PV         VG     Fmt  Attr PSize   PFree
  /dev/md0   vg_xen lvm2 a-   465.76g 393.76g

helena:~# vgs
  VG     #PV #LV #SN Attr   VSize   VFree
  vg_xen   1   3   0 wz--n- 465.76g 393.76g

helena:~# lvs
  LV      VG     Attr   LSize  Origin Snap%  Move Log Copy%  Convert
  xen_lv0 vg_xen -wi-ao 24.00g
  xen_lv1 vg_xen -wi-ao 24.00g
  xen_lv2 vg_xen -wi-ao 24.00g
Do exactly the same same on the other node!
DRBD resource r1
- The DRBD replication link is the point-to-point eth1-eth1 connection using 10.0.0.X addresses.
- The become-primary-on both in the startup section and allow-two-primaries in the net section are mandatory for Xen live migration.
- The fencing stuff in the handler is required to avoid split-brain situation when stonith is enabled in the cluster. It is absolutely essential to have fencing enabled in order to avoid potentially disastrous split-brain situations. There might be issues with the handler fencing resource-and-stonith when one has the situation of multiple guests running on different nodes and an event triggers a stonith action. I still haven’t fully understood the implications but suffice to say that a stonith-deathmatch is possible. Another possibility is that the cluster could create resources constraints that prevent one or more guests to run anywhere.
- The al-extents in the syncer section (the Activity Log Extents, 4MB each) is the nearest prime number close to E = (Sync_Rate)*(Sync_Time)/4. I used Sync_Rate = 30MB/s and Sync_Time= 120s yielding 900 (907 is nearest prime).
- The resource configuration file is located in /etc/drbd.d/r1.res and the DRBD config file /etc/drbd.conf is such that all files matching /etc/drbd.d/*.res will be loaded when drbd starts.
(:source:)
- /etc/drbd.d/r1.res
resource r1 {
  device /dev/drbd1;
  disk /dev/vg_xen/xen_lv1;
  meta-disk internal;
  startup {
      degr-wfc-timeout 30;
      wfc-timeout 30;
      become-primary-on both;
  }
  net {
      allow-two-primaries;
      cram-hmac-alg sha1;
      shared-secret “lucid”;
      after-sb-0pri discard-zero-changes;
      after-sb-1pri discard-secondary;
      after-sb-2pri disconnect;
      rr-conflict disconnect;
  }
  disk {
- fencing resource-only;
      fencing resource-and-stonith;
      on-io-error detach;
  }
  handlers {
      fence-peer “/usr/lib/drbd/crm-fence-peer.sh”;
      after-resync-target “/usr/lib/drbd/crm-unfence-peer.sh”;
      outdate-peer “/usr/lib/drbd/outdate-peer.sh”;
      split-brain “/usr/lib/drbd/notify-split-brain.sh root”;
      pri-on-incon-degr “/usr/lib/drbd/notify-pri-on-incon-degr.sh root”;
      pri-lost-after-sb “/usr/lib/drbd/notify-pri-lost-after-sb.sh root”;
      local-io-error “/usr/lib/drbd/notify-io-error.sh root”;
  }
  syncer {
      rate 30M;
      csums-alg sha1;
      al-extents 809;
      verify-alg sha1;
  }
  on puck {
      address 10.0.0.1:7789;
  }
  on helena {
      address 10.0.0.2:7789;
  }
}
(:sourceend:)
Make the obvious changes for the other drbd resources: the resource name, the DRBD block device and the backing device name.
Make absolutely sure to use a unique replication port number (7789 above) for each and single resource! Also, in device=/dev/drbdX the value X MUST be integer (it will be the device minor device number — anything else will trigger a drbd shutdown with massive disruption/corruption. Yes, I tried it and it’s not pretty :)
DRBD/Pacemaker fencing ssh keys:
For the script /usr/lib/drbd/outdate-peer.sh to work (referenced above in the handler section resource conf file) requires a password-less ssh key for the 2 nodes:
puck:~/root/.ssh/authorized_keys:
from="helena,helena.bic.mni.mcgill.ca,132.206.178.60,10.0.0.2,192.168.1.19"...

helena:~/root/.ssh/authorized_keys:
from="puck,puck.bic.mni.mcgill.ca,132.206.178.61,10.0.0.1,192.168.1.18"...
Enabling DRBD resource and initial synchronization
helena:~# dd if=/dev/zero of=/dev/vg_xen/xen_lv1 bs=512 count=1024
1024+0 records in
1024+0 records out
533504 bytes (534 kB) copied, 0.0767713 s, 6.9 MB/s

helena:~# drbdadm create-md r1
Writing meta data...
initializing activity log
NOT initialized bitmap
New drbd meta data block successfully created.

helena:~# modprobe drbd

helena:~# drbdadm attach r1

helena:~# cat /proc/drbd
version: 8.3.8 (api:88/proto:86-94)
GIT-hash: d78846e52224fd00562f7c225bcc25b2d422321d build by root@helena, 2010-09-09 17:41:03

 1: cs:StandAlone ro:Secondary/Unknown ds:Inconsistent/DUnknown   r----
    ns:0 nr:0 dw:0 dr:0 al:0 bm:0 lo:0 pe:0 ua:0 ap:0 ep:1 wo:b oos:65009692

helena:~# drbdadm syncer r1

helena:~# cat /proc/drbd
version: 8.3.8 (api:88/proto:86-94)
GIT-hash: d78846e52224fd00562f7c225bcc25b2d422321d build by root@helena, 2010-09-09 17:41:03

 1: cs:StandAlone ro:Secondary/Unknown ds:Inconsistent/DUnknown   r----
    ns:0 nr:0 dw:0 dr:0 al:0 bm:0 lo:0 pe:0 ua:0 ap:0 ep:1 wo:b oos:65009692

helena:~# drbdadm connect r1
Do the same steps on the second node. The attach/syncer/connect steps can be done using drbdadm up resource.The DRBD state should then be like:
helena:~# cat /proc/drbd
version: 8.3.8 (api:88/proto:86-94)
GIT-hash: d78846e52224fd00562f7c225bcc25b2d422321d build by root@helena, 2010-09-09 17:41:03
 1: cs:Connected ro:Secondary/Secondary ds:Inconsistent/Inconsistent C r----
    ns:0 nr:0 dw:0 dr:0 al:0 bm:0 lo:0 pe:0 ua:0 ap:0 ep:1 wo:b oos:67106780
If the devices are empty (no data) there is no prefered node to do the following but it must be done on only one of them!
helena:~# drbdadm -- --overwrite-data-of-peer primary r1
helena:~# cat /proc/drbd
version: 8.3.8 (api:88/proto:86-94)
GIT-hash: d78846e52224fd00562f7c225bcc25b2d422321d build by root@helena, 2010-09-09 17:41:03
 1: cs:SyncSource ro:Primary/Secondary ds:UpToDate/Inconsistent C r----
    ns:32 nr:0 dw:0 dr:81520 al:0 bm:4 lo:0 pe:0 ua:0 ap:0 ep:1 wo:b oos:67025468
        [>....................] sync'ed:  0.2% (65452/65532)M delay_probe: 0
        finish: 0:41:04 speed: 27,104 (27,104) K/sec
Do the same for all the other drbd resources. Note that a drbd device has to be in primary mode in order to mount an ocfs2 filesystem on it.
Manually Resolving a Split-Brain Situation
See http://www.drbd.org/users-guide/s-resolve-split-brain.html.
I will just copy what’s in the drbd user guide:
Manual split brain recovery
DRBD detects split brain at the time connectivity becomes available again and the peer nodes exchange the initial DRBD protocol handshake. If DRBD detects that both nodes are (or were at some point, while disconnected) in the primary role, it immediately tears down the replication connection. The tell-tale sign of this is a message like the following appearing in the system log:
Split-Brain detected, dropping connection!
After split brain has been detected, one node will always have the resource in a StandAlone connection state. The other might either also be in the StandAlone state (if both nodes detected the split brain simultaneously), or in WFConnection (if the peer tore down the connection before the other node had a chance to detect split brain).
At this point, unless you configured DRBD to automatically recover from split brain, you must manually intervene by selecting one node whose modifications will be discarded (this node is referred to as the split brain victim). This intervention is made with the following commands:
~# drbdadm secondary resource
~# drbdadm -- --discard-my-data connect resource
On the other node (the split brain survivor), if its connection state is also StandAlone, you would enter:
~# drbdadm connect resource
You may omit this step if the node is already in the WFConnection state; it will then reconnect automatically. If the resource affected by the split brain is a stacked resource, use drbdadm --stacked instead of just drbdadm. Upon connection, your split brain victim immediately changes its connection state to SyncTarget, and has its modifications overwritten by the remaining primary node.
After re-synchronization has completed, the split brain is considered resolved and the two nodes form a fully consistent, redundant replicated storage system again.
OCFS2 Cluster Filesystem Setup
Stuff the following in /etc/ocfs2/cluster.conf
(:source:)
node:
       name = puck
       cluster = ocfs2
       number = 0
       ip_address = 192.168.1.18
       ip_port = 7777
node:
       name = helena
       cluster = ocfs2
       number = 1
       ip_address = 192.168.1.19
       ip_port = 7777
cluster:
       name = ocfs2
       node_count = 2
(:sourceend:)
This file syntax is very strict on white space, tabs and carriage returns between stanzas. In fact it such apita that it’s better to use ocfs2console. Then reconfigure with dpkg-reconfigure ocfs2-tools. If succesfull the init scrip should start the ocfs2 servives:
node1~#: /etc/init.d/o2cb start
Loading filesystem "configfs": OK
Mounting configfs filesystem at /sys/kernel/config: OK
Loading stack plugin "o2cb": OK
Loading filesystem "ocfs2_dlmfs": OK
Mounting ocfs2_dlmfs filesystem at /dlm: OK
Setting cluster stack "o2cb": OK
Starting O2CB cluster ocfs2: OK
At that point you can either use the command line or the OCFS2 gui ocsf2console to format an OCFS2 filesystem and mount it. In the gui select the already synced drbd device /dev/drbd1, format it and after making a mount point (/xen_cluster) just mount it. You might have to restart the ocfs2 servives. I have seen kernel oops with this though while running previous kernels (2.6.32–21) and a reboot was necessary at that point. I now prefer to do this manually on the command line. In the mkfs lines below the flag -N <X> indicates the maximum number of nodes that can mount the partition. See the OCFS2 man pages for more details. Use 2, (default value is 4) or you can always use tune2fs.ocfs2 to modify it later.
node1~#: mkfs -t ocfs2 -N 2 /dev/drbd1
node1~#: mount -t ocfs2 /dev/drbd1 /xen_cluster/r1
node1~#: mkfs -t ocfs2 -N 2 /dev/drbd2
node1~#: mount -t ocfs2 /dev/drbd2 /xen_cluster/r2
On the secondary drbd node: promote drbd to primary and mount the ocfs2 filesystem. No need to format them as they are in OCFS2 cluster and the other node is aware of it. The following command will show the state of the OCFS2 shared partitions between the nodes:
node1:~# mounted.ocfs2 -f
Device                FS     Nodes
/dev/mapper/xen_vg-xen_lv1  ocfs2  node1, node2
/dev/mapper/xen_vg-xen_lv2  ocfs2  node1, node2
/dev/drbd1            ocfs2  node1, node2
/dev/drbd2            ocfs2  node1, node2
Note: To use GFS rather than OCFS2 the link http://gfs.wikidev.net/DRBD_Cookbook is a good tutorial to setup GFS with DRBD. It’s RH centric but should be easily adapted to Debian.
Xen Setup
A good tutorial for Xen on Lenny 64bit can be found at http://www.howtoforge.com/virtualization-with-xen-on-debian-lenny-amd64.
Some notes on Xen-4.0 for Debian/Squeeze http://wiki.xensource.com/xenwiki/Xen4.0
Xen boot Serial Console Redirection
Setup a serial console on a laptop to possibly capture Xen kernel boot messages. Use the following grub menu.lst stanza (replace the root=UUID= with your boot disk):
title Raid1 (hd1) Xen 4.0-amd64 / Debian GNU/Linux, kernel 2.6.32–5-xen-amd64 / Serial Console
root (hd1,0)
kernel /boot/xen-4.0-amd64.gz dom0_mem=2048M dom0_max_vcpus=2 dom0_vcpus_pin loglvl=all guest_loglvl=all sync_console console_to_ring console=vga com1=38400,8n1 console=com1
module /boot/vmlinuz-2.6.32–5-xen-amd64 root=UUID=c0186fd3–605d-4a23-b718–3b4c869040e2 ro console=hvc0 earlyprintk=xen nomodeset
module /boot/initrd.img-2.6.32–5-xen-amd64
(:sourceend:)
This uses the first onboard serial port (COM1) on the host with a baud rate of 38400Bd with 8 databits, no parity and 1 stopbit.
The pv_ops dom0 Linux kernel is configured to use the Xen (hvc0) console. Dom0 Linux kernel console output will go to the serial console through Xen, so both Xen hypervisor and dom0 linux kernel output will go to the same serial console, where they can then be captured. More info can be found on the Xen Wiki http://wiki.xensource.com/xenwiki/XenSerialConsole.
Note in the above that dom0 memory is restricted to 2Gb (dom0_mem=2048M) and will use up to 2 virtual cpus (dom0_max_vcpus=2) and they are pinned with dom0_vcpus_pin. See the section below Xen VCPUs Memory Management for extra info.
The Xen boot options can be found here http://wiki.xensource.com/xenwiki/XenHypervisorBootOptions. Note that this is WorK In Progress (TM).
Use the following grub menu entry to hide the Xen boot messages and send the guest boot messages to the console (as usual) but keep the debug info for the Dom0 and the guests:
title Raid1 (hd1) Xen 4.0-amd64 / Debian GNU/Linux, kernel 2.6.32–5-xen-amd64
root (hd1,0)
kernel /boot/xen-4.0-amd64.gz dom0_mem=2048M dom0_max_vcpus=2 loglvl=all guest_loglvl=all console=tty0
module /boot/vmlinuz-2.6.32–5-xen-amd64 root=UUID=c0186fd3–605d-4a23-b718–3b4c869040e2 ro
module /boot/initrd.img-2.6.32–5-xen-amd64
(:sourceend:)
Here is a procedure to gather information in case of a kernel hang:
- In the Linux kernel, hit SysRq-L, SysRq-T
- Go in the hypervisor, hit Ctrl-A three times.
You should see a prompt saying (XEN) ** Serial …
- Hit * - that will collect all of the relevant information.
Network Bridging
Network bridging can be illustrated by this diagram (stolen from the the Xen wiki site http://wiki.xen.org/xenwiki/XenNetworking)
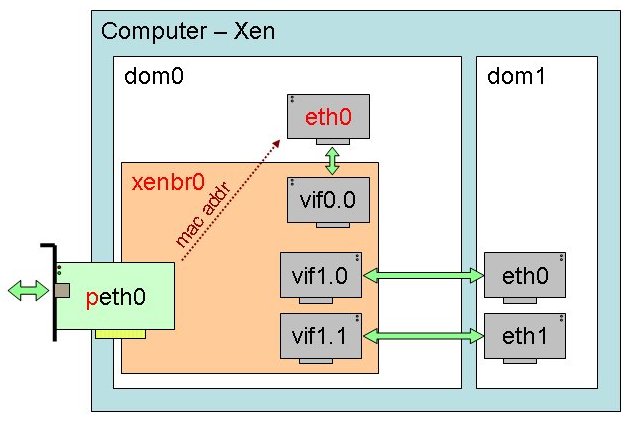
Here is the chain of events that happens when Xend starts up and runs the network-bridge script on the dom0:
- creates a new bridge named xenbr0
- “real” ethernet interface eth0 is brought down
- the IP and MAC addresses of eth0 are copied to virtual network interface veth0
- real interface eth0 is renamed peth0
- virtual interface veth0 is renamed eth0
- peth0 and vif0.0 are attached to bridge xenbr0. Please notice that in xen 3.3 and 4.0.x, the default bridge name is the same than the interface it is attached to. Eg: bridge name eth0, eth1 or ethX.VlanID
- the bridge, peth0, eth0 and vif0.0 are brought up
Enable network bridging for Xend by commenting out (network-script network-bridge) in /etc/xen/xend-config.sxp. Make sure to specify the netdev option with the proper value if there is more than one physical network interface.
(network-script 'network-bridge netdev=eth0')
Reboot. Have a look at http://wiki.xen.org/xenwiki/XenNetworking for an explanation of the different network setups and topologies for Xen.
as it is the case here.
Xen /dev and /proc files
Verify that Xend is well and running and that /proc/xen filesystem is mounted:
node1~: ls -l /proc/xen
-r--r--r-- 1 root root 0 Sep 15 13:42 capabilities
-rw------- 1 root root 0 Sep 15 13:42 privcmd
-rw------- 1 root root 0 Sep 15 13:42 xenbus
-rw------- 1 root root 0 Sep 15 13:42 xsd_kva
-rw------- 1 root root 0 Sep 15 13:42 xsd_port

node1~: cat /proc/xen/capabilities
control_d
The control_d means that you are in the Xen Dom0 (control domain). You should have the following devices in /dev/xen
crw------- 1 root root 10, 56 Sep 15 13:42 evtchn
crw------- 1 root root 10, 62 Sep 15 13:42 gntdev
and their minor/major device numbers should correspond to those in /proc/misc
56 xen/evtchn
62 xen/gntdev
Xend and xen-tools Configuration
Some default installation settings must be changed if one wants to have live migration and ultimately to have it supervized by pacemaker. It is important to restrict which host can issue a relocation request with (xend-relocation-hosts-allow ‘ ’) and be sure to check that there is no typo in there!
(:source:)
puck:~# ~malin/bin/crush /etc/xen/xend-config.sxp
(xend-http-server yes)
(xend-unix-server yes)
(xend-relocation-server yes)
(xend-port 8000)
(xend-relocation-port 8002)
(xend-address localhost)
(xend-relocation-address ‘ ’)
- (xend-relocation-hosts-allow ‘localhost helena\.bic\.mni\.mcgill\.ca puck\.bic\.mni\.mcgill\.ca’)
(xend-relocation-hosts-allow ‘^localhost$ ^helena\\.bic\\.mni\\.mcgill\\.ca$ ^puck\\.bic\\.mni\\.mcgill\\.ca$ ^132\\.206\\.178\\.60$ ^132\\.206\\.178\\.61$’)
(network-script ‘network-bridge netdev=eth0’)
(vif-script vif-bridge)
(dom0-min-mem 2048)
(enable-dom0-ballooning no)
(total_available_memory 0)
(dom0-cpus 0)
(vncpasswd ‘ ’)
(:sourceend:)
(:source:)
puck:~# ~malin/bin/crush /etc/xen-tools/xen-tools.conf
lvm = xen
install-method = debootstrap
install-method = debootstrap
debootstrap-cmd = /usr/sbin/debootstrap
size = 20Gb
memory = 2Gb
swap = 3Gb
fs = ext3
dist = `xt-guess-suite-and-mirror —suite`
image = full
gateway = 132.206.178.1
netmask = 255.255.255.0
broadcast = 132.206.178.255
nameserver = 132.206.178.7
bridge = eth0
kernel = /boot/vmlinuz-`uname -r`
initrd = /boot/initrd.img-`uname -r`
arch = amd64
mirror = `xt-guess-suite-and-mirror —mirror`
ext3_options = noatime,nodiratime,errors=remount-ro
ext2_options = noatime,nodiratime,errors=remount-ro
xfs_options = defaults
reiserfs_options = defaults
btrfs_options = defaults
serial_device = hvc0
disk_device = xvda
output = /etc/xen
extension = .cfg
copyhosts = 1
(:sourceend:)
(:source:)
puck:~# ~malin/bin/crush /etc/default/xendomains
XENDOMAINS_SYSRQ=“ ”
XENDOMAINS_USLEEP=100000
XENDOMAINS_CREATE_USLEEP=5000000
XENDOMAINS_MIGRATE=“ ”
XENDOMAINS_SAVE=/var/lib/xen/save
XENDOMAINS_SHUTDOWN=“—halt —wait”
XENDOMAINS_SHUTDOWN_ALL=“—all —halt —wait”
XENDOMAINS_RESTORE=true
XENDOMAINS_AUTO=/etc/xen/auto
XENDOMAINS_AUTO_ONLY=false
XENDOMAINS_STOP_MAXWAIT=300
(:sourceend:)
See http://wiki.xensource.com/xenwiki/XenBestPractices for more info. It’s best to allocate a fixed amount of memory to the Dom0 (dom0-min-mem 2048) and also to disable dom0 memory ballooning with the setting (enable-dom0-ballooning no) in the xend config file. This will make sure that the Dom0 never runs out of memory.
The Xen Dom0 physical network device should be present:
puck:~# ifconfig
eth0      Link encap:Ethernet  HWaddr 00:1b:21:50:0f:ec
          inet addr:132.206.178.61  Bcast:132.206.178.255  Mask:255.255.255.0
          inet6 addr: fe80::21b:21ff:fe50:fec/64 Scope:Link
          UP BROADCAST RUNNING MULTICAST  MTU:1500  Metric:1
          RX packets:2621736 errors:0 dropped:0 overruns:0 frame:0
          TX packets:111799 errors:0 dropped:0 overruns:0 carrier:0
          collisions:0 txqueuelen:0
          RX bytes:290640331 (277.1 MiB)  TX bytes:17035127 (16.2 MiB)

eth1      Link encap:Ethernet  HWaddr 00:30:48:9e:ff:04
          inet addr:10.0.0.1  Bcast:10.0.0.255  Mask:255.0.0.0
          inet6 addr: fe80::230:48ff:fe9e:ff04/64 Scope:Link
          UP BROADCAST RUNNING MULTICAST  MTU:1500  Metric:1
          RX packets:62308 errors:0 dropped:0 overruns:0 frame:0
          TX packets:62314 errors:0 dropped:0 overruns:0 carrier:0
          collisions:0 txqueuelen:1000
          RX bytes:4485102 (4.2 MiB)  TX bytes:3258684 (3.1 MiB)
          Memory:fbce0000-fbd00000

eth2      Link encap:Ethernet  HWaddr 00:30:48:9e:ff:05
          inet addr:192.168.1.18  Bcast:192.168.1.1  Mask:255.255.255.0
          inet6 addr: fe80::230:48ff:fe9e:ff05/64 Scope:Link
          UP BROADCAST RUNNING MULTICAST  MTU:1500  Metric:1
          RX packets:69006 errors:0 dropped:0 overruns:0 frame:0
          TX packets:24 errors:0 dropped:0 overruns:0 carrier:0
          collisions:0 txqueuelen:1000
          RX bytes:4140880 (3.9 MiB)  TX bytes:1934 (1.8 KiB)
          Memory:fbde0000-fbe00000

lo        Link encap:Local Loopback
          inet addr:127.0.0.1  Mask:255.0.0.0
          inet6 addr: ::1/128 Scope:Host
          UP LOOPBACK RUNNING  MTU:16436  Metric:1
          RX packets:5590 errors:0 dropped:0 overruns:0 frame:0
          TX packets:5590 errors:0 dropped:0 overruns:0 carrier:0
          collisions:0 txqueuelen:0
          RX bytes:6419836 (6.1 MiB)  TX bytes:6419836 (6.1 MiB)

peth0     Link encap:Ethernet  HWaddr 00:1b:21:50:0f:ec
          inet6 addr: fe80::21b:21ff:fe50:fec/64 Scope:Link
          UP BROADCAST RUNNING PROMISC MULTICAST  MTU:1500  Metric:1
          RX packets:73515001 errors:0 dropped:0 overruns:0 frame:0
          TX packets:114824 errors:0 dropped:0 overruns:0 carrier:0
          collisions:0 txqueuelen:1000
          RX bytes:72955828195 (67.9 GiB)  TX bytes:17247510 (16.4 MiB)
          Memory:fbb20000-fbb40000
and the bridge configuration can be inspected with the brctl command:
puck:~# brctl show
bridge name     bridge id               STP enabled     interfaces
eth0            8000.001b21500fec       no              peth0
Create the Guest (LVM Disk Device)
Each Xen guest host will live on its own volume group as 2 logical volumes, one for virtual disk and another for the virtual swap device). This volume group is located on top of its own replication device.
See below for how to create a guest host using disk images rather than LVMs.
You will hit a buglet in xen-create-image if you specify the disk image size or swap in unites of Kb in the file /etc/xen-tools/xen-tools.conf.
Ideally the domU config file should be shared between the nodes. Just make sure that both nodes have identical copies. For the moment I just stuff them in the default /etc/xen/<guest_name>.bic.mni.mcgill.ca.cfg and sync it manually to the other node. This will create a host guest called kurma with IP address 1322.206.178.241 with the virtual disk devices on the volume group vg1. Obviously the volume group must be accessible and that means the drbd device under it must be in primary mode. If it’s not, then promote it to primary and force a scan of the volume groups with vgscan.
puck:~# xen-create-image --hostname=kurma.bic.mni.mcgill.ca --ip=132.206.178.241 --arch=amd64 --role=udev --lvm=vg1

General Information
--------------------
Hostname       :  kurma.bic.mni.mcgill.ca
Distribution   :  squeeze
Mirror         :  http://ftp.ca.debian.org/debian/
Partitions     :  swap            3Gb   (swap)
                  /               20Gb  (ext3)
Image type     :  full
Memory size    :  2Gb
Kernel path    :  /boot/vmlinuz-2.6.32-5-xen-amd64
Initrd path    :  /boot/initrd.img-2.6.32-5-xen-amd64

Networking Information
----------------------
IP Address 1   : 132.206.178.241 [MAC: 00:16:3E:85:58:34]
Netmask        : 255.255.255.0
Broadcast      : 132.206.178.255
Gateway        : 132.206.178.1
Nameserver     : 132.206.178.7
  Logical volume "kurma.bic.mni.mcgill.ca-swap" created

Creating swap on /dev/vg1/kurma.bic.mni.mcgill.ca-swap
mkswap: /dev/vg1/kurma.bic.mni.mcgill.ca-swap: warning: don't erase bootbits sec
tors
        on whole disk. Use -f to force.
Setting up swapspace version 1, size = 3145724 KiB
no label, UUID=cd23c566-4572-43b0-aed9-f8643eebbad8
Done
  Logical volume "kurma.bic.mni.mcgill.ca-disk" created

Creating ext3 filesystem on /dev/vg1/kurma.bic.mni.mcgill.ca-disk
mke2fs 1.41.12 (17-May-2010)
Filesystem label=
OS type: Linux
Block size=4096 (log=2)
Fragment size=4096 (log=2)
Stride=0 blocks, Stripe width=0 blocks
1310720 inodes, 5242880 blocks
262144 blocks (5.00%) reserved for the super user
First data block=0
Maximum filesystem blocks=4294967296
160 block groups
32768 blocks per group, 32768 fragments per group
8192 inodes per group
Superblock backups stored on blocks:
        32768, 98304, 163840, 229376, 294912, 819200, 884736, 1605632, 2654208,
        4096000

Writing inode tables: done
Writing superblocks and filesystem accounting information: done

This filesystem will be automatically checked every 20 mounts or
180 days, whichever comes first.  Use tune2fs -c or -i to override.
Done
Installation method: debootstrap

Copying files from host to image.
Copying files from /var/cache/apt/archives/ -> /tmp/2eMPe0va9g/var/cache/apt/archives
Done
Done
I: Retrieving Release
I: Retrieving Packages
I: Validating Packages
I: Resolving dependencies of required packages...
I: Resolving dependencies of base packages...
I: Found additional required dependencies: insserv libbz2-1.0 libdb4.8 libslang2
I: Found additional base dependencies: libnfnetlink0 libsqlite3-0
I: Checking component main on http://ftp.ca.debian.org/debian...
I: Validating libacl1
I: Validating adduser
I: Validating apt-utils
I: Validating apt


Copying files from new installation to host.
Copying files from /tmp/2eMPe0va9g/var/cache/apt/archives -> /var/cache/apt/archives/
Done
Done
Done

Running hooks
Running hook 01-disable-daemons
hook 01-disable-daemons: done.
Running hook 05-shadowconfig-on
Shadow passwords are now on.
hook 05-shadowconfig-on: done.
Running hook 15-disable-hwclock
update-rc.d: using dependency based boot sequencing
hook 15-disable-hwclock: done.
Running hook 20-setup-apt
Get:1 http://ftp.ca.debian.org squeeze Release.gpg [835 B]
Ign http://ftp.ca.debian.org/debian/ squeeze/contrib Translation-en
Ign http://ftp.ca.debian.org/debian/ squeeze/main Translation-en
Ign http://ftp.ca.debian.org/debian/ squeeze/non-free Translation-en
Hit http://ftp.ca.debian.org squeeze Release

[...]

Creating Xen configuration file
Done
Setting up root password
Generating a password for the new guest.
All done

Installation Summary
---------------------
Hostname        :  kurma.bic.mni.mcgill.ca
Distribution    :  squeeze
IP-Address(es)  :  132.206.178.241
RSA Fingerprint :  34:03:64:21:dd:9a:bb:c0:f5:4d:10:05:ce:20:6d:63
Root Password   :  *********
It is vital to explicitely specify the volume group name that will host the guest domU disks with —lvm=. Otherwize the default value from the xen-tools.conf will be used.
Create the Guest (Sparse Loopback File Device)
Just do as in the previous section but replace the —lvm= option by —dir=dir where the disk image and swap files will be created. The disk image file is then mounted using a loopback device and the xen-tools will stuff it with the right bits. You might want to also specify where the guest config will be created using the option —output=dir.
Boot the Guest
puck:~# xm create /xen_cluster/xen0/matsya.bic.mni.mcgill.ca.cfg

[...]

~# xm list
Name                                        ID   Mem VCPUs      State   Time(s)
Domain-0                                     0  2043     2     r----- 137872.3
matsya.bic.mni.mcgill.ca                     3  2048     3     -b----   9275.4

~# xm vcpu-list
Name                                ID  VCPU   CPU State   Time(s) CPU Affinity
Domain-0                             0     0     0   r--   63861.3 0
Domain-0                             0     1     1   -b-   74013.4 1
matsya.bic.mni.mcgill.ca             3     0     6   -b-    3536.2 any cpu
matsya.bic.mni.mcgill.ca             3     1     7   -b-    2450.8 any cpu
matsya.bic.mni.mcgill.ca             3     2     4   -b-    3288.4 any cpu
(:source:)
~# ~malin/bin/crush /xen_cluster/xen0/matsya.bic.mni.mcgill.ca.cfg
kernel = ‘/boot/vmlinuz-2.6.32–5-xen-amd64’
ramdisk = ‘/boot/initrd.img-2.6.32–5-xen-amd64’
vcpus = ‘3’
memory = ‘2048’
root = ‘/dev/xvda2 ro’
disk = [
                ‘file:/xen_cluster/xen0/domains/matsya.bic.mni.mcgill.ca/disk.img,xvda2,w’,
                ‘file:/xen_cluster/xen0/domains/matsya.bic.mni.mcgill.ca/swap.img,xvda1,w’,
            ]
name = ‘matsya.bic.mni.mcgill.ca’
vif = [ ‘ip=132.206.178.240,mac=00:16:3E:17:1A:86,bridge=eth0’ ]
on_poweroff = ‘destroy’
on_reboot = ‘restart’
on_crash = ‘restart’
(:sourceend:)
Once the guest is created and running, Xen will setup the network. For instance here is the output of all the chains defined in the iptables of the Dom0 in the case of 2 running guests, matsya.bic.mni.mcgill.ca and kurma.bic.mni.mcgill.ca
helena:~# brctl show
bridge name     bridge id               STP enabled     interfaces
eth0            8000.001b21538ed6       no              peth0
                                                        vif7.0
                                                        vif8.0
helena:~# iptables -L
Chain INPUT (policy ACCEPT)
target     prot opt source               destination

Chain FORWARD (policy ACCEPT)
target     prot opt source               destination
ACCEPT     all  --  anywhere             anywhere            state RELATED,ESTABLISHED PHYSDEV match --physdev-out vif8.0
ACCEPT     udp  --  anywhere             anywhere            PHYSDEV match --physdev-in vif8.0 udp spt:bootpc dpt:bootps
ACCEPT     all  --  anywhere             anywhere            state RELATED,ESTABLISHED PHYSDEV match --physdev-out vif8.0
ACCEPT     all  --  xennode-1.bic.mni.mcgill.ca  anywhere            PHYSDEV match --physdev-in vif8.0
ACCEPT     all  --  anywhere             anywhere            state RELATED,ESTABLISHED PHYSDEV match --physdev-out vif7.0
ACCEPT     udp  --  anywhere             anywhere            PHYSDEV match --physdev-in vif7.0 udp spt:bootpc dpt:bootps
ACCEPT     all  --  anywhere             anywhere            state RELATED,ESTABLISHED PHYSDEV match --physdev-out vif7.0
ACCEPT     all  --  xennode-2.bic.mni.mcgill.ca  anywhere            PHYSDEV match --physdev-in vif7.0

Chain OUTPUT (policy ACCEPT)
target     prot opt source               destination
You can peak at the networking setup of the guest using the xenstore command xenstore-ls fed with the Xen backend path of the vif (virtual interface):
puck:~# xm network-list kurma.bic.mni.mcgill.ca
Idx BE     MAC Addr.     handle state evt-ch tx-/rx-ring-ref BE-path
0   0  00:16:3E:85:58:34    0     4      10    768  /769     /local/domain/0/backend/vif/11/0

puck:~# xenstore-ls /local/domain/0/backend/vif/11/0
bridge = "eth0"
domain = "kurma.bic.mni.mcgill.ca"
handle = "0"
uuid = "f0cef322-dc1b-c935-223b-62a44a985181"
script = "/etc/xen/scripts/vif-bridge"
ip = "132.206.178.241"
state = "4"
frontend = "/local/domain/11/device/vif/0"
mac = "00:16:3E:85:58:34"
online = "1"
frontend-id = "11"
feature-sg = "1"
feature-gso-tcpv4 = "1"
feature-rx-copy = "1"
feature-rx-flip = "0"
feature-smart-poll = "1"
hotplug-status = "connected"
Hints for using Xen over OCFS2
http://www.tchetch.net/wiki/debian/xen/install
http://www.debian-administration.org/article/578/Heartbeat2_Xen_cluster_with_drbd8_and_OCFS2
http://publications.jbfavre.org/virtualisation/cluster-xen-corosync-pacemaker-drbd-ocfs2.en
http://wiki.kartbuilding.net/index.php/Xen_Networking
Again, those will give you an idea on how to prepare Xen for pacemaker/DRBD/OCFS2 with live migration. They are rather old, full of obvious mistakes and typos and some, as I have myself verified, cannot and will not work as advertized.
Guest Console Login
malin@cicero:~$ ssh kurma
Linux kurma 2.6.32-5-xen-amd64 #1 SMP Wed Jan 12 05:46:49 UTC 2011 x86_64

The programs included with the Debian GNU/Linux system are free software;
the exact distribution terms for each program are described in the
individual files in /usr/share/doc/*/copyright.

Debian GNU/Linux comes with ABSOLUTELY NO WARRANTY, to the extent
permitted by applicable law.

kurma::~> pwd
/home/bic/malin
kurma::~> df
Filesystem            Size  Used Avail Use% Mounted on
/dev/xvda2             20G  1.1G   18G   6% /
tmpfs                1023M     0 1023M   0% /lib/init/rw
udev                  987M   32K  987M   1% /dev
tmpfs                1023M  4.0K 1023M   1% /dev/shm
gustav:/raid/home/bic
                      503G  161G  342G  33% /home/bic
kurma::~>
To disconnect hit CTRL-]. At this point the domU is also accessible through ssh. Editing in the console can lead to frustation as the terminal device emulation is a bit screwy.
Xen Block Device, Scheduling, Virtual CPUs and Memory Management
See http://book.xen.prgmr.com/mediawiki/index.php/Scheduling for good info.
http://publib.boulder.ibm.com/infocenter/lnxinfo/v3r0m0/index.jsp?topic=/liaai/xen/rhel/liaaixenrbindpin.htm
http://wiki.xensource.com/xenwiki/XenBestPractices for Xen Best Practices, like disabling ballooning for dom0, pinning core(s) to it and giving it more cpu time to service outstanding IO requests.
Virtual Block Devices
You can attach and detach block devices to a guest using the xm-tools commands:
~# xm block-attach domain-id be-dev fe-dev mode [bedomain-id]
- domain-id
The domain id of the guest domain that the device will be attached to.
- be-dev
The device in the backend domain (usually domain 0) to be exported. This can be specified as a physical partition (phy:/dev/sda7) or as a file mounted as loopback (file://path/to/loop.iso).
- fe-dev
How the device should be presented to the guest domain. It can be specified as either a symbolic name, such as /dev/xvdb1 or even xvdb1.
- mode
The access mode for the device from the guest domain. Supported modes are w (read/write) or r (read-only).
- bedomain-id
The back end domain hosting the device. This defaults to domain 0.
To detach a domain’s virtual block device use:
~# xm block-detach domain-id devid [--force]
devid may be the symbolic name or the numeric device id given to the device by domain 0. You will need to run xm block-list to determine that number.
You need the cooperation of the guest to detach a device (it can be opened or in use inside the guest) and using —force can lead to IO errors. Be careful!
As an example, lets say one wants to give a guest with guest id 1 access to a logical volume lv0 created on the dom0 using the standard LVM tools:
~# lvcreate -L 250GB vg_xen lv0
~# xm block-attach 1 phy:/dev/vg_xen/lv0 /dev/xvdb1 w
Scheduling
By default, unless specified with the Xen boot line sched= parameter the domU scheduler is set to credit. The xm sched-credit syntax:
sched-credit [ -d domain-id [ -w[=WEIGHT] | -c[=CAP] ] ]
This sets the credit scheduler parameters. The credit scheduler is a proportional fair share CPU scheduler built from the ground up to be work conserving on SMP hosts.
Each domain (including Domain0) is assigned a weight and a cap.
PARAMETERS:
- WEIGHT A domain with a weight of 512 will get twice as much CPU as a domain with a weight of 256 on a contended host. Legal weights range from 1 to 65535 and the default is 256.
- CAP The cap optionally fixes the maximum amount of CPU a domain will be able to consume, even if the host system has idle CPU cycles. The cap is expressed in percentage of one physical CPU: 100 is 1 physical CPU, 50 is half a CPU, 400 is 4 CPUs, etc. The default, 0, means there is no upper cap.
VCPUs and Memory
To restrict Dom0 to run on a certain CPUs one has to add the kernel stanza dom0_max_vcpus=X to the Xen boot line in /boot/grub/menu.lst, where X is the number of vcpus dedicated to Dom0. The grub menu entry for a dom0 with an allocation of 2GB of ram and 2 virtual CPUs would look like:
title Raid1 (hd1) Xen 4.0-amd64 / Debian GNU/Linux, kernel 2.6.32–5-xen-amd64 / Serial Console
root (hd1,0)
kernel /boot/xen-4.0-amd64.gz dom0_mem=2048M dom0_max_vcpus=2 loglvl=all guest_loglvl=all sync_console console_to_ring console=vga com1=38400,8n1 console=com1
module /boot/vmlinuz-2.6.32–5-xen-amd64 root=UUID=c0186fd3–605d-4a23-b718–3b4c869040e2 ro console=hvc0 earlyprintk=xen nomodeset
module /boot/initrd.img-2.6.32–5-xen-amd64
(:sourceend:)
The memory and virtual cpus allocated to an unprivileged Xen domain (domU) can be set both at the domain creation and reset while the domU is running. As an example of a domU allocated with 4 virtual cpus (vcpus=‘4’) and pinned to the third logical cpu to the 6th (cpus=[‘2–5’] and 2GB of memory (memory=‘2048’):
(:source:)
kernel = ‘/boot/vmlinuz-2.6.32–5-xen-amd64’
ramdisk = ‘/boot/initrd.img-2.6.32–5-xen-amd64’
vcpus = ‘4’
cpus = [‘2’,’3’,’4’,’5’]
memory = ‘2048’
root = ‘/dev/xvda1 ro’
disk = [
                ‘file:/xen_cluster/r1/disk.img,xvda1,w’,
                ‘file:/xen_cluster/r2/swap.img,xvda2,w’,
            ]
name = ‘xennode-1.bic.mni.mcgill.ca’
vif = [ ‘ip=132.206.178.241,mac=00:16:3E:12:94:DF,bridge=eth0’ ]
on_poweroff = ‘destroy’
on_reboot = ‘restart’
on_crash = ‘restart’
(:sourceend:)
Xen resources management
A multitude of tools exist to manage and gather information and/or statistics from a Xen virtual domain. Have a look at http://wiki.xensource.com/xenwiki/XenManagementTools for a list.
A GUI that can connect remotely over secured channels is virt-manager for example. In order to allow connections one must reconfigure Xend by enabling (xend-unix-server yes) in /etc/xen/xend-config.sxp and restart xend with /etc/init.d/xend restart. After that one export the environment variable VIRSH_DEFAULT_CONNECT_URI=xen:///.
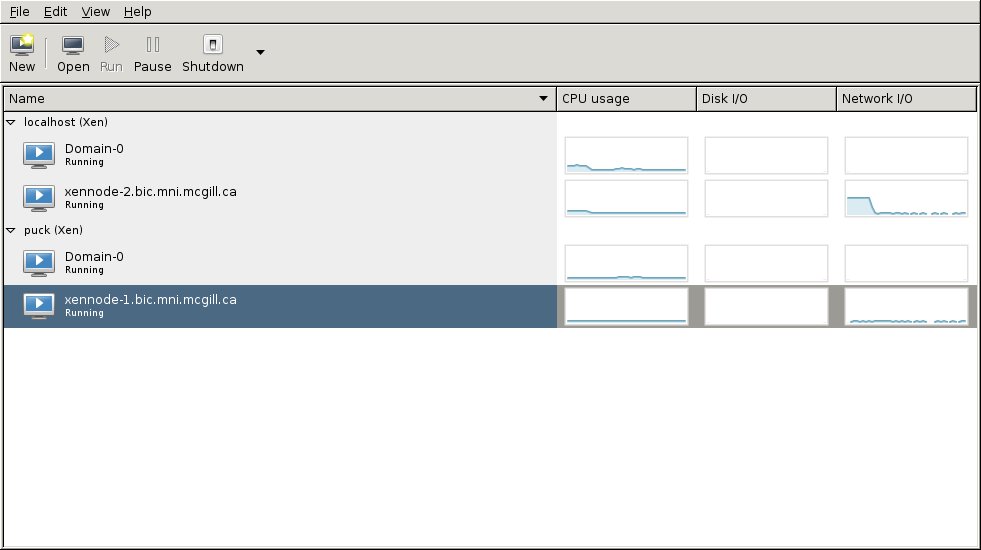
The command xentop will show the state of the Dom0 and running DomUs:
puck:~# xentop

xentop - 16:11:50   Xen 4.0.1
2 domains: 1 running, 1 blocked, 0 paused, 0 crashed, 0 dying, 0 shutdown
Mem: 12573788k total, 4351752k used, 8222036k free    CPUs: 8 @ 2000MHz
      NAME  STATE   CPU(sec) CPU(%)     MEM(k) MEM(%)  MAXMEM(k) MAXMEM(%) VCPUS NETS NETTX(k) NETRX(k) VBDS   VBD_OO   VBD_RD   VBD_WR  VBD_RSECT VBD_WSECT SSID
  Domain-0 -----r        514    1.6    2092288   16.6   no limit       n/a     2    0        0        0    0        0        0        0          0         0 0
VCPUs(sec):   0:        362s  1:        152s
xennode-1. --b---         15    0.8    2089984   16.6    2097152      16.7     4    1     1199        6    1        0        2      164         16      2792 0
VCPUs(sec):   0:         12s  1:          1s  2:          1s  3:          1s
Net0 RX:     6258bytes       39pkts        0err        0drop  TX:  1227871bytes 8872pkts        0err     9983drop
VBD BlkBack 51713 [ca: 1]  OO:        0   RD:        2   WR:      164   RSECT: 16   WSECT:       2792
From the Xen-tools toolbox comes xm, which has a fairly rich syntax:
helena:~# xm vcpu-list
Name                                ID  VCPU   CPU State   Time(s) CPU Affinity
Domain-0                             0     0     7   r--     368.5 any cpu
Domain-0                             0     1     1   -b-     154.9 any cpu
xennode-1.bic.mni.mcgill.ca          2     0     2   -b-      14.7 2
xennode-1.bic.mni.mcgill.ca          2     1     3   -b-       1.2 3
xennode-1.bic.mni.mcgill.ca          2     2     4   -b-       1.1 4
xennode-1.bic.mni.mcgill.ca          2     3     5   -b-       1.1 5
Another one is libvirt and related binaries (virsh help)
helena:~# virsh list
 Id Name                 State
----------------------------------
  0 Domain-0             running
  2 xennode-1.bic.mni.mcgill.ca idle

helena:~# virsh dominfo xennode-1.bic.mni.mcgill.ca
Id:             2
Name:           xennode-1.bic.mni.mcgill.ca
UUID:           7df57c76-8555-bd41-b9da-31054aef3521
OS Type:        linux
State:          idle
CPU(s):         4
CPU time:       21.6s
Max memory:     2097152 kB
Used memory:    2089984 kB
Persistent:     no
Autostart:      disable
Xen Virtual Block Devices (VBDs) and DRBD
In order to use a DRBD resource (<resource> is the resource name NOT the block device) as the virtual block device xvda1, you must add a line like the following to your Xen domU configuration:
(:source:)disk = [ 'drbd:<resource>,xvda1,w' ]
See http://www.drbd.org/users-guide/ch-xen.html for more details. But suffice to say that It Just Doesn’t Work (TM) for Debian/Squeeze.
Corosync Installation and Configuration
Create a new file /etc/apt/sources.list.d/pacemaker.list that contains:
deb http://people.debian.org/~madkiss/ha lenny main
Add the Madkiss key to you package system:
>~ apt-key adv --keyserver pgp.mit.edu --recv-key 1CFA3E8CD7145E30
If you omit this step you will get this error:
W: GPG error: http://people.debian.org lenny Release: The following signatures
couldn't be verified because the public key is not available: NO_PUBKEY 1CFA3E8CD7145E30
Update the package list
>~ aptitude update
Installing the package pacemaker will install pacemaker with corosync, if you need openais later on, you could install that as a plugin in corosync. OpenAIS is need for example for DLM or CLVM, but thats beyond the scope of this howto.
>~ aptitude install pacemaker
Create an auth key for nodes communication
To create an authkey for corosync communication between your two nodes do this on the first node:
node1~: sudo corosync-keygen
This creates a key in /etc/corosync/authkey. If it’s too slow that’s because there is not enough entropy. Get the system active by doing find / -file blah or something along this. You need to copy this file to the second node and put it in the /etc/corosync directory with the right permissions. So on the first node:
node1~: scp /etc/corosync/authkey node2:/etc/corosync/authkey
And on the second node:
node2~: sudo mv ~/authkey /etc/corosync/authkey
node2~: sudo chown root:root /etc/corosync/authkey
node2~: sudo chmod 400 /etc/corosync/authkey
Make core files with exec name and pid’s appended on both nodes:
node1~: echo 1 > /proc/sys/kernel/core_uses_pid
node1~: echo core.%e.%p > /proc/sys/kernel/core_pattern
and make the change permanent on both nodes with:
node1~: cat /etc/sysctl.d/core_uses_pid.conf
kernel.core_uses_pid = 1
kernel.core_pattern = core.p
Edit corosync config file
Most of the options in the /etc/corosync/corosync.conf file are ok to start with, but you must check that corosync can communicate so make sure to adjust the interface section:
(:source:)
interface {
- The following values need to be set based on your environment
   ringnumber: 0
   bindnetaddr: 192.168.1.0
   mcastaddr: 226.94.1.1
   mcastport: 5405
}
(:sourceend:)
Adjust bindnetaddr to your local subnet: if you have configured the IP 10.0.0.1 for the first node and 10.0.0.2 for the second node, set bindnetaddr to 10.0.0.0. In my case the communication ring is redundant with one link with IP 132.206.178.60 to IP 132.206.178.61 (implying bindnetaddr set to 132.206.178.0 and another link with IP on a private network with IP 192.168.1.18 to 192.168.1.19 with the associated bindnetaddr set to 192.168.1.0
Corosync redundant dual ring config
One ring on public network 132.206.178.0/24 and the other ring on private network 192.168.1.0/24. /etc/corosync/corosync.conf:
(:source:)
totem {
version: 2
token: 3000
token_retransmits_before_loss_const: 10
join: 60
consensus: 4500
vsftype: none
max_messages: 20
clear_node_high_bit: yes
       secauth: off
       threads: 0
       rrp_mode: active
  interface {
      ringnumber: 0
      bindnetaddr: 132.206.178.0
      mcastaddr: 226.94.1.0
      mcastport: 5400
  }
  interface {
      ringnumber: 1
      bindnetaddr: 192.168.1.0
      mcastaddr: 226.94.1.1
      mcastport: 5401
  }
}
amf {
mode: disabled
}
service {
       ver:       0
       name:      pacemaker
}
aisexec {
      user:   root
      group:  root
}
logging {
      fileline: off
      to_stderr: yes
      to_logfile: no
      to_syslog: yes
syslog_facility: daemon
      debug: off
      timestamp: on
      logger_subsys {
              subsys: AMF
              debug: off
              tags: enter|leave|trace1|trace2|trace3|trace4|trace6
      }
}
(:sourceend:)
Now that you have configured both nodes you can start the cluster on both sides.
Edit /etc/default/corosync to enable corosync at startup and start the services:
node1~: sudo /etc/init.d/coroync start
Starting corosync daemon: corosync.
node2~: sudo /etc/init.d/coroync start
Starting corosync daemon: corosync.
The following processes should appear on both nodes:
root       /usr/sbin/corosync
root        \_ /usr/lib/heartbeat/stonithd
112         \_ /usr/lib/heartbeat/cib
root        \_ /usr/lib/heartbeat/lrmd
112         \_ /usr/lib/heartbeat/attrd
112         \_ /usr/lib/heartbeat/pengine
112         \_ /usr/lib/heartbeat/crmd

stonithd -> shoot the other node in the head daemon
cib      -> cluster information base
lrmd     -> local resource manager daemon
pengine  -> policy engine
crmd     -> cluster resource manager deamon
Corosync Status and Ring Management
The ring state is displayed using the command:
node1:~# corosync-cfgtool -s
Printing ring status.
Local node ID 1018351236
RING ID 0
        id      = 132.206.178.60
        status  = ring 0 active with no faults
RING ID 1
        id      = 192.168.1.19
        status  = ring 1 active with no faults
To enable a fixed-but-used-to-be-faulty ring use command corosync-cfgtool -r
There is an annoying bug in corosync-1.2.x (supposed to be fixed in the upcoming Weaver’s Needle release — a.k.a. corosync 2.y.z) in that if the ring doesn’t initialize correctly there is no way out short of a reboot: restarting the network just doesn’t work as corosync processes simply hang:
~# corosync-cfgtool -s

Could not initialize corosync configuration API error 6
What happens is that corosync cannot not bind to network socket(s) and everything becomes fubar. Some info can be found here https://lists.linux-foundation.org/pipermail/openais/2011-January/015626.html
IPMI Configuration for STONITH
In order to use the IPMI resource agent for stonith one must first install some packages on the cluster nodes.
puck:~# apt-get update
puck:~# apt-get install ipmitool openipmi
To have the IPMI device handler modules loaded one adds the following line to /etc/modules
# /etc/modules: kernel modules to load at boot time.
#
# This file contains the names of kernel modules that should be loaded
# at boot time, one per line. Lines beginning with "#" are ignored.
# Parameters can be specified after the module name.

ipmi_si
ipmi_devintf
To load the modules do modprobe ipmi_si and modprobe ipmi_devintf. If successfull, a new device /dev/ipmi<X> should be created that allows in-band communications for the BMC.
The BMC network config is done at the BIOS level, using a static IP address along with broadcast, gateway and netmask (using DHCP is possible). Login through the web interface using the manufacturer default username and password ADMIN/ADMIN. Change the passsord and create another user called root with administrative privileges.
Use ipmitool command to attempt a connection to the remote node BMC, user root and password in file /root/ipmipass:
puck:~# ipmitool -I lanplus -H 192.168.1.17 -U root -f /root/ipmipass sel
SEL Information
Version          : 1.5 (v1.5, v2 compliant)
Entries          : 0
Free Space       : 10240 bytes
Percent Used     : 0%
Last Add Time    : Not Available
Last Del Time    : Not Available
Overflow         : false
Supported Cmds   : 'Reserve' 'Get Alloc Info'
# of Alloc Units : 512
Alloc Unit Size  : 20
# Free Units     : 512
Largest Free Blk : 512
Max Record Size  : 2

puck:~# ipmitool -I lanplus -H 192.168.1.17 -U root -f ./ipmipass sdr
FAN 1            | 11881 RPM         | ok
FAN 2            | 11881 RPM         | ok
FAN 3            | 11881 RPM         | ok
FAN 4            | 10404 RPM         | ok
FAN 5            | disabled          | ns
FAN 6            | disabled          | ns
CPU1 Vcore       | 0.95 Volts        | ok
CPU2 Vcore       | 0.96 Volts        | ok
+1.5 V           | 1.51 Volts        | ok
+5 V             | 5.09 Volts        | ok
+5VSB            | 5.09 Volts        | ok
+12 V            | 12.14 Volts       | ok
-12 V            | -12.29 Volts      | ok
+3.3VCC          | 3.31 Volts        | ok
+3.3VSB          | 3.26 Volts        | ok
VBAT             | 3.24 Volts        | ok
CPU1 Temp        | 0 unspecified     | ok
CPU2 Temp        | 0 unspecified     | ok
System Temp      | 29 degrees C      | ok
Chassis Intru    | 0 unspecified     | ok
PS Status        | 0 unspecified     | nc

puck:~# ipmitool -I lanplus -H 192.168.1.17 -U root -f /root/ipmipass chassis power status
Chassis Power is on
Pacemaker/CRM (Cluster Resource Manager) Configuration
Cluster Architecture and Internals.
The Pacemaker architecture is described in the Pacemaker documentation available at http://www.clusterlabs.org/doc/en-US/Pacemaker/1.0/html/Pacemaker_Explained/s-intro-architecture.html.
A quick view of the stack (from the doc mentionned above):
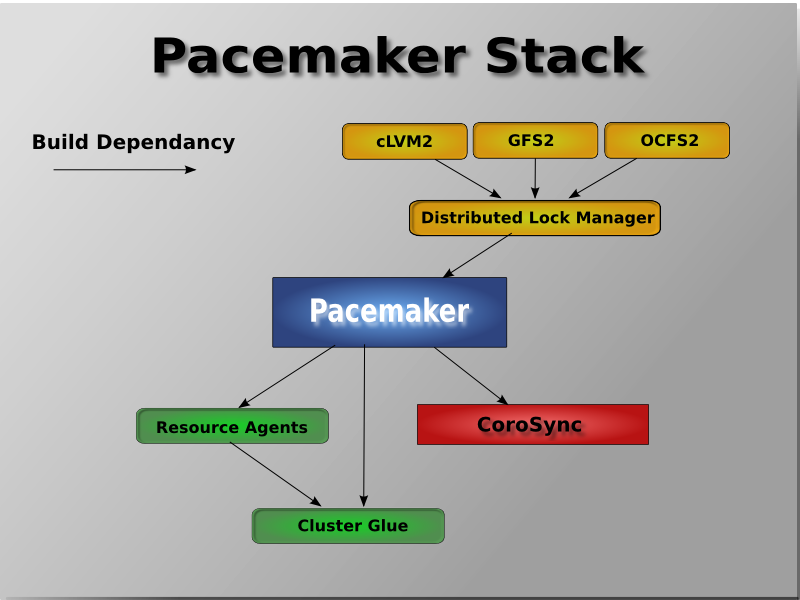
The pacemaker internals consist of four key components:
- CIB (aka. Cluster Information Base)
- CRMd (aka. Cluster Resource Management daemon)
- PEngine (aka. PE or Policy Engine)
- STONITHd
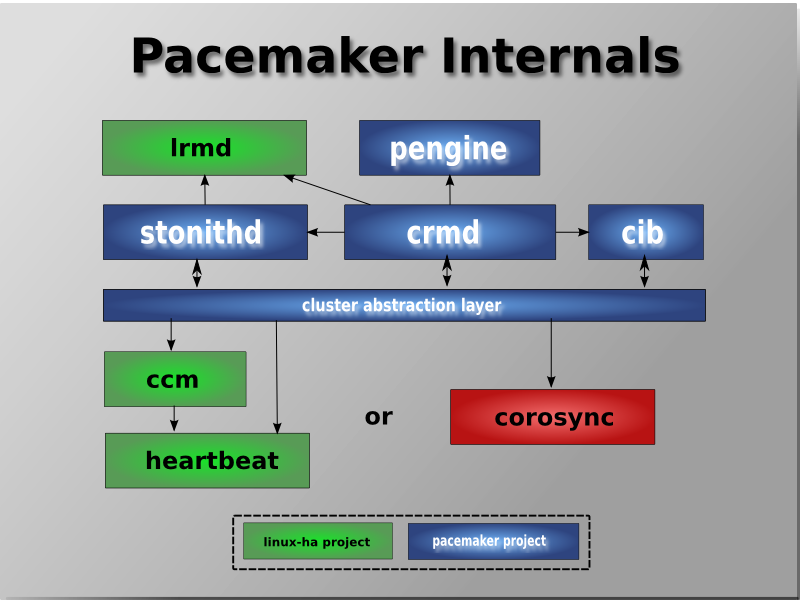
Initial Configuration
To configure the cluster stack one can either go the brutral way with cibadmin (must speak/grok XML) or use the crm shell command line interface.
See http://www.clusterlabs.org/wiki/DRBD_HowTo_1.0 and http://www.clusterlabs.org/doc/crm_cli.html
http://www.clusterlabs.org/doc/en-US/Pacemaker/1.1/html/Pacemaker_Explained/index.html
First, one must disable a few services that are started automatically at boot time by the LSB init scripts. This is needed as the cluster will from now on manage the start/stop/restart and monitoring of those services and having them started at boot time before pacemaker has had a chance to get hold of them can cause confusion and even bring down the cluster.
Strickly speaking disabling corosync at boot time is not really necessary but, for the little paranoid inside me, having a node rebooted in a HA-cluster, me want to go through the logs and find out why and only when satisfied that all is good will I manually restart the cluster stack.
puck:~# update-rc.d -f corosync remove
puck:~# update-rc.d -f drbd remove
puck:~# update-rc.d -f o2cf remove
puck:~# update-rc.d -f xendomain remove
You can always reinstate them with update-rc.d [-n] <name> defaults.
node1 -> puck
node2 -> helena
After starting corosync on both systems one should see something like this (dates and versions will be different though, this is just from an old run of mine):
puck:~# crm_mon --one-shot -V
crm_mon[7363]: 2009/07/26_22:05:40 ERROR: unpack_resources: No STONITH
resources have been defined
crm_mon[7363]: 2009/07/26_22:05:40 ERROR: unpack_resources: Either configure
some or disable STONITH with the stonith-enabled option
crm_mon[7363]: 2009/07/26_22:05:40 ERROR: unpack_resources: NOTE: Clusters with
shared data need STONITH to ensure data integrity

# crm_mon -1
============
Last updated: Wed Oct 20 16:39:53 2010
Stack: openais
Current DC: helena - partition with quorum
Version: 1.0.9-74392a28b7f31d7ddc86689598bd23114f58978b
2 Nodes configured, 2 expected votes
0 Resources configured.
============

Online: [ puck helena ]
Cluster Options and Properties.
First, we set up some cluster options that will affect its behaviour as a whole.
In a two-node cluster, the concept of quorum does not apply. It is thus safe to set Pacemaker’s “no-quorum-policy” to ignore loss of quorum.
We also set a default stickiness greater than zero so that resources have a tendency to ‘stick’ to a node. This avoids resources being bounced around when a node is restarted or rebooted.
The Policy Engine creates files in /var/lib/pengine/pe-{input,warn,error}.bz2 —those are the transition files used by the PE to plot a path to attain a new state when events are detected. By default, they will just indefinitely accumulate. With one transition check every 15mins, we keep 672 (worth a week). They are useful in case an hb_report has to be submitted to the Pacemaker Mailing List.
Finally we disable stonith (just for the moment — it will be enabled later on).
puck:~# crm configure
crm(live)configure# property no-quorum-policy=ignore
crm(live)configure# property default-resource-stickiness=100
crm(live)configure# property pe-input-series-max="672"
crm(live)configure# property pe-error-series-max="672"
crm(live)configure# property pe-warn-series-max="672"
crm(live)configure# property stonith-enabled=false
crm(live)configure# verify
crm(live)configure# commit
crm(live)configure# exit
bye
Actually, for a 2-node cluster, failure to disable quorum might lead to a stonith deathmatch when stonith is enabled. See the entry How STONITH works below.
DRBD, OCFS2 and Xen
Next, define the resources for DRBD, the OCFS2 filesystem and the Xen domU using the crm shell.
puck:~# crm configure edit
and stick the following in it:
(:source:)
primitive resDRBDr1 ocf:linbit:drbd params drbd_resource=“r1” op start interval=“0” timeout=“240s” op stop interval=“0” timeout=“100s” op monitor interval=“20s” role=“Master” timeout=“240s” op monitor interval=“30s” role=“Slave” timeout=“240s” meta migration-threshold=“3” failure-timeout=“60s”
primitive resOCFS2r1 ocf:heartbeat:Filesystem params device=“/dev/drbd/by-res/r1” directory=“/xen_cluster/r1” fstype=“ocfs2” op monitor interval=“10s” timeout=“60s” op start interval=“0” timeout=“90s” op stop interval=“0” timeout=“60s” meta migration-threshold=“3” failure-timeout=“60s”
primitive resXen1 ocf:heartbeat:Xen params xmfile=“/xen_cluster/r1/xen1.cfg” name=“xennode-1.bic.mni.mcgill.ca” op monitor interval=“20s” timeout=“60s” op start interval=“0” timeout=“90s” op stop interval=“0” timeout=“60s” op migrate_from interval=“0” timeout=“120s” op migrate_to interval=“0” timeout=“120s” meta allow-migrate=“true” target-role=“stopped”
(:sourceend:)
A few notes regarding the above.
- Modify the drbd resource name, the OCFS2 filesystem and Xen config name, etc, according to your local setup.
- The resource meta property migration-threshold=N will move the resource away to a new node after N failures. A default value is not set by the cluster so it has to be explicitely set.
- The resource meta property failure-timeout=“60s” sets a timeout to expire the above constraint. So in this case the node will be able to run a failed resource after 60s. There is no default value for this meta property so again we must set it up explicitely.
- The Xen resource is created in a stopped state and have explicit timeouts set for migration to or away from a node. Once were are done setting up the CIB we can start the resource with crm resource start resXen1.
Then one creates a Master/Slave resource for the DRBD primitive and a clone for the OCFS2 filesystem.
(:source:)
ms msDRBDr1 resDRBDr1 meta notify=“true” master-max=“2” interleave=“true” target-role=“Started”
clone cloOCFS2r1 resOCFS2r1 meta interleave=“true” ordered=“true” target-role=“Started”
(:sourceend:)
- The master-max=“2” for the DRBD resource allows 2 concurrently running primaries in the cluster, a required feature is one wants Xen live migration.
- The resources must be started in a specific order and colocation constraints between them must be established.
- The OCFS2 filesystem can only be mounted if the drbd device is in primary mode.
- Xen DomU can run only and only if it has access to its disk images.
- The drbd resource must first be promoted to Master (primary) before the OCFS2 filesystem can be mounted on top of it.
- The OCFS2 filesystem must be started before the Xen DomU can be started.
(:source:)
colocation colOCFS12-with-DRBDrMaster inf: cloOCFS2r1 msDRBDr1:Master
colocation colXen-with-OCFSr1 inf: resXen1 cloOCFSr1
order ordDRBD-before-OCFSr1 inf: msDRBDr1:promote cloOCFS2r1:start
order ordOCFS2r1-before-Xen1 inf: cloOCFS2r1:start resXen1:start
(:sourceend:)
Network connectivity and ping
After that one sets up a ping resource to monitor network connectivity, clone it on both nodes and restrict the Xen guests to run on a node if and only if the ping resource can connect to a configured gateway — 132.206.178.1 in our case.
(:source:)
primitive resPing ocf:pacemaker:ping params dampen=“5s” multiplier=“100” host_list=“132.206.178.1” attempts=“3” op monitor interval=“20s” timeout=“60s” op start interval=“0” timeout=“65s” op stop interval=“0” timeout=“30s”
clone cloPing resPing meta globally-unique=“false”
location locPing resXen1 rule -inf: not_defined pingd or pingd lte 0
(:sourceend:)
STONITH and IPMI
Finally one must have a way of fencing a node in an active/active cluster setup in case it behaves strangely or doesn’t respond. Failure to configure a fencing device will must likely lead to data corruption (a case of split-brain: both node are primary but data is not in a consistent state) between the nodes and a manual intervention will be necessary. See Manually Resolving a Split-Brain Situation for instructions on how to do that, God forbid.
The split-brain situation is avoided by using a stonith resource configured to use IPMI on both nodes. Once the primitives are defined one sets up location constraints such that each node has one instance of the stonith resource running such that it can shoot the other offending node in case of failure (ie, a resource won’t stop properly, a node seems to be available but doesn’t respond, etc). One then enables the cluster property stonith-enabled=“true” along with the options stonith-action=“poweroff” to power off a node when stonith’ed rather that a reset (the default).
(:source:)
primitive resStonitHelena stonith:external/ipmi params hostname=“helena” ipaddr=“192.168.1.17” userid=“root” passwd=“********” interface=“lanplus” op start interval=“0” timeout=“60s” op stop interval=“0” timeout=“60s” op monitor interval=“3600s” timeout=“60”
primitive resStonithPuck stonith:external/ipmi params hostname=“puck” ipaddr=“192.168.1.16” userid=“root” passwd=“********” interface=“lanplus” op start interval=“0” timeout=“60s” op stop interval=“0” timeout=“60s” op monitor interval=“3600s” timeout=“60”
location locStonithHelena resStonitHelena -inf: helena
location locStonithPuck resStonitPuck -inf: puck
property stonith-enabled=“true”
property stonith-action=“poweroff”
(:sourceend:)
Cluster Stack Logic: failures and successes.
The following are just my notes on different setups I tried and are here just for mnemonic purposes. They should be skipped unless you want to know what kind of madness I went into :) Just skip ahead to Cluster Resource Management.
Once this is all done the cluster should be in a state where all the configured resources are running on the nodes: (The DRBD resources resRDBDr5 below is a partition used by the domU resource resXen1 as a web disk).
puck:~# crm_mon -1
============
Last updated: Mon Dec  6 14:29:51 2010
Stack: openais
Current DC: helena - partition with quorum
Version: 1.0.9-74392a28b7f31d7ddc86689598bd23114f58978b
2 Nodes configured, 2 expected votes
6 Resources configured.
============

Online: [ puck helena ]

 Master/Slave Set: msDRBDr12
     Masters: [ helena puck ]
 Clone Set: cloOCFS12
     Started: [ helena puck ]
 resXen1        (ocf::heartbeat:Xen):   Started helena
 Clone Set: cloPing
     Started: [ puck helena ]
 resStonithPuck (stonith:external/ipmi):        Started helena
 resStonithHelena       (stonith:external/ipmi):        Started puck
The final CIB from crm configure show
(:source:)
node helena attributes standby=“off”
node puck attributes standby=“off”
primitive resDRBDr1 ocf:linbit:drbd params drbd_resource=“r1” op start interval=“0” timeout=“240s” op stop interval=“0” timeout=“100s” op monitor interval=“30s” role=“Master” timeout=“240s” op monitor interval=“31s” role=“Slave” timeout=“240s” meta migration-threshold=“3” failure-timeout=“60s” target-role=“Started”
primitive resDRBDr2 ocf:linbit:drbd params drbd_resource=“r2” op start interval=“0” timeout=“240s” op stop interval=“0” timeout=“100s” op monitor interval=“30s” role=“Master” timeout=“240s” op monitor interval=“31s” role=“Slave” timeout=“240s” meta migration-threshold=“3” failure-timeout=“60s” target-role=“Started”
primitive resDRBDr5 ocf:linbit:drbd params drbd_resource=“r5” op start interval=“0” timeout=“240s” op stop interval=“0” timeout=“100s” op monitor interval=“30s” role=“Master” timeout=“240s” op monitor interval=“31s” role=“Slave” timeout=“240s” meta migration-threshold=“3” failure-timeout=“60s” target-role=“Started”
primitive resOCFSr1 ocf:heartbeat:Filesystem params device=“/dev/drbd/by-res/r1” directory=“/xen_cluster/r1” fstype=“ocfs2” op monitor interval=“10s” timeout=“60s” op start interval=“0” timeout=“90s” op stop interval=“0” timeout=“60s” meta migration-threshold=“3” failure-timeout=“60s” target-role=“Started”
primitive resOCFSr2 ocf:heartbeat:Filesystem params device=“/dev/drbd/by-res/r2” directory=“/xen_cluster/r2” fstype=“ocfs2” op monitor interval=“10s” timeout=“60s” op start interval=“0” timeout=“90s” op stop interval=“0” timeout=“60s” meta migration-threshold=“3” failure-timeout=“60s” target-role=“Started”
primitive resPing ocf:pacemaker:ping params dampen=“5s” multiplier=“100” host_list=“132.206.178.1” attempts=“3” op monitor interval=“20s” timeout=“60s” op start interval=“0” timeout=“65s” op stop interval=“0” timeout=“30s”
primitive resStonithHelena stonith:external/ipmi params hostname=“helena” ipaddr=“192.168.1.17” userid=“root” passwd=“********” interface=“lanplus” op start interval=“0” timeout=“60s” op stop interval=“0” timeout=“60s” op monitor interval=“3600s” timeout=“60” meta target-role=“Started”
primitive resStonithPuck stonith:external/ipmi params hostname=“puck” ipaddr=“192.168.1.16” userid=“root” passwd=“********” interface=“lanplus” op start interval=“0” timeout=“60s” op stop interval=“0” timeout=“60s” op monitor interval=“3600s” timeout=“60” meta target-role=“Started”
primitive resXen1 ocf:heartbeat:Xen params xmfile=“/xen_cluster/r1/xennode-1.bic.mni.mcgill.ca.cfg” name=“xennode-1.bic.mni.mcgill.ca” op monitor interval=“20s” timeout=“60s” op start interval=“0” timeout=“90s” op stop interval=“0” timeout=“60s” op migrate_from interval=“0” timeout=“120s” op migrate_to interval=“0” timeout=“120s” meta allow-migrate=“true” target-role=“Started” migration-threshold=“3” failure-timeout=“60s”
group groDRBDr12 resDRBDr1 resDRBDr2 resDRBDr5
group groOCFS12 resOCFSr1 resOCFSr2
ms msDRBDr12 groDRBDr12 meta notify=“true” master-max=“2” interleave=“true”
clone cloOCFS12 groOCFS12 meta interleave=“true” ordered=“true”
clone cloPing resPing meta globally-unique=“false”
location locPing1 resXen1 rule $id=“locPing1-rule” -inf: not_defined pingd or pingd lte 0
location locStonithHelena resStonithHelena -inf: helena
location locStonithPuck resStonithPuck -inf: puck
colocation colOCFS12-with-DRBDr12Master inf: cloOCFS12 msDRBDr12:Master
colocation colXen1-with-OCFS12 inf: resXen1 cloOCFS12
order ordDRBDr12-before-OCFS12 inf: msDRBDr12:promote cloOCFS12:start
order ordOCFS12-before-Xen1 inf: cloOCFS12:start resXen1:start
property $id=“cib-bootstrap-options” dc-version=“1.0.9–74392a28b7f31d7ddc86689598bd23114f58978b” cluster-infrastructure=“openais” expected-quorum-votes=“2” stonith-enabled=“true” no-quorum-policy=“ignore” last-lrm-refresh=“1291499241” default-resource-stickiness=“100”
(:sourceend:)
A 2-node cluster with 2 Xen guests, each guest on its own dedicated DRBD block device
The above was just a proof-of-concept for me: the CIB becomes rapidly unmanageable in the event of adding more guests, with or without multiple DRBD devices per VMs. Having the disk image and swap image on different devices in an unnecessary complication and one can create the Xen hosts using one device for both images reducing the complexity of the CIB. An example of a 2-node cluster with 2 Xen guests, each guest on its own dedicated DRBD block device.
I have now implemented this with a 4 guest Xen cluster managed by pacemaker. See Quick Resume: Howto Create and Add a New Xen Guest to Pacemaker for details on how to add a guest and let it be managed by pacemaker.
+----------+  +----------+             +----------+  +----------+
|   domU   |  |   domU   |             |   domU   |  |   domU   |
+----------+  +----------+             +----------+  +----------+
     ||            ||                       ||            ||
+----------+  +----------+             +----------+  +----------+
|  ocfs2   |  |  ocfs2   |             |  ocfs2   |  |  ocfs2   |
+----------+  +----------+             +----------+  +----------+
| drbd r0  |  | drbd r1  |<~~~~~~~~~~~>| drbd r1  |  | drbd r0  |
+-----+----+  +----------+             +----------+  +-----+----+
|     ^    |  |          |             |          |  |     ^    |
|     '~~~~~~~~~~~~~~~~~~~~~~~~~~~~~~~~~~~~~~~~~~~~~~~~~~~~'    |
|          |  |          |             |          |  |          |
+----------+  +----------+             +----------+  +----------+
| xen_lv0  |  | xen_lv1  |             | xen_lv1  |  | xen_lv0  |
+----------+--+----------+             +----------+--+----------+
|         vg_xen         |             |         vg_xen         |
+------------------------+             +------------------------+
|       mirror dm0       |             |       mirror dm0       |
+----------+--+----------+             +----------+--+----------+
|   sdc    |  |   sdd    |             |   sdc    |  |   sdd    |
+----------+--+----------+             +----------+--+----------+
Cluster layout:
puck:~# crm_mon -1
============
Last updated: Fri Feb 11 16:13:06 2011
Stack: openais
Current DC: helena - partition with quorum
Version: 1.0.9-74392a28b7f31d7ddc86689598bd23114f58978b
2 Nodes configured, 2 expected votes
9 Resources configured.
============

Online: [ puck helena ]

 resXen1	(ocf::heartbeat:Xen):	Started helena
 Master/Slave Set: msDRBDr1
     Masters: [ helena puck ]
 Clone Set: cloOCFSr1
     Started: [ helena puck ]
 resXen2	(ocf::heartbeat:Xen):	Started puck
 Master/Slave Set: msDRBDr2
     Masters: [ puck helena ]
 Clone Set: cloOCFSr2
     Started: [ puck helena ]
 resStonitHelena	(stonith:external/ipmi):	Started puck
 resStonithPuck	(stonith:external/ipmi):	Started helena
 Clone Set: cloPing
     Started: [ helena puck ]
and the CIB would look like this:
(:source:)
node helena attributes standby=“off”
node puck attributes standby=“off”
primitive resDRBDr1 ocf:linbit:drbd params drbd_resource=“r1” op start interval=“0” timeout=“240s” op stop interval=“0” timeout=“100s” op monitor interval=“30s” role=“Master” timeout=“240s” op monitor interval=“31s” role=“Slave” timeout=“240s” meta migration-threshold=“3” failure-timeout=“120s”
primitive resDRBDr2 ocf:linbit:drbd params drbd_resource=“r2” op start interval=“0” timeout=“240s” op stop interval=“0” timeout=“100s” op monitor interval=“30s” role=“Master” timeout=“240s” op monitor interval=“31s” role=“Slave” timeout=“240s” meta migration-threshold=“3” failure-timeout=“120s”
primitive resOCFSr1 ocf:heartbeat:Filesystem params device=“/dev/drbd/by-res/r1” directory=“/xen_cluster/xen1” fstype=“ocfs2” op monitor interval=“10s” timeout=“60s” op start interval=“0” timeout=“90s” op stop interval=“0” timeout=“60s” meta migration-threshold=“3” failure-timeout=“120s”
primitive resOCFSr2 ocf:heartbeat:Filesystem params device=“/dev/drbd/by-res/r2” directory=“/xen_cluster/xen2” fstype=“ocfs2” op monitor interval=“10s” timeout=“60s” op start interval=“0” timeout=“90s” op stop interval=“0” timeout=“60s” meta migration-threshold=“3” failure-timeout=“120s”
primitive resPing ocf:pacemaker:ping params dampen=“5s” multiplier=“100” host_list=“132.206.178.1” attempts=“3” op monitor interval=“20s” timeout=“60s” op start interval=“0” timeout=“65s” op stop interval=“0” timeout=“30s”
primitive resStonitHelena stonith:external/ipmi params hostname=“helena” ipaddr=“192.168.1.17” userid=“root” passwd=“********” interface=“lanplus” op start interval=“0” timeout=“60s” op stop interval=“0” timeout=“60s” op monitor interval=“7200s” timeout=“60”
primitive resStonithPuck stonith:external/ipmi params hostname=“puck” ipaddr=“192.168.1.16” userid=“root” passwd=“********” interface=“lanplus” op start interval=“0” timeout=“60s” op stop interval=“0” timeout=“60s” op monitor interval=“7200s” timeout=“60”
primitive resXen1 ocf:heartbeat:Xen params xmfile=“/xen_cluster/xen1/kurma.bic.mni.mcgill.ca.cfg” name=“kurma.bic.mni.mcgill.ca” op monitor interval=“20s” timeout=“60s” op start interval=“0” timeout=“90s” op stop interval=“0” timeout=“60s” op migrate_from interval=“0” timeout=“120s” op migrate_to interval=“0” timeout=“120s” meta allow-migrate=“true” target-role=“Started” migration-threshold=“3” failure-timeout=“120s”
primitive resXen2 ocf:heartbeat:Xen params xmfile=“/xen_cluster/xen2/varaha.bic.mni.mcgill.ca.cfg” name=“varaha.bic.mni.mcgill.ca” op monitor interval=“20s” timeout=“60s” op start interval=“0” timeout=“90s” op stop interval=“0” timeout=“60s” op migrate_from interval=“0” timeout=“120s” op migrate_to interval=“0” timeout=“120s” meta allow-migrate=“true” target-role=“Started” migration-threshold=“3” failure-timeout=“120s”
ms msDRBDr1 resDRBDr1 meta notify=“true” master-max=“2” interleave=“true”
ms msDRBDr2 resDRBDr2 meta notify=“true” master-max=“2” interleave=“true” target-role=“Started”
clone cloOCFSr1 resOCFSr1 meta notify=“true” interleave=“true” ordered=“true”
clone cloOCFSr2 resOCFSr2 meta notify=“true” interleave=“true” ordered=“true”
clone cloPing resPing meta globally-unique=“false”
location locPingXen1 resXen1 rule $id=“locPingXen1-rule” -inf: not_defined pingd or pingd lte 0
location locPingXen2 resXen2 rule $id=“locPingXen2-rule” -inf: not_defined pingd or pingd lte 0
location locStonithHelena resStonitHelena -inf: helena
location locStonithPuck resStonithPuck -inf: puck
colocation colOCFSr1-with-DRBDr1Master inf: cloOCFSr1 msDRBDr1:Master
colocation colOCFSr2-with-DRBDr2Master inf: cloOCFSr2 msDRBDr2:Master
order ordDRBDr1-before-OCFSr1 inf: msDRBDr1:promote cloOCFSr1:start
order ordDRBDr2-before-OCFSr2 inf: msDRBDr2:promote cloOCFSr2:start
order ordOCFSr1-before-Xen1 inf: cloOCFSr1 resXen1
order ordOCFSr2-before-Xen2 inf: cloOCFSr2 resXen2
property $id=“cib-bootstrap-options” dc-version=“1.0.9–74392a28b7f31d7ddc86689598bd23114f58978b” cluster-infrastructure=“openais” expected-quorum-votes=“2” no-quorum-policy=“ignore” default-resource-stickiness=“100” stonith-enabled=“true”
(:sourceend:)
Fail: md0 → drbd → lvm → ocfs → guest
Another setup I tried is the case where the DRBD backing device is the raid mirror itself and logical volumes hold the ocfs filesystems with the guest disk images. It doesn’t seem to be working: for some reason the Xen guest cannot be live migrated.
+------------------------+             +------------------------+
|          domU          |             |          domU          |
+------------------------+             +------------------------+
     ||            ||                       ||            ||
+----------+  +----------+             +----------+  +----------+
|   ocfs2  |  |   ocfs2  |             |   ocfs2  |  |   ocfs2  |
+----------+  +----------+             +----------+  +----------+
| xen_lv1  |  | xen_lv2  |             |  xen_lv1 |  | xen_lv2  |
+----------+--+----------+             +----------+--+----------+
|  volume group vg_xen   |             |   volume group vg_xen  |
+------------------------+             +------------------------+
|     physical volume    |             |     physical volume    |
+------------------------+             +------------------------+
|       drbd r1          |<~~~~~~~~~~~>|       drbd r1          |
+------------------------+             +------------------------+
|       mirror md0       |             |       mirror md0       |
+----------+--+----------+             +----------+--+----------+
|   sdc    |  |   sdd    |             |   sdc    |  |   sdd    |
+----------+--+----------+             +----------+--+----------+
The cluster state would look like:
puck:~# crm_mon -1
============
Last updated: Mon Jan 10 17:34:10 2011
Stack: openais
Current DC: helena - partition with quorum
Version: 1.0.9-74392a28b7f31d7ddc86689598bd23114f58978b
2 Nodes configured, 2 expected votes
7 Resources configured.
============

Online: [ puck helena ]

 Master/Slave Set: msDRBDr1
     Masters: [ helena puck ]
 Clone Set: cloXenVG
     Started: [ puck helena ]
 Clone Set: cloOcfsXen1
     Started: [ puck helena ]
 Clone Set: cloPing
     Started: [ puck helena ]
 resXen1        (ocf::heartbeat:Xen):   Started helena
 resStonithHelena       (stonith:external/ipmi):        Started puck
 resStonithPuck (stonith:external/ipmi):        Started helena
(:source:)
primitive resDRBDr1 ocf:linbit:drbd params drbd_resource=“r1” op start interval=“0” timeout=“240s” op stop interval=“0” timeout=“100s” op monitor interval=“30s” role=“Master” timeout=“240s” op monitor interval=“31s” role=“Slave” timeout=“240s” meta migration-threshold=“3” failure-timeout=“60s”
primitive resOcfsXen1Disk ocf:heartbeat:Filesystem params device=“/dev/xen_vg/xen1_lv_disk” directory=“/xen_cluster/xen1_disk” fstype=“ocfs2” op monitor interval=“10s” timeout=“60s” op start interval=“0” timeout=“90s” op stop interval=“0” timeout=“60s” meta migration-threshold=“3” failure-timeout=“60s” target-role=“Started”
primitive resOcfsXen1Swap ocf:heartbeat:Filesystem params device=“/dev/xen_vg/xen1_lv_swap” directory=“/xen_cluster/xen1_swap” fstype=“ocfs2” op monitor interval=“10s” timeout=“60s” op start interval=“0” timeout=“90s” op stop interval=“0” timeout=“60s” meta migration-threshold=“3” failure-timeout=“60s” target-role=“Started”
primitive resPing ocf:pacemaker:ping params dampen=“5s” multiplier=“100” host_list=“132.206.178.1” attempts=“3” op monitor interval=“20s” timeout=“60s” op start interval=“0” timeout=“65s” op stop interval=“0” timeout=“30s”
primitive resStonithHelena stonith:external/ipmi params hostname=“helena” ipaddr=“192.168.1.17” userid=“root” passwd=“********” interface=“lanplus” op start interval=“0” timeout=“60s” op stop interval=“0” timeout=“60s” op monitor interval=“3600s” timeout=“60” meta target-role=“Started”
primitive resStonithPuck stonith:external/ipmi params hostname=“puck” ipaddr=“192.168.1.16” userid=“root” passwd=“********” interface=“lanplus” op start interval=“0” timeout=“60s” op stop interval=“0” timeout=“60s” op monitor interval=“3600s” timeout=“60” meta target-role=“Started”
primitive resXen1 ocf:heartbeat:Xen params xmfile=“/xen_cluster/xen1_disk/xennode-1.bic.mni.mcgill.ca.cfg” name=“xennode-1.bic.mni.mcgill.ca” op monitor interval=“20s” timeout=“60s” op start interval=“0” timeout=“90s” op stop interval=“0” timeout=“60s” op migrate_from interval=“0” timeout=“120s” op migrate_to interval=“0” timeout=“120s” meta allow-migrate=“true” target-role=“Started” migration-threshold=“3” failure-timeout=“60s”
primitive resXenVG ocf:heartbeat:LVM params volgrpname=“xen_vg” op monitor interval=“10s” timeout=“60s” op start interval=“0” timeout=“60s” op stop interval=“0” timeout=“60s” meta migration-threshold=“3” failure-timeout=“60s”
group groOcfsXen1 resOcfsXen1Disk resOcfsXen1Swap
ms msDRBDr1 resDRBDr1 meta notify=“true” master-max=“2” interleave=“true”
clone cloOcfsXen1 groOcfsXen1 meta interleave=“true” ordered=“true” target-role=“Started”
clone cloPing resPing meta globally-unique=“false”
clone cloXenVG resXenVG meta interleave=“true” ordered=“true”
location locPing1 resXen1 rule $id=“locPing1-rule” -inf: not_defined pingd or pingd lte 0
location locStonithHelena resStonithHelena -inf: helena
location locStonithPuck resStonithPuck -inf: puck
colocation colOcfsXen1-with-DRBDr1Master inf: cloOcfsXen1 msDRBDr1:Master
colocation colXen1-with-OcfsXen1 inf: resXen1 cloOcfsXen1
order ordDRBDr1-before-XenVG inf: msDRBDr1:promote cloXenVG:start
order ordOcfsXen1-before-Xen1 inf: cloOcfsXen1 resXen1
order ordXenVG-before-OcfsXen1 inf: cloXenVG cloOcfsXen1
property $id=“cib-bootstrap-options” dc-version=“1.0.9–74392a28b7f31d7ddc86689598bd23114f58978b” cluster-infrastructure=“openais” expected-quorum-votes=“2” stonith-enabled=“true” last-lrm-refresh=“1294692932” default-resource-stickiness=“100”
(:sourceend:)
More failed attempts
A slight modification of the above: I also tried something along the line [ drbd resDRBDr1 ] -> [ LVM resLVM ] -> [ OCFS2 resOCFS2 ] grouping the LVM and OCFS resources together:
(:source:)
primitive resDRBDr1 ocf:linbit:drbd params drbd_resource=“r1” …
primitive resLVM ocf:heartbeat:LVM params volgrpname=“xen_vg” …
primitive resOCFS2 ocf:heartbeat:Filesystem fstype=“ocfs2” …
primitive resXen1 ocf:heartbeat:Xen params xmfile=“/etc/xen/xen1cfg” name=“xen1” meta allow-migrate=“true”
group groLVM-OCFS resLVM resOCFS2
ms msDRBDr1 resDRBDr1 meta notify=“true” master-max=“2” interleave=“true”
colocation colLVM-OCFS-on-DRBDr1Master inf: groLVM-OCFS msDRBDr1:Master
colocation colXen-with-OcfsXen inf: resXen1 groLVM-OCFS
order ordDRBDr1-before-LVM inf: msDRBDr1:promote groLVM-OCFS:start
order ordLVM-OCFS-before-Xen inf: groLVM-OCFS:start resXen1:start
(:sourceend:)
DRBD is again configured with allow-two-primary but when I try to live migrate crm resource move the Xen guest I get:
pengine: [11978]: notice: check_stack_element: Cannot migrate resXen1 due to dependency on group groLVM-OCFS (coloc)
and the guest is shutdown and restarted on the other node.
Final Setup
After all this, here’s a CIB for with the following properties:
- 4 Xen guests, each running on sparse files located on OCFS filesystems, mounted on top of DRBD block devices, who in turn are sitting on top of LVMs.
- Active/Active cluster, with DRBD in dual-primary mode tgo allow live migration.
- Stonith is enabled, using IPMI, to poweroff offending nodes.
- Ping resources are used to restrict guests to run on nodes with outside network connectivity.
- One guest has a block device attached, used as a disk for web content.
- Policy Engine files are restricted to
4*24*7 = 672
~# crm configure show
node helena \
        attributes standby="off"
node puck \
        attributes standby="off"
primitive resDRBDr-www ocf:linbit:drbd \
        params drbd_resource="r-www" \
        op start interval="0" timeout="240s" \
        op stop interval="0" timeout="100s" \
        op monitor interval="30s" role="Master" timeout="240s" \
        op monitor interval="31s" role="Slave" timeout="240s" \
        meta migration-threshold="3" failure-timeout="60s" target-role="Started"
primitive resDRBDr0 ocf:linbit:drbd \
        params drbd_resource="r0" \
        op start interval="0" timeout="240s" \
        op stop interval="0" timeout="100s" \
        op monitor interval="30s" role="Master" timeout="240s" \
        op monitor interval="31s" role="Slave" timeout="240s" \
        meta migration-threshold="3" failure-timeout="120s"
primitive resDRBDr1 ocf:linbit:drbd \
        params drbd_resource="r1" \
        op start interval="0" timeout="240s" \
        op stop interval="0" timeout="100s" \
        op monitor interval="30s" role="Master" timeout="240s" \
        op monitor interval="31s" role="Slave" timeout="240s" \
        meta migration-threshold="3" failure-timeout="120s"
primitive resDRBDr2 ocf:linbit:drbd \
        params drbd_resource="r2" \
        op start interval="0" timeout="240s" \
        op stop interval="0" timeout="100s" \
        op monitor interval="30s" role="Master" timeout="240s" \
        op monitor interval="31s" role="Slave" timeout="240s" \
        meta migration-threshold="3" failure-timeout="120s"
primitive resDRBDr3 ocf:linbit:drbd \
        params drbd_resource="r3" \
        op start interval="0" timeout="240s" \
        op stop interval="0" timeout="100s" \
        op monitor interval="30s" role="Master" timeout="240s" \
        op monitor interval="31s" role="Slave" timeout="240s" \
        meta migration-threshold="3" failure-timeout="120s"
primitive resOCFSr0 ocf:heartbeat:Filesystem \
        params device="/dev/drbd/by-res/r0" directory="/xen_cluster/xen0" fstype="ocfs2" \
        op monitor interval="10s" timeout="60s" \
        op start interval="0" timeout="90s" \
        op stop interval="0" timeout="60s" \
        meta migration-threshold="3" failure-timeout="120s"
primitive resOCFSr1 ocf:heartbeat:Filesystem \
        params device="/dev/drbd/by-res/r1" directory="/xen_cluster/xen1" fstype="ocfs2" \
        op monitor interval="10s" timeout="60s" \
        op start interval="0" timeout="90s" \
        op stop interval="0" timeout="60s" \
        meta migration-threshold="3" failure-timeout="120s"
primitive resOCFSr2 ocf:heartbeat:Filesystem \
        params device="/dev/drbd/by-res/r2" directory="/xen_cluster/xen2" fstype="ocfs2" \
        op monitor interval="10s" timeout="60s" \
        op start interval="0" timeout="90s" \
        op stop interval="0" timeout="60s" \
        meta migration-threshold="3" failure-timeout="120s"
primitive resOCFSr3 ocf:heartbeat:Filesystem \
        params device="/dev/drbd/by-res/r3" directory="/xen_cluster/xen3" fstype="ocfs2" \
        op monitor interval="10s" timeout="60s" \
        op start interval="0" timeout="90s" \
        op stop interval="0" timeout="60s" \
        meta migration-threshold="3" failure-timeout="120s"
primitive resPing ocf:pacemaker:ping \
        params dampen="5s" multiplier="100" host_list="132.206.178.1" attempts="3" \
        op monitor interval="20s" timeout="60s" \
        op start interval="0" timeout="65s" \
        op stop interval="0" timeout="30s"
primitive resStonithHelena stonith:external/ipmi \
        params hostname="helena" ipaddr="192.168.1.17" userid="root" passwd="******" interface="lanplus" \
        op start interval="0" timeout="60s" \
        op stop interval="0" timeout="60s" \
        op monitor interval="7200s" timeout="60" \
        meta target-role="Started"
primitive resStonithPuck stonith:external/ipmi \
        params hostname="puck" ipaddr="192.168.1.16" userid="root" passwd="******" interface="lanplus" \
        op start interval="0" timeout="60s" \
        op stop interval="0" timeout="60s" \
        op monitor interval="7200s" timeout="60"
primitive resXen0 ocf:heartbeat:Xen \
        params xmfile="/xen_cluster/xen0/matsya.bic.mni.mcgill.ca.cfg" name="matsya.bic.mni.mcgill.ca" \
        op monitor interval="20s" timeout="60s" \
        op start interval="0" timeout="90s" \
        op stop interval="0" timeout="60s" \
        op migrate_from interval="0" timeout="120s" \
        op migrate_to interval="0" timeout="120s" \
        meta allow-migrate="true" migration-threshold="3" failure-timeout="120s" target-role="Started" is-managed="true"
primitive resXen1 ocf:heartbeat:Xen \
        params xmfile="/xen_cluster/xen1/kurma.bic.mni.mcgill.ca.cfg" name="kurma.bic.mni.mcgill.ca" \
        op monitor interval="20s" timeout="60s" \
        op start interval="0" timeout="90s" \
        op stop interval="0" timeout="60s" \
        op migrate_from interval="0" timeout="120s" \
        op migrate_to interval="0" timeout="120s" \
        meta allow-migrate="true" target-role="Started" migration-threshold="3" failure-timeout="120s" is-managed="true"
primitive resXen2 ocf:heartbeat:Xen \
        params xmfile="/xen_cluster/xen2/varaha.bic.mni.mcgill.ca.cfg" name="varaha.bic.mni.mcgill.ca" \
        op monitor interval="20s" timeout="60s" \
        op start interval="0" timeout="90s" \
        op stop interval="0" timeout="60s" \
        op migrate_from interval="0" timeout="120s" \
        op migrate_to interval="0" timeout="120s" \
        meta allow-migrate="true" target-role="Started" migration-threshold="3" failure-timeout="120s" is-managed="true"
primitive resXen3 ocf:heartbeat:Xen \
        params xmfile="/xen_cluster/xen3/narasimha.bic.mni.mcgill.ca.cfg" name="narasimha.bic.mni.mcgill.ca" \
        op monitor interval="20s" timeout="60s" \
        op start interval="0" timeout="90s" \
        op stop interval="0" timeout="60s" \
        op migrate_from interval="0" timeout="120s" \
        op migrate_to interval="0" timeout="120s" \
        meta allow-migrate="true" migration-threshold="3" failure-timeout="120s"
group groDRBDr2-r-www resDRBDr2 resDRBDr-www
ms msDRBDr0 resDRBDr0 \
        meta notify="true" master-max="2" interleave="true"
ms msDRBDr1 resDRBDr1 \
        meta notify="true" master-max="2" interleave="true"
ms msDRBDr2 groDRBDr2-r-www \
        meta notify="true" master-max="2" interleave="true"
ms msDRBDr3 resDRBDr3 \
        meta notify="true" master-max="2" interleave="true"
clone cloOCFSr0 resOCFSr0 \
        meta notify="true" interleave="true" ordered="true"
clone cloOCFSr1 resOCFSr1 \
        meta notify="true" interleave="true" ordered="true"
clone cloOCFSr2 resOCFSr2 \
        meta notify="true" interleave="true" ordered="true"
clone cloOCFSr3 resOCFSr3 \
        meta notify="true" interleave="true" ordered="true"
clone cloPing resPing \
        meta globally-unique="false"
location locPingXen0 resXen0 \
        rule $id="locPingXen0-rule" -inf: not_defined pingd or pingd lte 0
location locPingXen1 resXen1 \
        rule $id="locPingXen1-rule" -inf: not_defined pingd or pingd lte 0
location locPingXen2 resXen2 \
        rule $id="locPingXen2-rule" -inf: not_defined pingd or pingd lte 0
location locPingXen3 resXen3 \
        rule $id="locPingXen3-rule" -inf: not_defined pingd or pingd lte 0
location locStonithHelena resStonithHelena -inf: helena
location locStonithPuck resStonithPuck -inf: puck
colocation colOCFSr0-with-DRBDr0Master inf: cloOCFSr0 msDRBDr0:Master
colocation colOCFSr1-with-DRBDr1Master inf: cloOCFSr1 msDRBDr1:Master
colocation colOCFSr2-with-DRBDr2Master inf: cloOCFSr2 msDRBDr2:Master
colocation colOCFSr3-with-DRBDr3Master inf: cloOCFSr3 msDRBDr3:Master
order ordDRBDr0-before-OCFSr0 inf: msDRBDr0:promote cloOCFSr0:start
order ordDRBDr1-before-OCFSr1 inf: msDRBDr1:promote cloOCFSr1:start
order ordDRBDr2-before-OCFSr2 inf: msDRBDr2:promote cloOCFSr2:start
order ordDRBDr3-before-OCFSr3 inf: msDRBDr3:promote cloOCFSr3:start
order ordOCFSr0-before-Xen0 inf: cloOCFSr0 resXen0
order ordOCFSr1-before-Xen1 inf: cloOCFSr1 resXen1
order ordOCFSr2-before-Xen2 inf: cloOCFSr2 resXen2
order ordOCFSr3-before-Xen3 inf: cloOCFSr3 resXen3
property $id="cib-bootstrap-options" \
        dc-version="1.0.9-74392a28b7f31d7ddc86689598bd23114f58978b" \
        cluster-infrastructure="openais" \
        expected-quorum-votes="2" \
        no-quorum-policy="ignore" \
        default-resource-stickiness="100" \
        stonith-enabled="true" \
        last-lrm-refresh="1302033641" \
        pe-input-series-max="672" \
        pe-error-series-max="672" \
        pe-warn-series-max="672" \
        stonith-action="poweroff"
Colocation Crazyness
This doesn’t belong here but for the moment it will suffice. This is just for me to remember to look at the colocation semantics more carefully. This is from the pacemaker mailing list gurus (and it’s really conterintuitive to say the least).
> If you ever consider do something about it, here is another thing that
> can be lived with, but is non-intuitive.
>
> 1) colocation c1 inf: A B
>
> the most significant is B (if B is stopped nothing else will be running)
>
> 2) colocation c2 inf: A B C
>
> most significant - A
>
> 3) colocation c3 inf: ( A B ) C
>
> most significant - C
>
> 4) colocation c4 inf: ( A B ) C D
>
> most significant - C again
>
> I am trying to find a logic to remember this, but fails so far :)

No wonder. I have a patch ready to fix this, but have never been
happy with it.

Resources within a resource set have opposite semantics to 2-rsc
collocations. But two adjacent resource sets are again as 2-rsc
collocations, i.e. the left set follows the right set. Now,
just to add to the confusion, in the example 4) above it is not
very obvious that there are two sets, and that the second set is
"C D". So, 4) should be equivalent to these 5 2-rsc collocations:

A C
B C
A D
B D
D C

What is the difference (if any) of the above to

A D
B D
D C

Well, we leave that to the interested as an exercise ;-)
An attempt to have OCFS2 and DLM managed by the cluster
Googling the problem below yields a few links:
http://www.mail-archive.com/pacemaker@oss.clusterlabs.org/msg02870.html
~# crm configure

crm(live)configure# primitive resDRBD ocf:linbit:drbd \
> params drbd_resource="r1" \
> operations $id="resDRBD-operations" \
> op monitor interval="20s" role="Master" timeout="30s" \
> op monitor interval="30" role="Slave" timeout="20"

crm(live)configure# primitive resFS ocf:heartbeat:Filesystem \
> params device="/dev/drbd1" directory="/xen_cluster/r1" fstype="ocfs2" \
> op monitor interval="120s"

crm(live)configure# ms msDRBD resDRBD \
> meta resource-stickines="100" notify="true" master-max="2" interleave="true"

crm(live)configure# primitive resO2CB ocf:pacemaker:o2cb op monitor interval="120s"
crm(live)configure# primitive resDLM ocf:pacemaker:controld op monitor interval="120s"

crm(live)configure# clone cloneDLM resDLM meta globally-unique="false" interleave="true"
crm(live)configure# colocation colDLMDRBD inf: cloneDLM msDRBD:Master
crm(live)configure# order ordDRBDDLM 0: msDRBD:promote cloneDLM

crm(live)configure# clone cloneO2CB resO2CB meta globally-unique="false" interleave="true"
crm(live)configure# colocation colO2CBDLM inf: cloneO2CB cloneDLM
crm(live)configure# order ordDLMO2CB 0: cloneDLM cloneO2CB

crm(live)configure# clone cloneFS resFS meta interleave="true" ordered="true"
crm(live)configure# colocation colFSO2CB inf: cloneFS cloneO2CB
crm(live)configure# order ordO2CBFS 0: cloneO2CB cloneFS

crm(live)configure# verify
crm(live)configure# commit
crm(live)configure# exit
Errors are getting reported when pacemaker attempt to start the DLM and o2cb resources:
Oct 13 16:21:52 helena udevd-work[18267]: kernel-provided name 'dlm-monitor' and NAME= 'misc/dlm-monitor' disagree, please use SYMLINK+= or change the kernel to provide the proper name
Oct 13 16:21:52 helena udevd-work[19491]: kernel-provided name 'dlm-control' and NAME= 'misc/dlm-control' disagree, please use SYMLINK+= or change the kernel to provide the proper name
Oct 13 16:21:52 helena udevd-work[18268]: kernel-provided name 'dlm_plock' and NAME= 'misc/dlm_plock' disagree, please use SYMLINK+= or change the kernel to provide the proper name
Oct 13 16:21:52 helena kernel: [11754.231771] DLM (built Sep 17 2010 21:58:47) installed

Oct 13 17:49:07 helena lrmd: [5728]: info: RA output: (resDLM:0:probe:stderr) dlm_controld.pcmk: no process found
Oct 13 17:49:07 helena o2cb[5752]: INFO: configfs not laoded

Oct 13 17:49:25 helena o2cb[6224]: ERROR: ocfs2_controld.pcmk did not come up
Oct 13 18:09:50 helena corosync[5715]:   [pcmk  ] info: pcmk_notify: Enabling node notifications for child 10291 (0x7f282000c250)
Oct 13 18:09:50 helena ocfs2_controld.pcmk: Unable to connect to CKPT: Object does not exist
There is something bad with the OCF o2cb script and pacemaker!
A little googling yields this: http://www.gossamer-threads.com/lists/linuxha/pacemaker/65702
Cluster Resource Management
The full blown syntax is explained in the pacemaker documentation at
http://www.clusterlabs.org/doc/en-US/Pacemaker/1.0/html/Pacemaker_Explained/s-moving-resource.html
The exit return code of resource agents is explained in http://refspecs.linuxfoundation.org/LSB_4.1.0/LSB-Core-generic/LSB-Core-generic/iniscrptact.html
for the LSB compliants RAs and in http://www.linux-ha.org/wiki/OCF_Resource_Agents for the OCF agents.
See http://www.linux-ha.org/doc/dev-guides/ra-dev-guide.html for info on how to write (and test!) OCF-compliant RAs.
Cluster Status
Use the command crm_mon to query the cluster status along with resources states, etc. The flag −1 is for a one-shot view of the cluster state. You can also group the resources per nodes (—group-by-node and show the inactive ones (not shown by default) with —inactive.
helena:~# crm_mon --group-by-node --inactive -1
============
Last updated: Tue Feb 22 13:53:58 2011
Stack: openais
Current DC: puck - partition with quorum
Version: 1.0.9-74392a28b7f31d7ddc86689598bd23114f58978b
2 Nodes configured, 2 expected votes
15 Resources configured.
============

Node puck: online
        resDRBDr3:1     (ocf::linbit:drbd) Master
        resStonitHelena (stonith:external/ipmi) Started
        resDRBDr2:0     (ocf::linbit:drbd) Master
        resDRBDr1:1     (ocf::linbit:drbd) Master
        resXen0 (ocf::heartbeat:Xen) Started
        resXen1 (ocf::heartbeat:Xen) Started
        resXen2 (ocf::heartbeat:Xen) Started
        resDRBDr0:1     (ocf::linbit:drbd) Master
        resOCFSr1:1     (ocf::heartbeat:Filesystem) Started
        resOCFSr0:1     (ocf::heartbeat:Filesystem) Started
        resOCFSr2:0     (ocf::heartbeat:Filesystem) Started
        resOCFSr3:1     (ocf::heartbeat:Filesystem) Started
        resXen3 (ocf::heartbeat:Xen) Started
        resPing:1       (ocf::pacemaker:ping) Started
Node helena: online
        resStonithPuck  (stonith:external/ipmi) Started
        resOCFSr1:0     (ocf::heartbeat:Filesystem) Started
        resDRBDr1:0     (ocf::linbit:drbd) Master
        resPing:0       (ocf::pacemaker:ping) Started
        resOCFSr0:0     (ocf::heartbeat:Filesystem) Started
        resDRBDr3:0     (ocf::linbit:drbd) Master
        resDRBDr0:0     (ocf::linbit:drbd) Master
        resOCFSr3:0     (ocf::heartbeat:Filesystem) Started
        resDRBDr2:1     (ocf::linbit:drbd) Master
        resOCFSr2:1     (ocf::heartbeat:Filesystem) Started

Inactive resources:

 Clone Set: cloOCFSr0
     Started: [ helena puck ]

helena:~# crm_mon --inactive -1
============
Last updated: Tue Feb 22 13:58:02 2011
Stack: openais
Current DC: puck - partition with quorum
Version: 1.0.9-74392a28b7f31d7ddc86689598bd23114f58978b
2 Nodes configured, 2 expected votes
15 Resources configured.
============

Online: [ puck helena ]

Full list of resources:

 resXen1        (ocf::heartbeat:Xen):   Started puck
 Master/Slave Set: msDRBDr1
     Masters: [ helena puck ]
 Clone Set: cloOCFSr1
     Started: [ helena puck ]
 resXen2        (ocf::heartbeat:Xen):   Started puck
 Master/Slave Set: msDRBDr2
     Masters: [ puck helena ]
 Clone Set: cloOCFSr2
     Started: [ puck helena ]
 resStonitHelena        (stonith:external/ipmi):        Started puck
 resStonithPuck (stonith:external/ipmi):        Started helena
 Clone Set: cloPing
     Started: [ helena puck ]
 resXen0        (ocf::heartbeat:Xen):   Started puck
 Master/Slave Set: msDRBDr0
     Masters: [ helena puck ]
 Clone Set: cloOCFSr0
     Started: [ helena puck ]
 resXen3        (ocf::heartbeat:Xen):   Started puck
 Master/Slave Set: msDRBDr3
     Masters: [ helena puck ]
 Clone Set: cloOCFSr3
     Started: [ helena puck ]
The crm shell can also be used with crm status.
Changing Node Status
To put a node on standby mode issue the command crm node standbye <node_name>. The resources located on node node_name will then be stopped in an ordely fashion and restarted on the other node. Note that there might be cluster constraints that forbid the online node to run the resources!
For instance if a resource originally running on node1 is manually migrated to node2 then it won’t restart anywhere upon putting node2 in standby unless one un-migrate the resource prior to putting node2 offline. See Manually Migrating (Moving) Resources Around for details.
helena:~# crm_mon -1
============
Last updated: Fri Oct 22 13:07:23 2010
Stack: openais
Current DC: puck - partition with quorum
Version: 1.0.9-74392a28b7f31d7ddc86689598bd23114f58978b
2 Nodes configured, 2 expected votes
6 Resources configured.
============

Online: [ puck helena ]

 Master/Slave Set: msDRBDr1
     Masters: [ helena puck ]
 Clone Set: cloOCFS2r1
     Started: [ helena puck ]
 resXen1        (ocf::heartbeat:Xen):   Started puck
 Clone Set: cloPing
     Started: [ puck helena ]
 resStonithHelena       (stonith:external/ipmi):        Started puck
 resStonithPuck (stonith:external/ipmi):        Started helena

helena:~# crm node standby helena

helena:~# crm_mon -1
============
Last updated: Fri Oct 22 13:07:46 2010
Stack: openais
Current DC: puck - partition with quorum
Version: 1.0.9-74392a28b7f31d7ddc86689598bd23114f58978b
2 Nodes configured, 2 expected votes
6 Resources configured.
============

Node helena: standby
Online: [ puck ]

 Master/Slave Set: msDRBDr1
     Masters: [ puck ]
     Stopped: [ resDRBDr1:0 ]
 Clone Set: cloOCFS2r1
     Started: [ puck ]
     Stopped: [ resOCFS2r1:0 ]
 resXen1        (ocf::heartbeat:Xen):   Started puck
 Clone Set: cloPing
     Started: [ puck ]
     Stopped: [ resPing:1 ]
 resStonithHelena       (stonith:external/ipmi):        Started puck
To put back the node online type crm node online <node_name>. Resources might start migrating around, all depending on their stickiness.
helena:~# crm node online helena

helena:~# crm_mon -1
============
Last updated: Fri Oct 22 13:15:55 2010
Stack: openais
Current DC: puck - partition with quorum
Version: 1.0.9-74392a28b7f31d7ddc86689598bd23114f58978b
2 Nodes configured, 2 expected votes
6 Resources configured.
============

Online: [ puck helena ]

 Master/Slave Set: msDRBDr1
     Masters: [ helena puck ]
 Clone Set: cloOCFS2r1
     Started: [ helena puck ]
 resXen1        (ocf::heartbeat:Xen):   Started puck
 Clone Set: cloPing
     Started: [ puck helena ]
 resStonithHelena       (stonith:external/ipmi):        Started puck
 resStonithPuck (stonith:external/ipmi):        Started helena
Manually Migrating (Moving) Resources Around
To move resources around the cluster use the command crm resource move <rsc> [<node>] [<lifetime>] (or migrate). On a 2-node cluster you obviously don’t have to specify the target node. Used this way, this command will move the specified resource away from its current node. Lets say on node node-1 that you issue the command crm resource move myRes then behind the scene a constraint is introduced in the CIB:
<rsc_location rsc="myRes" node="node-1" score="-INFINITY"/>
This will achieve the desired effect but will also have long-term consequences. As the tool will warn you, the creation of an -INFINITY constraint will prevent the resource from running on node node-1 until crm resource unmove myRes (or unmigrate) is issued. This includes the situation where every other cluster node is no longer available.
There are subtle differences between starting, moving and migrating multi-state resources (master/slave).
One would think that crm resource start would be the inverse of crm resource stop, but in fact it is not…Try crm resource promote for ms resources, or even better, crm resource meta <resource-id> delete target-role, which reverts it to the respective defaults and thus in fact is the inverse of crm resource stop for all resource types.
Cluster Properties and Resources Management
You can list the cluster resources with anyone of the following commands (crm is the cluster shell):
~# crm_resource --list
~# crm resource list
~# crm resource show
To display the current location of ‘myResource’:
~# crm_resource --resource myResource --locate
Use the following to tell the cluster not to manage ‘myResource’. The cluster will not attempt to start or stop a unmanaged resource under any circumstances. This is useful when performing maintenance tasks on a resource.
~# crm_resource --resource myResource --set-parameter is-managed --meta --parameter-value false
~# crm resource unmanage myResource

~# crm_resource --resource myResource --set-parameter is-managed --meta --parameter-value
~# crm resource unmanage myResource
It is possible to shut down pacemaker but keep the current service state, ie. all services will be kept running on their current node. This typically used to perform an upgrade of the cluster stack without disturbing its state.
~# crm configure property maintenance-mode=true
This overrides all individual “is-managed=true” instance-attributes. Note that there is a subtle difference between the effect of the command above and the following one:
crm configure property is-managed-default=false
as, unlike maintenance-mode, this one is still going to run monitor ops.
Managing Resources Failovers and Failcounts
See http://wiki.lustre.org/index.php/Using_Pacemaker_with_Lustre for example.
Resetting the failcounter
If Pacemaker monitors a resource and finds that it isn’t running, by default it will try to restart the it on the node. If the resource cannot be restarted on the node, it then migrates the resource to another node.
It is the administrator’s task to find out the cause of the error and to reset the failcounter of the resource. This can be achieved by entering:
~# crm resource failcount <resource> delete <node>
“Cleaning up” a Resource
Sometimes it is necessary to “clean up” a resource. Internally, this command removes any information about a resource from the Local Resource Manager on every node and thus forces a complete re-read of the status of that resource. The command syntax is:
~# crm resource cleanup resMyOST
This command removes information about the resource called resMyOST on all nodes. You can see the resources failcounts with:
~# crm_mon -1 --failcounts
~# crm_mon -1 --f
Cluster Events and System Logs
Pacemaker and Corosync are extremely verbose. Even in case of a very quiescent systems a lot is written to the syslog.
A few of those warnings are however completely irrelevant and are just leftovers from code development logging and the developpers forgot to remove them before commiting. Those will appear everytime the pengine (Policy Engine) timer pops. They can be safely dismissed.
Mar 25 06:35:37 puck crmd: [6124]: info: crm_timer_popped: PEngine Recheck Timer (I_PE_CALC) just popped!
...
Mar 25 06:35:37 puck pengine: [6123]: ERROR: create_notification_boundaries: Creating boundaries for msDRBDr1
Mar 25 06:35:37 puck pengine: [6123]: ERROR: create_notification_boundaries: Creating boundaries for msDRBDr1
Mar 25 06:35:37 puck pengine: [6123]: ERROR: create_notification_boundaries: Creating boundaries for msDRBDr1
Mar 25 06:35:37 puck pengine: [6123]: ERROR: create_notification_boundaries: Creating boundaries for msDRBDr1
Mar 25 06:35:37 puck pengine: [6123]: ERROR: create_notification_boundaries: Creating boundaries for cloOCFSr1
The following events though are a little more worrying but as long as they don’t occur too frequently things should be ok. I’ve asked on the pacemaker mailing list what they are about just to have one of the developper tell me to submit a bug report if they show up too often.!
Mar 25 11:30:06 puck lrmd: [6121]: WARN: G_SIG_dispatch: Dispatch function for SIGCHLD was delayed 880 ms (> 100 ms) before being called (GSource: 0x22f6fc0)
Mar 25 11:30:06 puck lrmd: [6121]: info: G_SIG_dispatch: started at 1751169259 should have started at 1751169171
Mar 25 11:53:27 puck lrmd: [6121]: WARN: G_SIG_dispatch: Dispatch function for SIGCHLD was delayed 200 ms (> 100 ms) before being called (GSource: 0x22f6fc0)
Mar 25 11:53:27 puck lrmd: [6121]: info: G_SIG_dispatch: started at 1751309357 should have started at 1751309337
The cluster communication ring will sometimes have hicups:
corosync[6130]:   [TOTEM ] Incrementing problem counter for seqid 1938641 iface 132.206.178.60 to [1 of 10]
corosync[6130]:   [TOTEM ] Incrementing problem counter for seqid 1938649 iface 132.206.178.60 to [2 of 10]
corosync[6130]:   [TOTEM ] Decrementing problem counter for iface 132.206.178.60 to [1 of 10]
corosync[6130]:   [TOTEM ] ring 0 active with no faults
If the problem counter ever reaches 10 then the ring will be shutdown and manual intervention is required. Note that since there is a dual communication ring corosync will happily continue his duties if the redundant ring is configured as an active one in /etc/corosync/corosync.conf:
totem {
        version: 2
...
        # This specifies the mode of redundant ring, which may be none, active, or passive.
        rrp_mode: active
...
}
As explained in the Corosync Configuration section, one can reinstate the dual ring once it has been verified that there is really no problem with it by using the command corosync-cfgtool -r
~# corosync-cfgtool -s
Printing ring status.
Local node ID 1018351236
RING ID 0
        id      = 132.206.178.60
        status  = ring 0 active with no faults
RING ID 1
        id      = 192.168.1.19
        status  = administrative fault

~# corosync-cfgtool -r

~# corosync-cfgtool -s
Printing ring status.
Local node ID 1018351236
RING ID 0
        id      = 132.206.178.60
        status  = ring 0 active with no faults
RING ID 1
        id      = 192.168.1.19
        status  = ring 1 active with no faults
Stonith Events
A small script /root/bin/whodidit.sh will show stonith events:
Looking for STONITH events in today's log /var/log/syslog:
...nope!
Looking for STONITH events in yesterdays's log /var/log/syslog.1:
...nope!
Looking for STONITH events in older logs:
>>> In /var/log/syslog.2.gz ?
...nope!
>>> In /var/log/syslog.3.gz ?
...nope!
>>> In /var/log/syslog.4.gz ?
Mar 21 15:45:51 puck crmd: [6124]: info: te_fence_node: Executing reboot fencing operation (204) on helena (timeout=60000)
Mar 21 15:45:51 puck stonithd: [6119]: info: client tengine [pid: 6124] requests a STONITH operation RESET on node helena
Mar 21 15:45:52 puck stonithd: [6119]: info: Succeeded to STONITH the node helena: optype=RESET. whodoit: puck
>>> In /var/log/syslog.5.gz ?
...nope!
>>> In /var/log/syslog.6.gz ?
...nope!
>>> In /var/log/syslog.7.gz ?
...nope!
How STONITH Works
In Pacemaker clusters, all operations (start/monitor/stop) have a timeout. If this timeout elapses prior to the completion of the operation, the operation is considered failed.
- An HA resource is started on one node.
- If the start succeeds, the resource will be monitored indefinitely.
- If the start fails, the resource will be stopped, then re-started on either the current node, or another node.
- While the resource is being monitored, if the monitor ever fails, the resource will be stopped, then re-started on either the current node, or another node.
- If a resource needs to be stopped, and the stop succeeds, the resource is re-started on either the current node, or another node.
- If a stop fails, the node will be fenced/STONITHd because this is the only safe thing to do. If you can’t safely know you’ve terminated the HA resource, the least-worst course of action is to kill the entire node hard, and right now because the alternative is potential data corruption and/or data loss.
Given this chain of events, it is critically important that creators of resource agents (i.e. the scripts that start, stop and monitor HA resources) ensure that stop operations always succeed, unless the resource cannot actually be stopped.
     ===========
.->--| start   |-->--. N
|    ===========     |
|        |           |
|        V Y         |
|        |           |
|    ===========     |
^ .>-| monitor |     V
| |  ===========     |
| |   |  |           |
| |   |  |           |
| .-<-.  V N         |
|   Y    |           |
|        |           |
|    ===========     |
.-<--| stop    |-<---.
  Y  ===========
         |
         V N
         |
     ===========
     | stonith |
     ===========
The best worst case failover time is the least amount of time it will take, under the most adverse conditions, for a highly available resource to fail on one node, restart on another node, and become accessible to client systems
See also http://www.mail-archive.com/pacemaker@oss.clusterlabs.org/msg04312.html
Quick Resume: How to Create and Add a New Xen Guest to Pacemaker
In the following, replace X by the appropriate thing, ie, 1, 2 or higher. So if you want a new xen host living on top of logical volume xen_lv4, then replace X by 4. You’ll then have a drbd device /dev/drbd4 using resource file /etc/drbd.d/r4.res and a OCFS2 filesystem mounted on /xen_cluster/xen4. The pacemaker resource will be named resXen4. The new guest hostname and IP are entirely up to you.
The procedure should take less than 15 minutes, the bulk of it being in the xen-create-image section.
- create a new 24GB logical volume xen_lvX on the vg_xen volume group on both nodes:
~# lvcreate --size 24G --name xen_lvX vg_xen
  Logical volume "xen_lvX" created
The logical volume will be used to hold the disk image — 20GB for the virtual system disk and the rest for a swap file.
- add a drbd resource rX that will live on top of the new logical volume.
Make sure the resource file rX.res is identical on both nodes. Also double verify that the resource is properly referencing the right drbd and backing devices in the top 3 lines of /etc/drbd.d/rX.res
resource rX {
    device /dev/drbdX;
    disk /dev/vg_xen/xen_lvX;
Finally make sure the port number for the duplication link are not in use in any other resource file:
    on puck {
        address 10.0.0.1:7790;
    }
    on helena {
        address 10.0.0.2:7790;
    }
- initialize the drbd block device.
Do the following on both nodes:
~# dd if=/dev/zero of=/dev/vg_xen/xen_lvX bs=512 count=1024
~# drbdadm create-md rX
~# drbdadm attach rX
~# drbdadm syncer rX
~# drbdadm connect rX
Finally, perform the next step on only one of the node. Don’t forget to comment out become-primary-on both, then adjust drbd with drbdadm adjust rX on both nodes. Once the drbdadm command returns, undo the change and re-adjust drbd.
~# drbdadm -- --overwrite-data-of-peer primary rX
- create a OCFS2 filesystem /xen_cluster/xenX with the drbd block device /dev/drbdX
The mkfs -t ocfs2 -N 2 /dev/drbdX command has to be done on one node only.
~# mkfs -t ocfs2 -N 2 /dev/drbdX
~# mkdir /xen_cluster/xenX
~# mount -t ocfs2 /dev/drbdX /xen_cluster/xenX
- create the new guest
~# xen-create-image --hostname=XXX.bic.mni.mcgill.ca --ip=132.206.178.XXX --arch=amd64 --role=udev --dir=/xen_cluster/xenX --output=/xen_cluster/xenX
- verify that the guest config file is well in /xen_cluster/xenX
- boot the new guest with the xm-tools and test that all is ok.
~# xm create -c /xen_cluster/xenX/XXX.bic.mni.mcgill.ca.cfg
Once satisfied that the guest is healthy, shut it down, unmount the OCFS2 filesystem and shutdown the drbd block device. From now on, pacemaker will take the relay.
~# xm shutdown XXX.bic.mni.mcgill.ca
~# umount /xen_cluster/xenX
~# drbdadm down rX
- update the pacemaker CIB using the crm shell.
Make sure to replace the hostname and config file for the guest in the Xen resource primitive definition resXenX below.
(:source:)
~# crm configure
primitive resDRBDrX ocf:linbit:drbd params drbd_resource=“rX” op start interval=“0” timeout=“240s” op stop interval=“0” timeout=“100s” op monitor interval=“30s” role=“Master” timeout=“240s” op monitor interval=“31s” role=“Slave” timeout=“240s” meta migration-threshold=“3” failure-timeout=“120s”
primitive resOCFSrX ocf:heartbeat:Filesystem params device=“/dev/drbd/by-res/rX” directory=“/xen_cluster/xenX” fstype=“ocfs2” op monitor interval=“10s” timeout=“60s” op start interval=“0” timeout=“90s” op stop interval=“0” timeout=“60s” meta migration-threshold=“3” failure-timeout=“120s”
primitive resXenX ocf:heartbeat:Xen params xmfile=“/xen_cluster/xenX/XXX.bic.mni.mcgill.ca.cfg” name=“XXX.bic.mni.mcgill.ca” op monitor interval=“20s” timeout=“60s” op start interval=“0” timeout=“90s” op stop interval=“0” timeout=“60s” op migrate_from interval=“0” timeout=“120s” op migrate_to interval=“0” timeout=“120s” meta allow-migrate=“true” migration-threshold=“3” failure-timeout=“120s”
ms msDRBDrX resDRBDrX meta notify=“true” master-max=“2” interleave=“true”
clone cloOCFSrX resOCFSrX meta notify=“true” interleave=“true” ordered=“true”
location locPingXenX resXenX rule -inf: not_defined pingd or pingd lte 0
colocation colOCFSrX-with-DRBDrXMaster inf: cloOCFSrX msDRBDrX:Master
order ordDRBDrX-before-OCFSrX inf: msDRBDrX:promote cloOCFSrX:start
order ordOCFSrX-before-XenX inf: cloOCFSrX resXenX
verify
commit
quit
(:sourceend:)
Cluster and Node Upgrades
There are 3 ways to upgrade the cluster stack:
- complete cluster shutdown and upgrade.
- rolling upgrade, doing one node at a time.
- disconnect and reattach, by leaving the resources un-managed during the upgrade.
I’ll just discuss the 2nd variant.
Cluster Rolling Upgrade
In this case one goes from node to node, one at a time, and perform the following sequence of actions:
- Put the node in standby mode. Some resources might migrate.
- Shutdown the cluster stack. Stonith might shoot it in the head if enabled. Restart if necessary.
- Upgrade Pacemaker and maybe also the cluster stack (Corosync). Might as well update/upgrade the underlying OS while at it.
- Restart the cluster stack.
- Put back the node in online mode.
- Repeat for every other node.
Local Guests Setup
| Name | CPU | RAM | Weight | Cap | Service |
| Dom0 | 2* | 2G** | 512 | 0 | pacemaker |
| matsya | 3 | 3G | 256 | 0 | web |
| kurma | 2 | 2G | 256 | 0 | sendmail |
| varaha | 1 | 2G | 256 | 0 | bind |
| narasimha | 1 | 2G | 256 | 0 | nis |
* pinned cpus ** non-ballooning memory
The credit scheduler assigns each domain a weight, and optionally a cap. The weight indicates the relative CPU allocation of a domain — if the CPU is scarce, a domain with a weight of 512 will receive twice as much CPU time as a domain with a weight of 256 (the default.) The cap sets an absolute limit on the amount of time a domain can receive, expressed in hundredths of a CPU (note that this number can exceed 100 on multiprocessor hosts.)
The scheduler transforms the weight into a credit allocation for each VCPU, using a separate accounting thread. As a VCPU runs, it consumes credits. Once the VCPU runs out of credits, it only runs when other, more thrifty VCPUs have finished executing. Periodically, the accounting thread goes through and gives everybody more credits.
In the present setup, the Dom0 credit scheduling weight is set at 512 — twice as much as the guest default value of 256 — and since this is not a configurable setting it is set at boot time in the privileged domain. The file /proc/xen/capabilities only exits on a host running xen.
(:source:)
- !/bin/sh -e
- rc.local
- This script is executed at the end of each multiuser runlevel.
- Make sure that the script will “exit 0” on success or any other
- value on error.
- In order to enable or disable this script just change the execution
- bits.
- By default this script does nothing.
- For munin ip_ plugin stats
iptables -A INPUT -d 132.206.178.61
iptables -A OUTPUT -s 132.206.178.61
iptables -A INPUT -d 10.0.0.1
iptables -A OUTPUT -s 10.0.0.1
iptables -A INPUT -d 192.168.1.18
iptables -A OUTPUT -s 192.168.1.18
- Xen credit scheduling weight for the Dom0 (twice the default guest value)
- Only do this if we are the privileged (control) domain.
if [ -e /proc/xen/capabilities]; then
xm sched-credit -d 0 -w 512
fi
exit 0
(:sourceend:)