fMRI studies are conducted on the Centre's 1.5 Tesla Siemens Sonata scanner and 3 Tesla Siemens Tim Trio scanner, using gradient echo EPI sequences. The scanners are operated by trained radiology technicians from the Montreal Neurological Institute. During the experiments, the technicians use preset fMRI sequences customized by BIC personnel. Some flexibility in these protocols is allowed and you are encouraged to consult us on protocol decisions when planning your study.
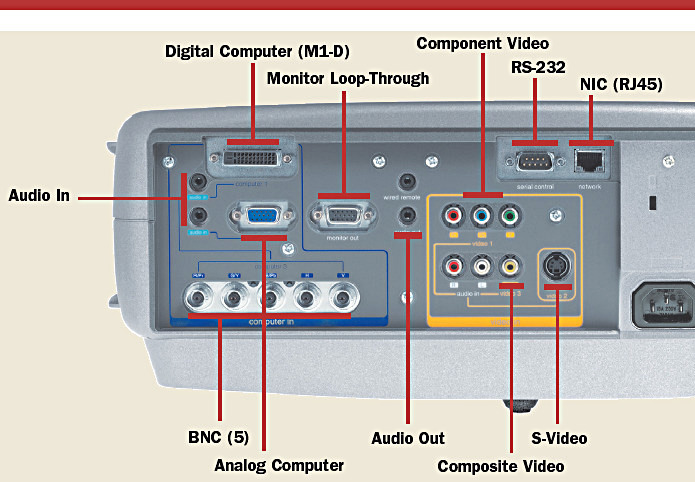
Equipment is in place for presenting visual stimuli or prompts using an LCD projector and mirror system. All of our projectors can display up to a 1024 x 768 pixel resolution and can be connected to a PC or Mac (or any other computer using a normal DB15 VGA connector). The following image shows the types of connectors that can be used. DVI connectors, commonly found on Macbooks, are also compatible. We provide adapters for the Thunderbolt or Mini Display port commonly used on Macbooks. We also have an adapter for the older Macbook Mini-DVI connector.
Please note that the light coming out of the projector lens is extremely bright and is focused directly at the scanner patient table. Therefore, at the end of your scan always ensure that the projector is turned off before the projector screen is moved away from the front of the scanner. Otherwise, the high intensity light will be focused directly into your subject's eyes and you risk blinding them!
The stimulus presentation software is the responsibility of the experimenter. There are commercially available experimental design programs which you can test and purchase. A few which have been used successfully here in the past are:
The Siemens scanners are equipped with audio input capability. There is a 1/8 inch line in stereo jack in the equipment room, and beside the scanner console, where you can plug the line out of a PC sound card, laptop, CD player, cellphone or any other audio device. If you use the audio input on the scanner, you must give your subject the headphone pads to hear the sound.
We also have a high quality sound delivery system by Sensimetrics. This is the SR14 ear insert system. Input to the system may be provided from any mini-jack headphone or stereo output jack.
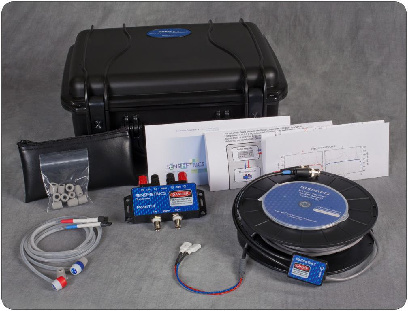
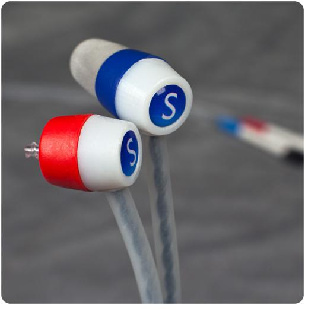
In order to use this audio setup, you must purchase and provide your own Comply foam ear inserts where you would use one pair for each participant that you intend to scan. The foam inserts cost about $5 per pair and can be ordered directly from Comply. Please note that these Canal Tip Originals are the only foam inserts that are known to be fully compatible with the SR14 system.
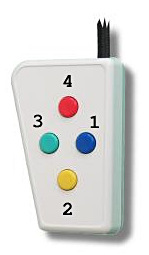
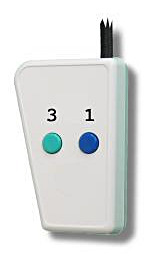
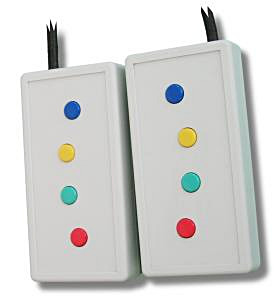
Our most popular device for subject feedback is a fiber optic response pad system which does not introduce any RF noise into the scanner room. This should also be your first option when considering input devices to use in our scanner. These USB devices are recognized by your computer as an external keyboard. We have several the response pads in several configurations; one of them is a 4-button device, with bottons arranged in a diamond shape. This one is a small 9x6cm plastic box with four color coded push buttons. The numeric characters 1, 2, 3, 4 are transmitted to your computer as keyboard presses of the following coloured buttons respectively: blue, yellow, green and red. The scanner trigger signal, which you will obtain with each scan, will be represented as a character 5 keyboard press. This setup has worked quite well for most experimenters. More information about the device can be found at Current Design's website http://www.curdes.com. The following picture shows what the 4 button diamond shaped fORP looks like with numbers drawn in above the corresponding button.
Following an experiment, your images are transferred from the MR scanner
computer to a directory on the BIC network. The technicians will
execute the data transfer, and your images will be saved in MINC format in the following
directory:
/data/transfer/minc
and in DICOM format in the following directory on any BIC network computer:
/data/transfer/dicom
The MINC images will remain in the transfer directory for seven days, after which they are permanently erased. The DICOM images also exist for seven days after the
transfer from the scanner.
Please keep in mind that fMRI studies occupy large amounts of disk space and because
the disks on the scanner console get filled very quickly, your images will be
deleted from the scanner after a period of seven (7) days. Therefore, the experimenter
is responsible for notifying the technicians as soon as possible if there has been
a problem with the image transfers. It is strongly recommended that you
carefully verify your transfers, because sometimes they are completely or partially
unsuccessful. If your transfer experienced problems, or your images have not
appeared in /data/transfer/minc or /data/transfer/dicom within 24 hours after your scan, please call the
MR technicians at the MNI (tel. 514-398-6844) and they will attempt to resend your data.
The next sections walk you through the steps required to plan a
study, book the scanner, perform the experiments, and analyze and interpret
the data.
| Previous | Back to table of contents | Next |
|---|