Access to CIVET
CIVET is available via the CBRAIN interface, linking high-performance computing (HPC) facilities across Canada and across the world. CBRAIN provides a web-based interface for configuring and running CIVET on large datasets.
Subscription to external users is made possible via collaborative projects. Users are invited to subscribe to CBRAIN by providing a description of their project.
CIVET is also available to BIC users, either via the CBRAIN interface or a basic command-line interface. Software resides in
/data/aces/aces1/quarantines/Linux-x86_64/
on BIC systems and operates via a grid scheduler (SGE). To access the software quarantine, use the command:
source /data/aces/aces1/quarantines/Linux-x86_64/Oct-2010/init.csh (or init.sh on sh or bash)
This quarantine provides access to CIVET-1.1.10 and CIVET-1.1.11.
A new quarantine will soon be available for CIVET-1.1.12.
Preparing Your Data for Processing
CIVET requires the image files to follow a strict naming convention. The native MRI files must have the following filename structure:
- $source_t1 = prefix_id_t1.mnc
- $source_t2 = prefix_id_t2.mnc
- $source_pd = prefix_id_pd.mnc
- $source_mask = prefix_id_mask.mnc
where $source_t1 is the T1-weighted image file, $source_t2 is the T2-weighted image file, $source_pd is the proton-density-weighted image file, $source_mask is the native brain mask (optional), prefix is the prefix you chose for the project you are working with, and id is the subject identification number. .mnc is the extension that indicates the MINC file format. Images are internally compressed in the MINC2 format to save space.
Converting other file types to MINC
It is convenient to keep the source files in a distinct directory. The T1-weighted image must always exist; the T2- and PD-weighted images and mask are optional. Given that most image files come with naming conventions that are very different than the CIVET requirement, we suggest creating a directory that contains symbolic links to the original image files, and use the CIVET naming convention to name the symbolic links.
The T2- and PD-weighted images can be used, if present, to obtain a multi-spectral brain mask and/or for a multi-spectral tissue classification. The input mask, if present, will be transformed to stereotaxic space and be used as a white matter brain mask. The user-supplied brain mask can be useful for eliminating meninges and dura when the automatic masking procedure fails to do so.
Anonymize your files
You may use the following process to make sure that your .mnc files do not contain any sensitive patient information, such as name. You may prefer to script the process if you have a large number of files. Of course, replace firstname and lastname below with your particular subject’s first and last names.
First, if it is not already in the proper (anonymous) naming convention of <prefix>_<id>_t1.mnc, do so now:
mv lastname_firstname_20100610_134507_2_mri.mnc StudyName_01_t1.mnc
Next, search the header for instances of the subject’s name. In this example, we search by first name, but you could equally search by last name.
mincheader StudyName_01_t1.mnc |grep firstname
The output will reveal the fields, if any, where the name is listed.
       patient:full_name = “firstname lastname” ;
       dicom_0×0010:el_0×0010 = “lastname firstname” ;
       :history = “Fri May 10 11:27:08 2013>>> dcm2mnc -anon -usecoordinates dicom-0005-lastname_firstname_20100610_134507_2_mri <prefix>_<id>_t1
Selectively replace those affected fields with a string (or empty string):
minc_modify_header StudyName_01_t1.mnc -sinsert patient:full_name=‘anonymous’
minc_modify_header StudyName_01_t1.mnc -sinsert dicom_0×0010:el_0×0010=‘anonymous’
minc_modify_header StudyName_01_t1.mnc -sinsert :history=‘ ’
Search your file again for your subject’s name. This time, it should come up blank.
mincheader StudyName_01_t1.mnc |grep firstname
If desired, you may do the same for age or gender:
minc_modify_header StudyName_01_t1.mnc -sinsert patient:age=‘ ’
minc_modify_header StudyName_01_t1.mnc -sinsert patient:birthdate=‘ ’
minc_modify_header StudyName_01_t1.mnc -sinsert patient:sex=‘ ’
To see a list of all patient fields (with potentially sensitive information), type:
mincheader StudyName_01_t1.mnc |grep patient:
Command Line Interface
The command (program to invoke) for CIVET is:
/data/aces/aces1/quarantines/Linux-x86_64/Oct-2010/CIVET-1.1.11/CIVET_Processing_Pipeline
To obtain help on its usage, do:
/data/aces/aces1/quarantines/Linux-x86_64/Oct-2010/CIVET-1.1.11/CIVET_Processing_Pipeline -help
The following is the output from the above command line to obtain help information:
CIVET_Processing_Pipeline, version 1.1.12, released January, 2013.
   Takes any number of multi or single spectral input MINC volumes and
   extracts the cortical surfaces from them utilizing the PMP pipeline
   system. It then calculates cortical thickness at each vertex of the
   produced cortical surfaces (non-linearly registered) using the t-link
   metric (in both Talairach and native spaces). It can also produce ANIMAL
   segmentations, symmetry analyses, regional thickness, surface areas
   and volumes for brain lobes.

   *************************************************************************
   New in January, 2013 quarantine, version 1.1.12

   1 - Neck-cropping option on native image (-headheight)
   2 - Improved linear registration (now using normalized mutual information
       and with model_mask on last fitting stage only)
   3 - Improved non-linear registration (now with a headmask and with
       reduced weight parameter, 2mm steps and higher sampling)
   4 - Application of population model’s head mask to reduce background
       noise in image for mincbet
   5 - Final pve classification is unmasked so it can recover any small
       bits of tissue missing from the brain mask
   6 - Improved masking of white matter mask using cortical_surface
       with a new model (on which the non-linear transform is applied)
   7 - Use smoothing from depth_potential instead of diffuse for
       cortical thickness and surface registration (more accurate smoothing
       and no more need for BLAS and LAPACK). Note: 20mm with old code is
       like 30mm with new code.
   8 - Improved filling of ventricles using an improved atlas (for
       white surface extraction)
   9 - Fixed WM/GM border by not allowing CSF/BG next to WM (under
       brainstem, mostly)
   10 - New ADNI population models
   11 - Generation of basic glim file as part of the CIVET QC
   12 - New verify figures for Laplacian fit and surface-surface
        intersections

   More to come soon:

   1 - improved medial cut through the corpus callosum.
   2 - bug fixed in N3 to be invariant to voxel size
   3 - high-resolution surfaces at 320k polygons.
   4 - classification and surface extraction in native space.
   5 - intermediate model for linear and non-linear volume registration.
   6 - Plug-in for alternate population templates
   7 - removal of self-intersections in .sm file for surface
       registration (Maxime Boucher)
   8 - Improved surface registration by geometric smoothing of
       the surface
   9 - Longitudinal surface registration and QC
   10 - Marching-cubes for initial white surface

   ********** From Nov-2010 quarantine, version 1.1.11 **********

   1 - option for user-defined surface parcellation atlas.
   2 - AAL surface parcellation atlas in models.
   3 - normalized cortical volumes maps on resampled surfaces
       (Lu Zhao and Maxime Boucher).

   ********** From Feb-2010 quarantine, version 1.1.10 **********

   1 - option for 3 Tesla.
   2 - options for reset-after and reset-to (PMP).
   3 - cortical area expansion/contraction maps on resampled surfaces.
   4 - new ICBM 152 non-linear model (40th generation, 2009),
       symmetric and asymmetric.
   5 - asymmetry maps for cortical thickness (now normalized)
   6 - asymmetry maps for position
   7 - basic lobar surface parcellation for quality control
       of surface registration
   8 - sum of absolute mean curvature
   9 - gyrification index for whole brain (in addition to by hemisphere)
   10 - GI and mean curvature on white, gray, mid surfaces

   ********** From Feb-14–2008 quarantine, version 1.1.9 **********

   1 - minc2-based quarantine.
   2 - new ICBM templates compatible with non-linear ICBM152 model.
   3 - asymmetry maps for cortical thickness.
   4 - cortical surfaces for hemispheres combined into single surface
       for convenience of visualization.
   5 - integrated VBM pipeline inside CIVET.
   6 - list of references produced by CIVET in targetdir.
   7 - really mask the background t1-image during classification to
       avoid confusion between noisy background and csf.
   8 - fixed tlaplace cortical thickness for extents of volume in native space.
   9 - ANIMAL segmentation only available as a plug-in module.
   10 - resampled cortical surfaces in stereotaxic space.
   11 - total cerebral volume.

   ********** From Jul-09–2007 quarantine, version 1.1.8 **********

   1 - ANIMAL segmentation has been disabled as the new default.
   2 - recompute non-linear transform to linear symmetric icbm152
       model when using the old ANIMAL parcellation.
   3 - simplification of PMP options and new -no-granular mode to
       submit all stages for one subject in one qsub job.
   4 - susceptibility artefact map now uses brain with cerebellum.
   5 - use a t1-native user-defined custom brain mask, if present,
       of the form SOURCE_DIR/PREFIX_ID_mask.mnc (or .gz) for
       linear registration and white matter masking.
   6 - use t1only for native brain mask (no need for multispectral
       mask in native).
   7 - run nu_correct in stereotaxic space on the interpolated
       original native image, not on the interpolated nu_corrected
       native image.
   8 - init environment files are now in the quarantine base
       directory (no longer in CIVET directory).

   ********** From previous Mar-30–2007 quarantine, version 1.1.7 **********

   1 - added mean curvature on native mid surfaces.
   2 - added gyrification index.
   3 - cortical thickness now always produced, with tlink method
       and 20mm blurring kernel as defaults.
   4 - added percentages for tissue types in verify image.
   5 - much improved brain mask, remove -crop-neck option.

   ********** From previous Mar-20–2007 quarantine, version 1.1.6 **********

   1 - support for various interpolation methods from native to
       stereotaxic (linear, cubic, sinc; default is linear).
   2 - error metric for brain mask in native space (in verify image).
   3 - shuffle the PMP steps so that -resetAll actually works.
   4 - file name extension for surface maps is .sm, not .mnc.
       (use rename ‘s/.mnc$/.sm/’ */transforms/surfreg/*.mnc).
   5 - can use a 0mm blurring kernel for cortical thickness (no blurring).
   6 - improved cut through callosum to split hemispheres.
   7 - fixed bug in surface registration for infinite loop (on RedHat).
   8 - clear history in minc files to go around likely bug in netCDF 3.6.1.

   ********** From previous Feb-28–2007 quarantine, version 1.1.5 **********

   1 - surface registration and resampling of cortical thickness.
   2 - binary masks in byte format to save disk space.
   3 - specification of data-processing template for voxel size
       (0.50mm, 0.75mm, 1.0mm, 2.0mm, etc; default is 1.0mm).
   4 - check for irregular slice spacing in native images.
   5 - summary of options printed in logs directory of subject.
   6 - validation of input parameters for correct values.
   7 - possibility to easily rerun CIVET with different options
       for cortical thickness method and fwhm.
   8 - keep mid-surfaces in stereotaxic space
   9 - keep surface lobes parcellation at vertices

   ********** From previous Jan-24–2007 quarantine, version 1.1.4 **********

   1 - add surface segmentation based on ANIMAL’s volume segmentation
       and calculation of cortex area for lobes (eventually will use
       surface registration with surface parcellation).
   2 - iterative correction to the mean and variance of the tissue types
       inside pve as the process converges (option -correct-pve)

   ********** From previous Jan-15–2007 quarantine, version 1.1.3 **********

   1 - add -nothreshold to mritoself for -spectral_mask. This affects only
       the multispectral mask, in very rare cases. If the native mask looks
       wrong and linear registration for no obvious reason, with -spectral_mask,
       then re-run your subject with this fix.
   2 - add -lsq6 to bestlinreg.pl and apply initial transform, if given, to
       mask, only if the mask is given too (does not apply to CIVET).

   ********** From previous Dec-20–2006 quarantine, version 1.1.2 **********

   1 - use the icbm152 mask for nu_correct instead of the avg305 mask,
       since subject is linearly registered to icbm152, not avg305.
   2 - transformation of surfaces to native space, with cortical thickness
       evaluated in native space.
   3 - quarantine based on minc-1.5 (upgraded versions of pcre, pcre++,
       CGAL,BOOST for compilation in 64 bits).
   4 - use icbm152 surface mask for verify image (red lines). Was avg305
       before.
   5 - use classified image from pve instead of classify_clean as input
       to cortical_mask for white matter masking.
   6 - improved mincbet for hyperintense voxels in t1 for masking meninges
   7 - verify.png now shows, in the first row, the brain mask that was
       used for linear registration (linear registration can live with a
       mask that is slightly off, but not too wrong however)
   8 - make all.q the default queue instead of aces.q
   9 - new flag -lsq12 to CIVET for 12-param linear registration (default
       is still 9-param)
  10 - multispectral classification now produces the good result

   ********** From previous Nov-02–2006 quarantine, version 1.1.0 **********

   The major flaws in the Sep-12–2006 quarantine have been discovered and
   fixed and the former quarantine should no longer be used for any reason.
   The Sep-12–2006 quarantine would give too much white matter, thus bad
   white surfaces and consequently wrong cortical thickness. All simulations
   done with the Sep-12–2006 quarantine should be redone using the current
   one.

   1 - nu_correct must be performed in Talairach space after linear
       registration, where a suitable brain mask is available.
   2 - multispectral brain mask now available in native space (was
       available only in Talairach space before)
   3 - fixed minc interface to mincbet to copy direction cosines of
       axes (was responsible for small rotation of brain in Talairach)
   4 - linear registration is more robust and is now really “best”
   5 - application of the non-linear transformation to the tag points
       used by classify_clean (essential for young children with small
       ventricles or AD subjects with large ventricles)

   There are several other minor enhancements that will not change the
   results but that will make your like easier:

   1 - verify.png image has an outline for the brain mask in Talairach
       so that you can easily see if the linear registration has been
       successful
   2 - clean-up of the lock files when CIVET is interrupted
   3 - source and target directories may use relative paths
   4 - source files may or may not be gzipped.

   *************************************************************************
Summary of options:
— Execution control -----------------------------------------------------------
  -spawn                Use the perl system interface to spawn jobs [default:
                        use local host scheduler RQCHP]
  -queue <queue>        Which queue to use [default: qwork@ms]
  -hosts <hosts>        Colon separated list of hosts
  -qopts <opts>         Extra options to queuing system [default: “-l
                        walltime=7:00:00”]
  -no-granular          Granularity level for submission of jobs using
                        queueing system. [default]
  -granular             opposite of -no-granular
  -maxqueued <val>      Maximum number of jobs that can be submitted at once.
                        [default: 800]
— File options ----------------------------------------------------------------
  -sourcedir <dir>      Directory containing the source files.
  -targetdir <dir>      Directory where processed data will be placed.
  -prefix <prefix>      File prefix to be used in naming output files.
  -id-subdir            Indicate that the source directory contains
                        sub-directories for each id
  -id-file <file>       A text file that contains all the subject id’s
                        (separated by space, tab, return or comma) that CIVET
                        will run on.
— Pipeline options ------------------------------------------------------------
  -template <val>       Define the template for image processing in
                        stereotaxic space (0.50, 0.75, 1.00, 1.50, 2.00,
                        3.00, 4.00, 6.00). [default: 1.00]
  -model <model>        Define the model for image-processing:
                        “icbm152nl_09s” (MNI ICBM152 non-linear symmetric
                        (2009)), “icbm152nl_09a” (MNI ICBM152 non-linear
                        asymmetric (2009)), “icbm152nl” (MNI ICBM152
                        non-linear 6th generation), “icbm152lin” (MNI ICBM152
                        linear), “ADNInl” (MNI ADNI non-linear)  [default:
                        icbm152nl]
  -surface-atlas <atlas_left.txt> <atlas_right.txt>
                        Define the atlas for surface parcellation
— CIVET options ---------------------------------------------------------------
  -multispectral        Use T1, T2 and PD native files for tissue
                        classification.
  -correct-pve          Apply correction to the mean and variance of tissue
                        types at pve iterations.
  -no-correct-pve       opposite of -correct-pve [default]
  -spectral_mask        Use T1, T2 and PD stereotaxic files for brain
                        masking.
  -interp <method>      Interpolation method from native to stereotaxic space
                        (“trilinear”, “tricubic”, “sinc” [default: trilinear]
  -headheight <dist>    head height in mm for neck cropping (suggested value:
                        170; default 0=none). [default: 0]
  -N3-distance <dist>   N3 spline distance in mm (suggested values: 200 for
                        1.5T scan; 50 for 3T scan).
  -N3-damping <lambda>  N3 damping coefficient (lambda) (suggested values:
                        1.0e-07). [default: 1.0e-07]
  -lsq6                 use 6-parameter transformation for linear
                        registration [default -lsq9]
  -lsq12                use 12-parameter transformation for linear
                        registration [default -lsq9]
  -no-surfaces          don’t build surfaces
  -thickness            compute cortical thickness and blur
                        [tlink|tlaplace|tnear|tnormal] [kernel size in mm]
                        [default: tlink 20]
  -resample-surfaces    resample cortical surfaces
  -no-resample-surfaces opposite of -resample-surfaces [default]
  -mean-curvature       produce mean curvature maps on surfaces
  -no-mean-curvature    opposite of -mean-curvature [default]
  -area-fwhm <fwhm>     blurring kernel size in mm for resampled surface
                        areas [default: 40]
  -volume-fwhm <fwhm>   blurring kernel size in mm for resampled surface
                        volumes [default: 40]
  -combine-surfaces     combine left and right cortical surfaces
  -no-combine-surfaces  opposite of -combine-surfaces [default]
— VBM options -----------------------------------------------------------------
  -VBM                  process VBM files for analysis [default -no-VBM]
  -no-VBM               don’t process VBM files for analysis
  -VBM-fwhm <fwhm>      blurring kernel size in mm for volume [default: 8]
  -VBM-symmetry         run symmetry tools [default -no-VBM-symmetry]
  -no-VBM-symmetry      don’t run symmetry tools
  -VBM-cerebellum       keep cerebellum in VBM maps
  -no-VBM-cerebellum    mask out cerebellum in VBM maps [default
                        -VBM-cerebellum]
— ANIMAL options --------------------------------------------------------------
  -animal               run volumetric ANIMAL segmentation and cortical
                        surface lobe parcellation [default -no-animal]
  -no-animal            don’t run volumetric ANIMAL segmentation and cortical
                        surface lobe parcellation
  -symmetric_atlas      Use linear symmetric atlas for ANIMAL segmentation
                        (old way)
  -lobe_atlas           Use non-linear lobe atlas for ANIMAL segmentation
                        (new way)
  -animal-atlas-dir <dir>
                        Directory containing the segmentation atlas
— Pipeline control ------------------------------------------------------------
  -run                  Run the pipeline.
  -status-from-files    Compute pipeline status from files
  -print-stages         Print the pipeline stages.
  -print-status         Print the status of each pipeline.
  -make-graph           Create dot graph file.
  -make-filename-graph  Create dot graph of filenames.
  -print-status-report  Writes a CSV status report to file in cwd.
— Stage Control ---------------------------------------------------------------
  -reset-all            Start the pipeline from the beginning.
  -reset-from <stage_name>
                        Restart from the specified stage.
  -reset-after <stage_name>
                        Restart after the specified stage.
  -reset-to <stage_name>
                        Run up to and including the specified stage.
  -reset-running        Restart currently running jobs. [default]
  -no-reset-running     opposite of -reset-running
USAGE (enumerating each subject ID in command line: <id1>, <id2> … <idn>):
CIVET_Processing_Pipeline -sourcedir <dir> -targetdir <dir> -prefix <prefix> [options] <id1> <id2> … <idn> -run > <logfile>
ALTERNATIVE USAGE (reading in subject list via text file: -id-file <idfile>):
CIVET_Processing_Pipeline -sourcedir <dir> -targetdir <dir> -prefix <prefix> [options] -id-file <idfile> -run > <logfile>
In any CIVET run, you must specify:
-sourcedir <dir>: directory of source images-targetdir <dir>: output directory-prefix <name>: the source images prefix (name of study)- a list of subjects to process (an enumeration or a list in a simple text file)
- an action command (like [+
-run=}). See the other action commands under Pipeline control options listed above.
Common additional options are:
-N3-distance <value>: spline distance for correction of non-uniformities using N3 (200 for 1.5T; 50–100 for 3.0T)-headheight <value>: height of head for neck-cropping to aid linear registration (about 175mm)-lsq12: use affine 12-parameter transformation to stereotaxic space-resample-surfaces: resample the cortical surfaces, thus providing vertex-based areas and volumes as well as lobar segmentation
The jobs will be scheduled automatically on the configured BIC cluster using SGE. They can be viewed using the qstat command.
To find out about the CIVET stages in order to do a reset, use the -print-stages option to first list
the stages, then use one of the Stage Control options to restart CIVET relative to a given stage. You should
rarely have to do this.
CBRAIN Interface
- At any time, you can obtain help about the Cbrain interface here https://wiki.cbrain.mcgill.ca/cbrain/cbrain.
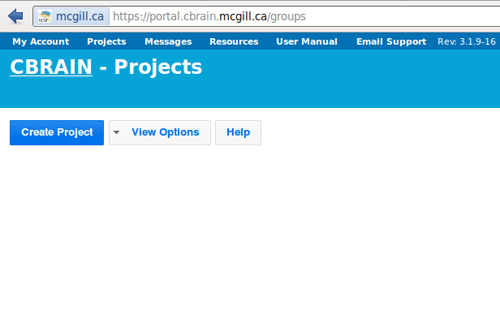
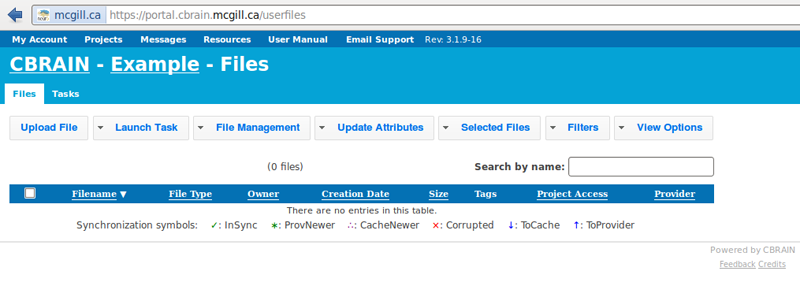
- To start a CIVET project, login to Cbrain at https://portal.cbrain.mcgill.ca/login, click on “Create Project.”
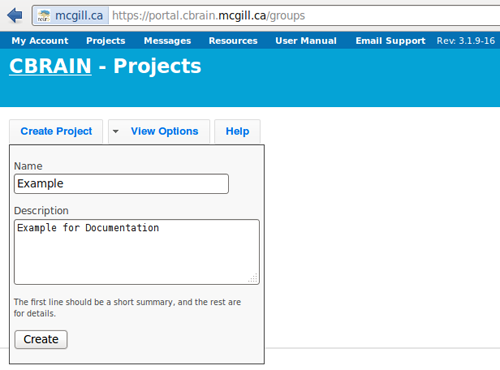
- Name your study whatever you like (here, we chose “Example”).
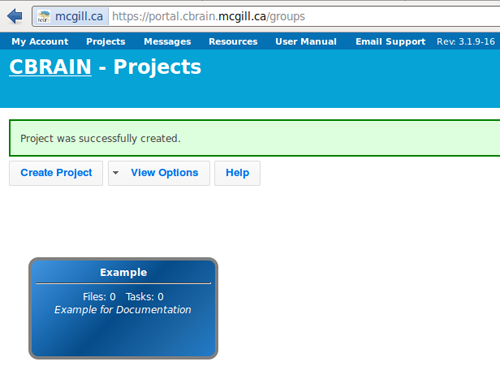
- You will see a box appear below with your study name. Click on it.
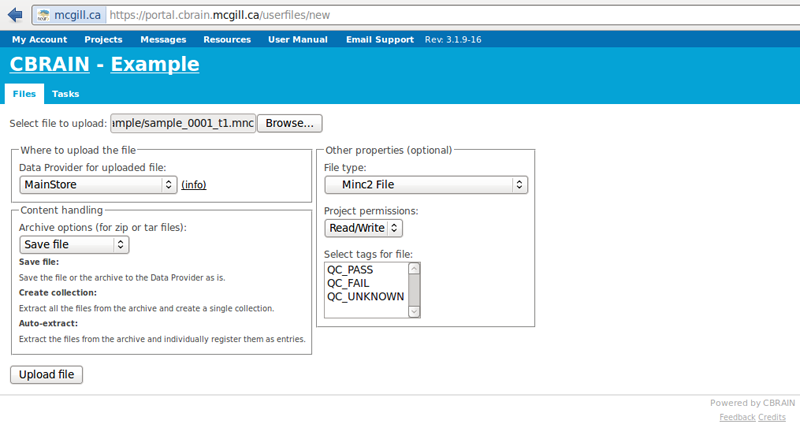
- To upload a single file at a time, click on “Upload File.” To upload multiple files at one time, you may prefer to use an SFTP client; see https://wiki.cbrain.mcgill.ca/cbrain/uploading and downloading large files
- Browse to a folder to select a mnc file to upload. Here, we choose “sample_0001_t1.mnc.”
- You may leave the defaults to automatically detect filetypes, or you may manually designate them (e.g., Minc2)
- The file will be uploaded in a few seconds or minutes; you may perform other operations freely while you wait.
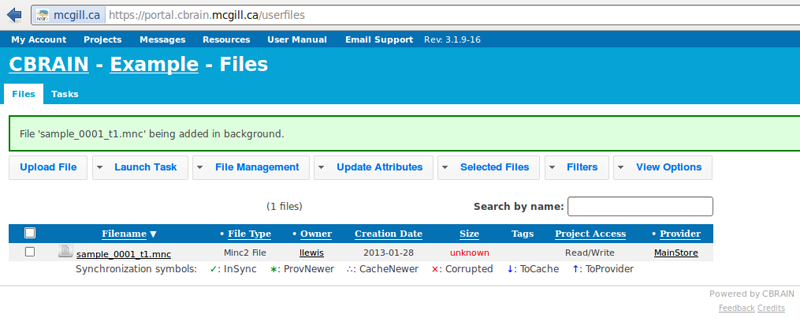
- You will be notified when it is done uploading.
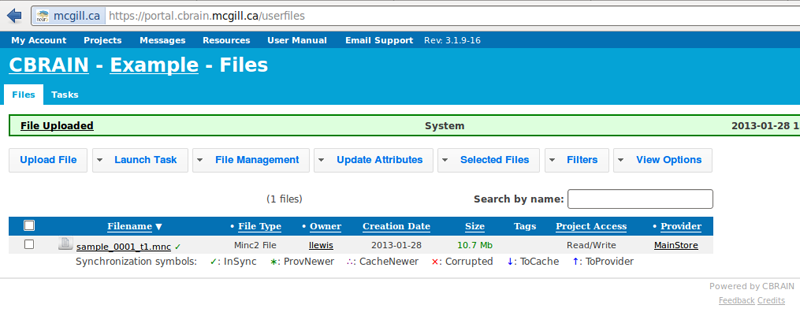
- Repeat this for any other files that you wish to add.
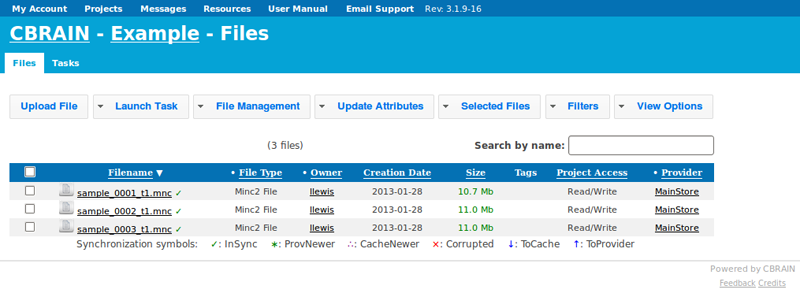
- Check the files that you wish to analyze (either separately, or the top box will select everything).
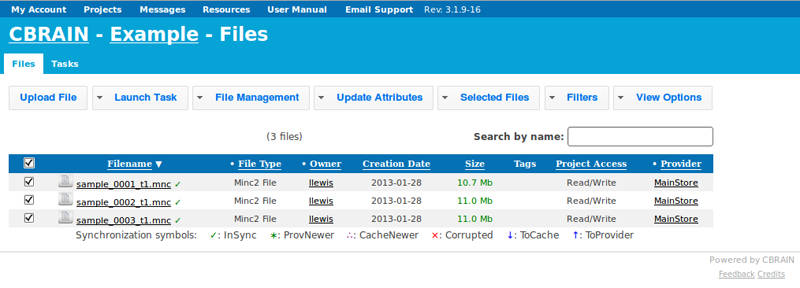
- Click on “Launch Task,” and then on drop-down menu, “Select a task to launch.”

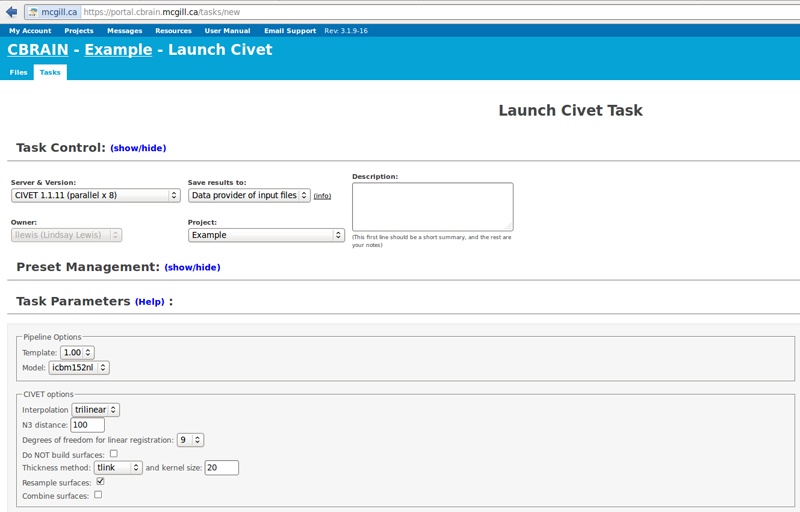
- Choose “Launch Civet.”
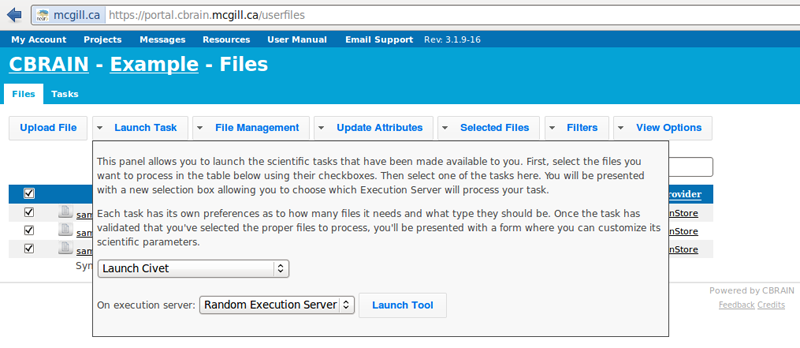
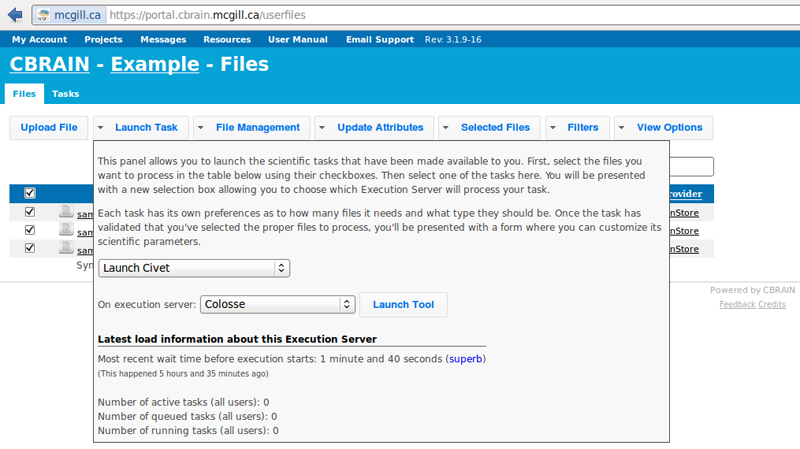
- Choose an execution server. We recommend that once you choose one, you consistently use the same one for all future analyses with the same dataset. Then click on “Launch Tool.”
- If you are a new user, you may want to leave many of the defaults.
- However, you will need to choose an “N3 distance” value. The N3 value that is optimal for your particular dataset may vary, and we highly suggest running a subset of your data at a few N3 values (at separations of ~25mm) in order to determine - based on visual quality control - which yields the most homogeneous intensity field. For 3T data, you may want to start with 125mm or 100mm, though it would be useful to also try 75mm and 50mm. For 1.5T data, you may want to start with 200mm. In this example, we used 100mm.
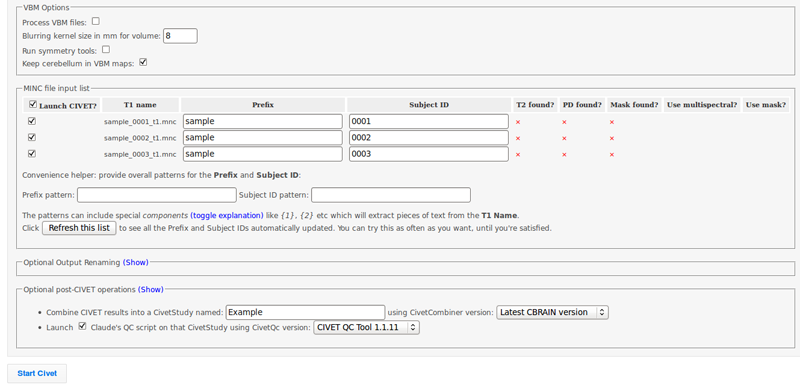
- Click on “Show” for “Optional post-CIVET operations,” and give your study a name. Here, we used “Example.”
- Be sure to check “Launch Claude’s QC script.”
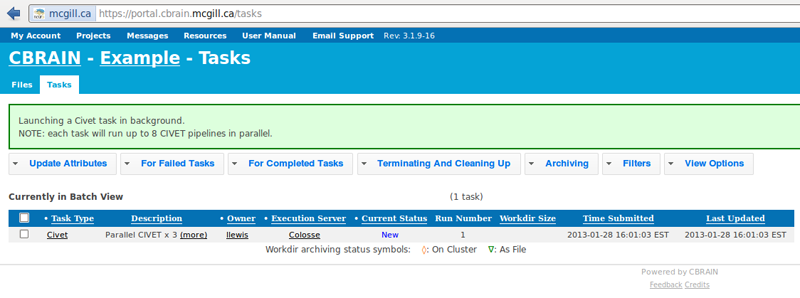
- You will see CIVET appear under your “Tasks” tab. You will be notified when processing is complete, and you may perform other operations freely while you wait.
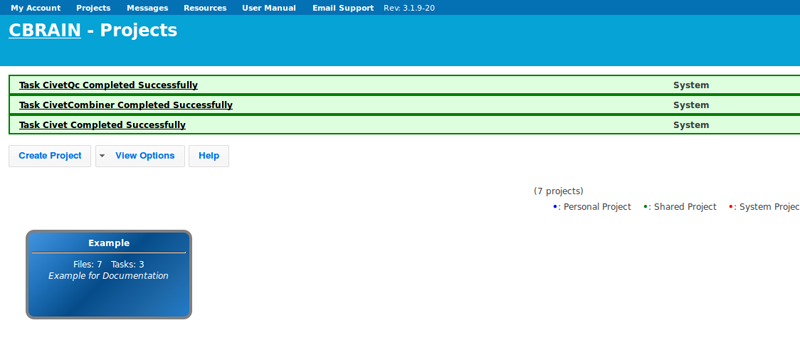
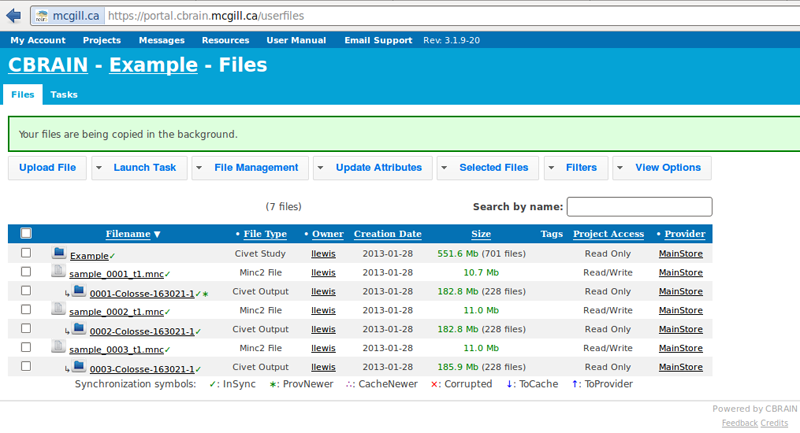
- When you have been notified that the tasks are complete, you may find your results under the “Files” tab, labeled as “Civet Output.”
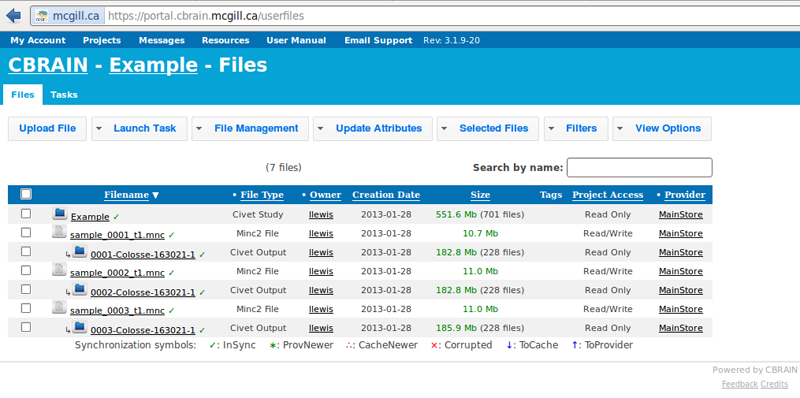
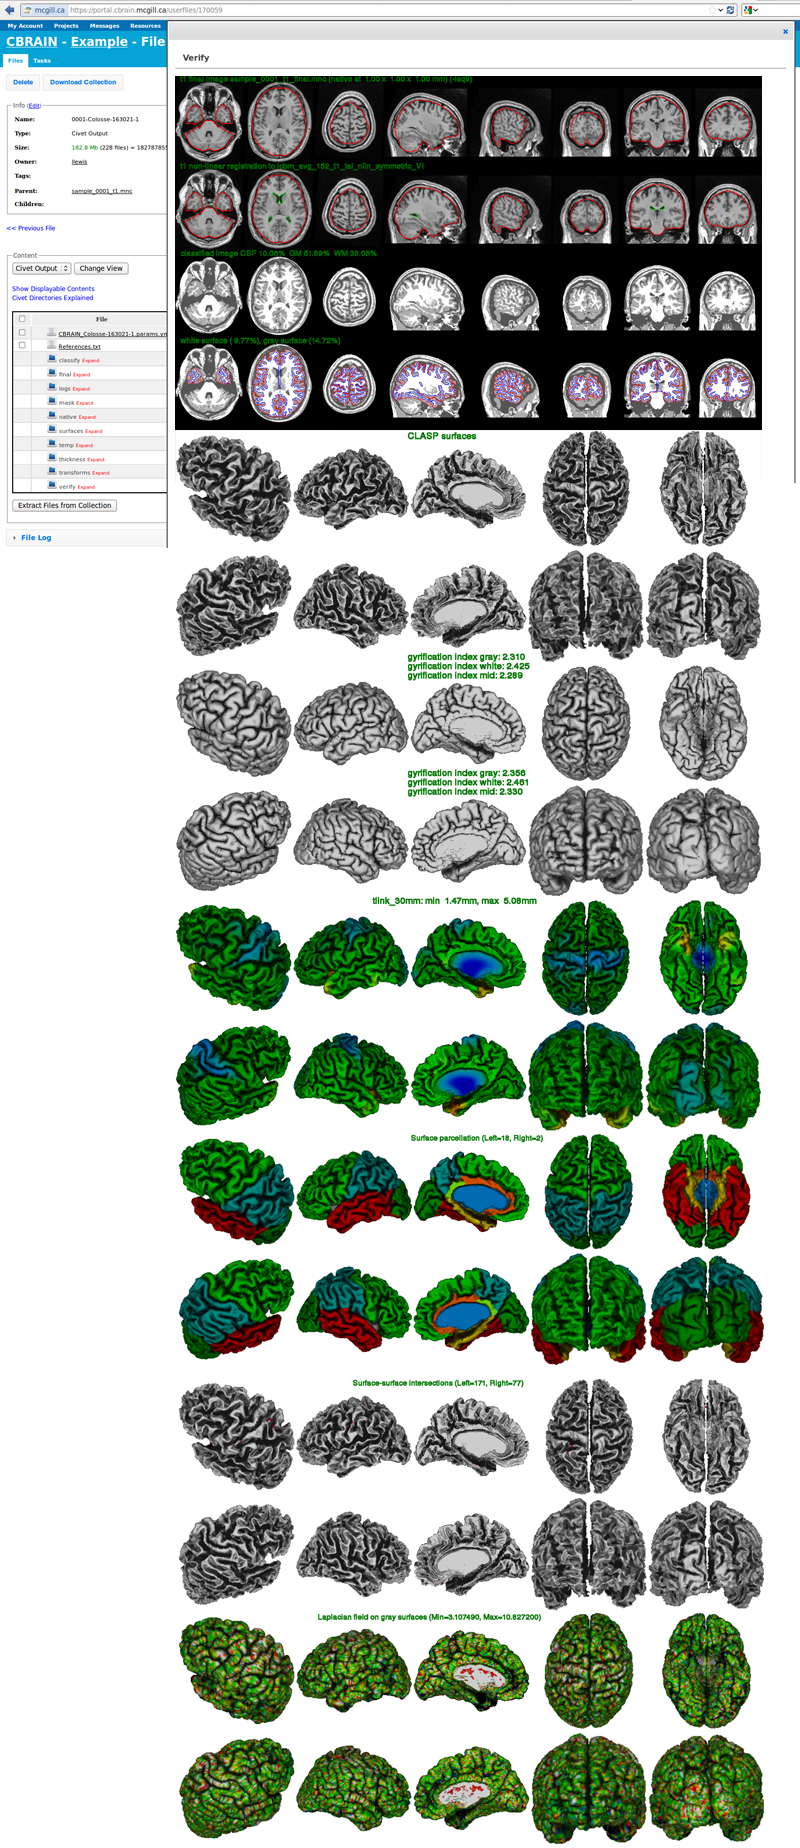
- You may quickly view your output directly on Cbrain by clicking on a “Civet Output” filename (though this may not be necessary if you wish to download your data and do quality control directly on your computer, or on Brainbrowser; for more information on QC and Brainbrowser see: http://www.bic.mni.mcgill.ca/ServicesSoftware/QualityControl)
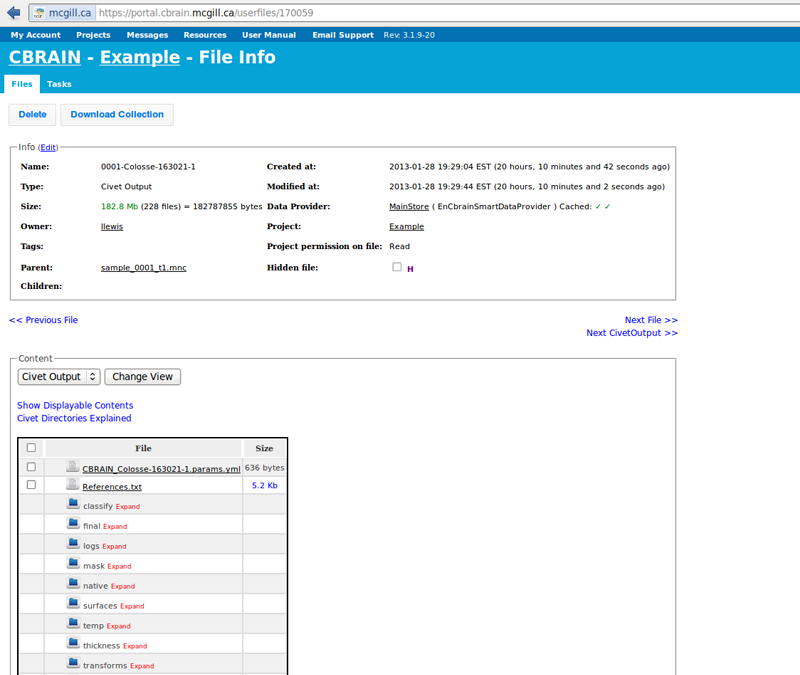

- Next, click on “Show Displayable Contents.” For more information on how to conduct Quality Control, click here: http://www.bic.mni.mcgill.ca/ServicesSoftware/QualityControl
- It will likely be necessary to use SFTP to transfer the files locally to your own computer. Check the boxes for the new output files. Click on “File Management,” under “Move/Copy” select “SFTP-Brainstorm,” and click on “Copy Files.” Please go here for additional instructions on using SFTP with Cbrain: https://wiki.cbrain.mcgill.ca/cbrain/uploading and downloading large files
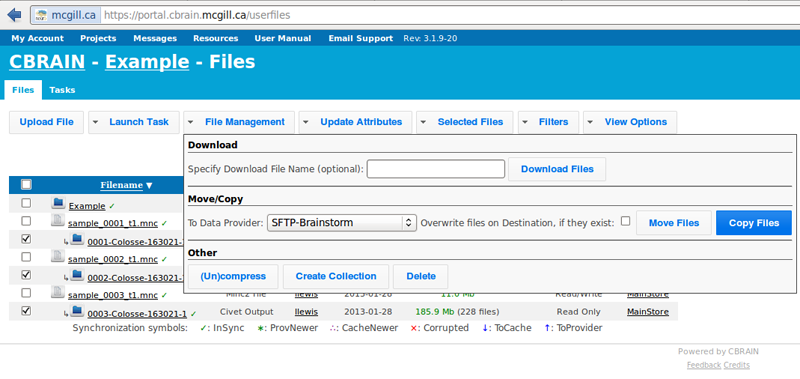
- You will be notified when the transfer is complete, and you may perform other operations freely while you wait.